Double Sided Engraving

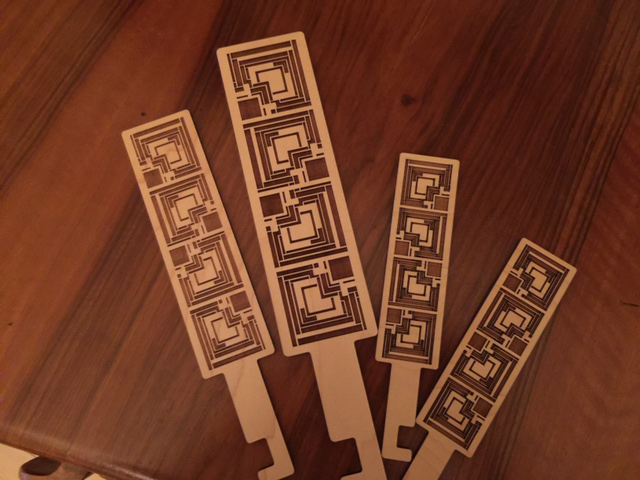
I created a file back in the beginning of time to test double sided engraving (and a few other things, like whether to score and engrave, or just engrave, etc.).

It’s a rack hook that will enable me to remove toast from a little countertop toaster oven. (Without toasting my hand in the process.) :slightly_smiling_face:

As I originally designed it, it was a little bit too large to fit comfortably in my hand, so I shrank it and printed a couple super small, just to see how small I could get the little lines between the engraved squares in the designs (answer = 0.34 mm), and then I printed a final one in a size that I will use.

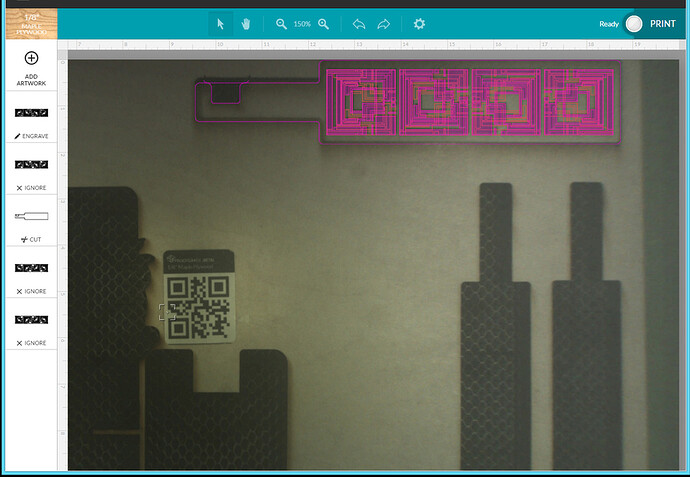
Some folks were interested in seeing the screen overlay shots on these:
This is what the overlay looks like after the cut, at the extreme far right limit of the printable field.

The dark lines you see are not distortion, they are the result of the cut. Flipping the piece and engraving the second side resulted in a perfectly aligned engrave, each of the four times that I did it.

I got perfect results by designing the reverse side engraving into the file to start with. You need to turn certain parts of the file on and off, but it’s a remarkably simple process once you understand it.

(I’ll put a tutorial for it in the tutorials section for those who want to design their own later.)
66 Likes

I was thinking about that design earlier this week, as we just bought a toaster oven! Nicely executed and can hardly wait to make one for us. :wink::squee::love:

12 Likes

I’d send you one of these (since I’ve got a few extra) but I really need to print them on 1/4 inch - this was just for testing and demonstration purposes - they’re a bit flimsy for long term use out of the 1/8 inch ply. :wink:

11 Likes

Beautifull job…how cool is this machine! In the hands of a newbie and you are churning out some quality stuff!!

17 Likes

Well done @Jules! Nice work. The design reminds me of Frank Lloyd Wright.

5 Likes

Thank you kindly :slight_smile:

(…cant’ take credit for it, and you have a good eye…it is a FLW design, modified, massaged and pressed into service for a lowly rack hook. Chuckle!)

8 Likes

Wow, so cool looking! Fantastic!

7 Likes

Quality work is right! very nice.

6 Likes

Really gahgeous, Jules! You are really digging in and producing some fantastic work. We are all the fortunate benefactors. Thank you!

7 Likes

beautiful job! I remember the original post way back when we (the forum members) were inputting tong ideas for your toaster oven dilemma! :grinning:

6 Likes

This is wonderful! Very nice!!

6 Likes

it’s like a Retro-Futuristic design. Well done, really well done :sunglasses:

2 Likes

Wooooow, sooo cool!!

4 Likes

Yay Jules…go baby go…lovin the design…when you post again…I shall be waiting.

2 Likes

Thanks so much everyone! :grinning:

My “Show and Tell” is going to drop off for a bit here…the things I’m testing with now are not “Show” worthy.

But I need them for the tutorials, and as soon as I get them out of the way, i can get down to some serious design fun. (I’m also waiting on parts, hinges, decorative nails, etc. so now is a good time to get some of the writeups out of the way.)

11 Likes

Why don’t you just work on something just for you. I hate that after you have done SO MUCH already that folks just expect you to keep it up. Take some time for yourself. :relaxed:

12 Likes

Oh, it’s okay, no one is asking me to do this…but by getting involved, i getz to haz input!
:wink:

It’s going to be a lifetime love affair for me with this machine, not a WBTYM. We have time to get to know each other.

11 Likes

Just spewed Dr Pepper out of my nose! Thanks for that @Jules! On the up side it might help my sinuses. :smiley:

6 Likes

Kinda wondered why no one had commented on that yet… chuckle!

3 Likes

Sometimes it is best to just whisle and slowly back out of the room. :blush:

9 Likes