Looks like it’s probably not synthetic, so that’s a plus. Hard to tell from the picture if it’s coated or the threads are dyed. I’m thinking more likely the threads are dyed, which makes it a little unpredictable what will happen.
If doing this myself, I would start by using the back for some tiny engrave tests to figure out settings. It doesn’t take much space to get a feel for what the fabric will do, so it can be subtle even if you “mess up” anything. Start with a small rectangle at the bottom of the back cover that’s about a quarter inch wide and let it go for just a couple of rows of engrave. If you get contrast you like, great! If not, move the rectangle over or up and increase the power a bit and try again. If you can get the book flat enough, you could even test on a bit of fabric inside the cover.
My usual starter settings for getting a contrast etch from just the fabric are full speed, power 10, LPI 270 BUT that’s when I have an extra area available for testing. For this, I’d start at full/3/270 and bump up 2-5 power at a time.
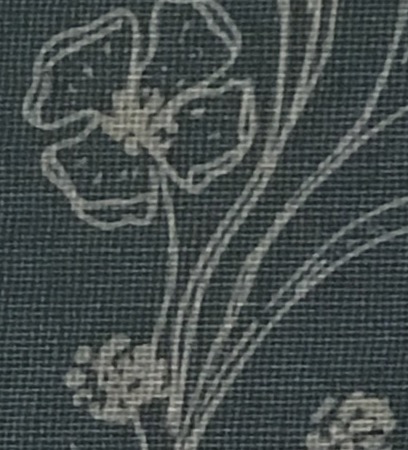
It’ll be obvious if it’s not going to etch if you make it to about 25 power and still get nothing. Here’s an example of the kind of contrast you might be lucky enough to get.
If it doesn’t want to etch the fabric with contrast and you want to just get it to expose the chipboard, I have full/60/270 listed as starter settings, but again it would be worth a small test on an inconspicuous part. This would benefit from some masking in case it gets sooty. In that case, avoid using anything wet to clean it up. Something like just putting down more masking to pull up soot can work well. (I don’t engrave down to the board much so I don’t have a lot of detailed advice.)
If you do a few tests and want additional advice, you know where to find me. Good luck, and can’t wait to see what you end up with!