Could be material has changed, or settings need to be tuned.
2 Likes
Do you have any of the ‘old’ ones you were successful with to see if it’s a product issue?
And, welcome to the community!!
2 Likes
Welcome to the forum.
Are you doing mulitiple tags at once? Where are you setting the focus?
3 Likes
Painted steel or anodized aluminum?
If they are painted steel, try wiping then with rubbing alcohol. It can brighten up those engraves. Heck, it might be worth trying that even if it’s aluminum.
5 Likes
Anodized Aluminum ![]()
I figured the vendor just had some shoddy pieces in there, but it gets frustrating wasting so much time…
2 Likes
These are the settings that I have found work the best…just attaching a picture because I have foggy brain right now ![]()
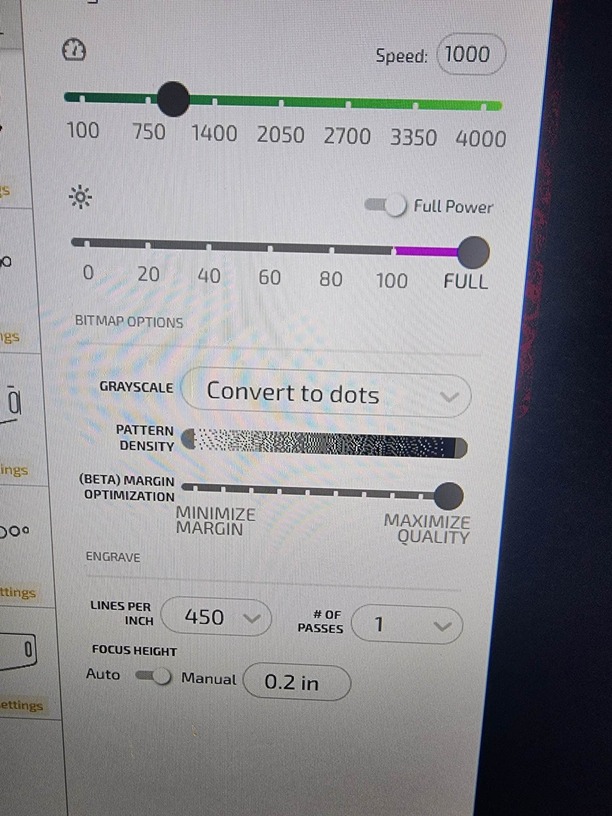
4 Likes
Here are a sampling of ones I have done…,most are great…but I put a couple where you can see the “fade”…Usually I can run another pass, and it will fix…I’m seriously hit and miss…it’s been a journey trying to learn all the things.

3 Likes
I was trying to do 4 at a time, and setting the focus in the middle…Do I need to do them one at a time??? I probably wrongly assumed that I could grid them out and do multiples…sure would be a time saver this way. Sometimes all four turn out fab, and others…BLAH!
2 Likes
In my limited experience, you can’t “over power” engraving on anodized aluminum. Slow it down and/or increase power to full.
9 Likes
You’re not wrong, you absolutely can. Search this forum for “jig” for lots of great options to get best results.
3 Likes
I did a bunch of these for christmas. I think I used Full/1000 on a GF Pro. But I did set the focus manually so I didn’t have to aim at a dogtag. And I used a jig that did 18 at a time, so that is definitely a thing. My results were pretty consistent.
3 Likes
I haven’t a clue how to make a jig…I was looking on the topics, but its all greek to me, lol…so new, I am…my head is spinning
2 Likes
There are lots of topics on it. Simply put, you take a piece of either draftboard or card stock or something cheap. You lay out your item (like dogtag) designs so that you have as many as you want. Make sure the actual size of the dogtag is showing as an outline, with your engraving centered on that as you want it. Put the material in and secure it somehow to the crumb tray, preferably in an easily reproducible spot. Then cut the outline and ignore the engraving. Make sure when you remove the pieces you cut out that you don’t move the material. Then you add your dogtags to the “holes” and ignore the outline and run the engrave. When done, replace the dogtags with fresh ones and repeat. As long as you don’t move the “jig” or move the design in your dashboard, you get perfect results every time.
6 Likes
Like this:

3 Likes
So just draw with lines around my tags? That is the part I am braindead on…sorry. I can see little type in the photo, but can’t read it. I swear my brain doesn’t seem to be on my side today. Thank for the info ![]()
2 Likes
More or less yes. As you do a few of these you’ll find that the tighter you pack the tags the better for efficiency (Less distance for the laser to traverse), and that making the holes oversized on one or two edges will make it easier to lift the tags out, but basically that’s the gist. Draw a cut shape around where your tags should go and then place them in your newly-cut jig.
Some examples:
6 Likes
The draw shape feature REALLY needs to draw rectangles…because squares aren’t it…lol…and I SUCK at drawing the lines…but it is what it is, so I mist try ![]()
2 Likes
You can make them rectangles – make the square, then click the ruler button in the lower left. You can enter precise length and width.
6 Likes
You are MORE help than I can ever tell you!!! Wow!
1 Like
Another good example:
4 Likes