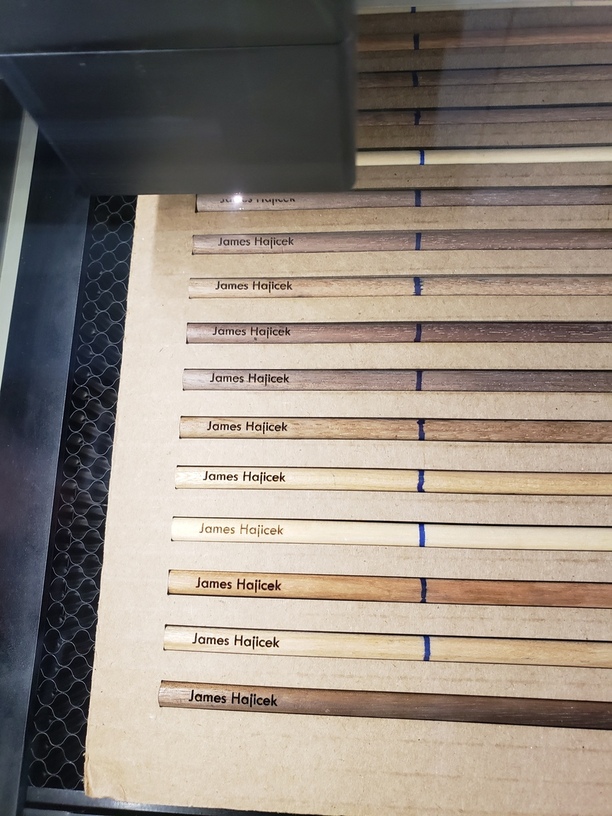
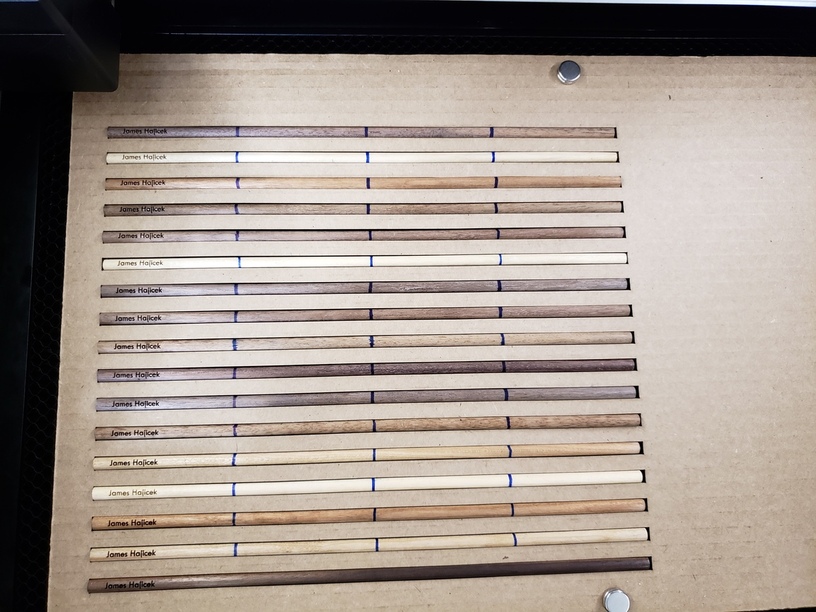
I’ve had a couple use cases for engraving on curved surfaces and the GF pulled though wonderfully!
A couple of glass bottles engraved and also some 1/4" dowels used by my art instructor engraved with his name. I really love my GF ![]()
edz
I’ve had a couple use cases for engraving on curved surfaces and the GF pulled though wonderfully!
A couple of glass bottles engraved and also some 1/4" dowels used by my art instructor engraved with his name. I really love my GF ![]()
edz
Very nice. I see that you made a jig to hold the dowels while you engraved them, but how did you coax the camera to position correctly?
Jack (not Christine)
Great work!
Did you rig up a stand in lieu of the crumb tray to be able to do the glass bottles? They look to be about 2" diameter–or were they bigger?
The dowels came out really nice. I’m going to guess you may have done a test or two to ensure you had the alignment right before doing the real ones?
I can’t speak for the OP but my guess would be that he made rectangles in his vector software with the text aligned properly within them. In GFUI you cut your rectangles while ignoring your text. Then place the dowels and ignore the rectangle and engrave the text and everything should line up perfectly!
The bottles look nice, can you post your settings in Beyond the Manual?
One reason for the jig was the placement, another was that when I tried to engrave one dowel first as a test, the air assist just pushed it away leaving me to engrave the crumb tray…
I was all set up to do it the way josephtpage mentions below, but I ended up removing the sheet of cardboard from the GF to get all the cutouts out, so it didn’t work out that way.
Still, not all was lost. I was still able to use the spacing for the words and then I just placed them on top of the dowels in the GF UI after running a test to ensure I had accurate alignment.
It sounds like from the question that you can’t rely on the GF UI to place things accurately, but I don’t have that problem. When I placed the words on the dowels in the scanned image of the bed, that’s where they went.
edz
I didn’t rig a jig for these. I removed the crumb tray and placed a piece of used draftboard and let the bottles rest against an edge of a cutout so they wouldn’t blow around. Other than that, used the GFUI to place the text.
edz
Done. Posted here: Engraving on curved glass surface
edz
Most of us aren’t that lucky!
how did you engrave on the glass bottles? They are taller than .5 inches so you must have removed the crumb tray. You wouldn’t have been able to cut the rectangle and ignore the engraving, replace the cutout square and then ignore the cut and just engrave.
Very nice work, the engraving looks really centered, I like it a lot!
Yes, the bottle was 1.48 inches in diameter and the jar was 1.72 inches in diameter. As or the engraving, I created an image in illustrator that engraved the rectangle and left the lettering blank. I asked for and received assistance in Adobe Illustrator - how to cut out text for engrave where I learned of the rasterize function in illustrator which allowed me to engrave the rectangle and not the text.
Hope this helps!
edz
Really nice! Engrave all things!
how did you do this? Ive been trying to figure it out for a while now and cant!! Help!!!
Welcome to the forum.
What are you trying to figure out - engraving on dowels? Engraving on bottles? Aligning text to curved surfaces? Lots of people here to help if you have a specific question.
Great idea!
Which one were you asking about? The dowels? If so, you simply create your project so that you have the template to cut your jig and the required engraving in the same file, separate colors just to make it clear. Load the file into the GF interface and insert a piece of scrap cardboard, securing it with pins or such to keep it from moving. The settings you need to cut will depend on the cardboard you use. Set the GF to ignore the engraving layer and simply cut the cardboard jig. Once cut, carefully remove the cut pieces without disturbing the cardboard. Insert your items to engrave in the jig and move on to the engrave layer, ignoring the cut layer.
Hope this helps.
how thick are those jars please
Welcome to the forum.
If you read the post on Aug. 18 it states that the bottle was 1.48" in diameter and the jar was 1.72" in diameter.
sorry, Thank You!