Etching Tile

OR…try ordering some LaserTiles. A bit more expensive, but the laser does not remove the glaze at all, the image is permanent…and well, they are amazing. You might find that you will save lots of extra time / steps by spending a bit more money and you won’t have to use black inks at all.

www.lasertiles.com

Here are three of different types that I’ve done;

a photo of my granddaughter

One of my brother’s B&W drawings;

IMG_2553

And last but not least, a dragon image done using gold Laser Foil;

IMG_2661

40 Likes

I’ll second the laser tile. I’ve put some rubber feet on one and I’ve been using it as a coaster for ~5 months now. It has held up very well against everything I have thrown at it. Heat, cold, coffee “stains”, dog slobber…give it a quick wipe down at it as good as new.

They take photo “Engraving” pretty good too

13 Likes

I gave these cheap tiles a shot. Works pretty well for line art. We have a friend who just bought a house after being cooped up in an apartment for a couple of years with his wife while they waited for the right deal. This is a gift for him.

I also tried to do a photo with a black tile, but that one was not as good. More experimenting needed with settings and the source file.

16 Likes

I still do not have settings, etc the way I’d like for a photo engrave on a black ceramic tile, but I am getting closer. This is an 18 cent 3x6 tile from Lowes.

Start with a greyscale photo with brightness and contrast ramped up. Invert the photo. For this one I used a speed of 200, full power, 270 LPI, and vary power.

16 Likes

I went back to Lowes over the weekend, and found another interesting tile to etch.

https://www.lowes.com/pd/American-Olean-Stellaris-Gemini-Glass-Subway-Tile-Common-3-in-x-6-in-Actual-5-875-in-x-2-875-in/1000002744

They’re $1.28 a tile.

These hardened glass tiles are 75mm x 150mm (2.875x5.875 inches). The glass can be etched and painted using the sharpie method, and the design casts a shadow onto the white backing which is pretty attractive.

The really cool thing is the white backing though. Flip the tile over, etch onto the back and it turns dark black, giving you two layers to work with.

Power levels (Glowforge Pro)
Glass etching

  • 400 speed, full power for a depth that can hold sharpie.
  • 1000 speed, full power to just mark the glass. Looks good, but won’t hold sharpie.

Backing:

  • 1000 speed, Full power for a nice dark black. Back off on the power to get a more “grey”.

Here’s my first attempt at an image on the backing:

That was 1000/Full, 250 DPI and “Convert to dots”. I suspect that “vary power” will work well with it. The text was 1000/Full on the glass side, which doesn’t produce a deep enough etch to hold much ink.

31 Likes

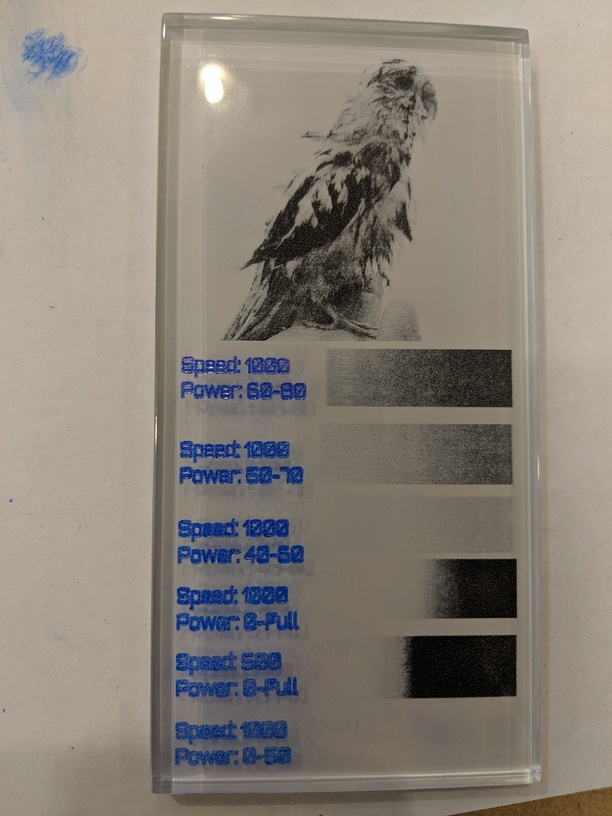
I did some testing on the backing on these glass tiles with gradients and “vary power”. It appears the useful greyscale range on a Pro is: 1000 speed, 50-90%.

29 Likes

Very neat. I grabbed one of those last week for future play.
I was thinking of burning through the white backing, but didn’t know it would change the color to black. (Hummm, new possibilities are brewing)

Thanks!

Yeah! I was also hoping to just ablate it away, and was surprised when it turned black.

I experimented a bit in “Cut” mode to see what it would take to ablate the backing.

Experiment 1 - 100 speed, full power, cut mode
This puts too much heat into the glass, and it melts and cracks.

Experiment 2 - 350 speed, full power, cut mode
This ablates the backing, and makes a pretty cool effect in the glass. Like bubbling silver. Maybe it’s melting the glass?


Experiment 3 - 350 speed, full power, etch mode
Completely burns through the backing, etches the glass from the back a little. It leaves black residue in the etch.

8 Likes

Love it! Is the stand you have this tile on also made on the laser or did you purchase it? It looks great.

This a Frog I did on a 10x14 tile from Home Depot. I found that using Scotch-Brite Non-Scratch Scrub Sponge works great to remove excess marker. No alcohol required.

Frog%201
I spent a little more time on the second frog. I found that Eraser sponges work best for removing excess markers.

I have been engraving photos, and coloring using sharpies. I put together a simple easel that works well for most tile sizes including 3x6 tiles. I posted the svg file.
Easel 1.svg.zip (1.8 KB)
51342

48 Likes

I did some of these last year (there’s a posting in Made on a Glowforge - one of my Dispatches from the Front series on the PRU). There are versions of the tile that aren’t clear glass as well as ones where the backing doesn’t turn black but turns a gray color instead. You’ll want to match the SKU on the tile with anything you do before buying a bunch more to do a project. Otherwise you may be counting on black and end up with gray or vice versa.

5 Likes

I bet that frog took a minute.

2 Likes

The stand was purchased ages ago. I can’t even remember where. Maybe Michaels. I wish I could take credit, but I’m not that skilled yet…

1 Like

I too have been inspired by the cheap Lowe’s tile projects on this forum. I am getting better at manipulating the sharpies to produce the effects I want and I love old botanical drawings. They are beautiful and don’t have a copyright anymore. The dandelion is a work in progress.


I also made box frames with my 3D printer using flexible filament. These frames are instead of rubber feet and the back is invisible.

I also used some of my doodles.

One quick question: I tried applying a coat of acrylic spray paint but the marker color oozed out onto the white tile. I was able to fix it, but what should I do to prevent this?

25 Likes

Wow your color work is really great.

2 Likes

I picked up some tiles to do a Mother’s Day gift. That being said, I haven’t experimented much with it yet. I was planning on using an acrylic urethane resin though to see if that would seal it right.

Great coloring! :grinning:

Beautiful work! I too tried spray acrylic lacquer and had bleed problems . On the plus side they heldup well in running water and didn’t fade.

THANK YOU for all the testing you’ve done and the sharing! I just got my GF and don’t know where to start. The ceramic and glass tiles produce such impressive pieces. It makes the wood look drap by comparison. I love the effect of etching the front of the glass tile and the shadow it creates!

Incredible use of fill pattern. It reminds me of the art of the Northwest Coast First Nations’.