First Cut (Pre-Release)

Think it took almost 21 seconds to cut. Have spent hours manually cutting a single inlay less complicated.

22 Likes

Fantastic! :grin:

5 Likes

Just assume we’d like pictures of anything Glowforge related if you have the camera handy and it’s not personal. There’s a picture of of the power cord floating around here somewhere with more than a dozen likes if I remember correctly.

18 Likes

To be fair it was a RED power cord. :stuck_out_tongue_winking_eye:

32 Likes

Imagine a production machine :glowforge: with a red cord :fire:

3 Likes

Designing for a detailed engrave is going to be interesting, sometimes challenging. The Glowforge part (SW and H/W) is easy using Proofgrade but when working with a laser I will need to be very aware of subtle differences in greyscale. To get the light shades the darker parts might end up too dark. I have some fairly good image editing S/W that I can adjust the dark and light separately, might try it later. But still, I just grabbed one of the wife’s random pencil drawings, threw in Proofgrade maple plywood, and left all settings automatic. (340 lines/inch, ~3 1/2" square) A work in progress.
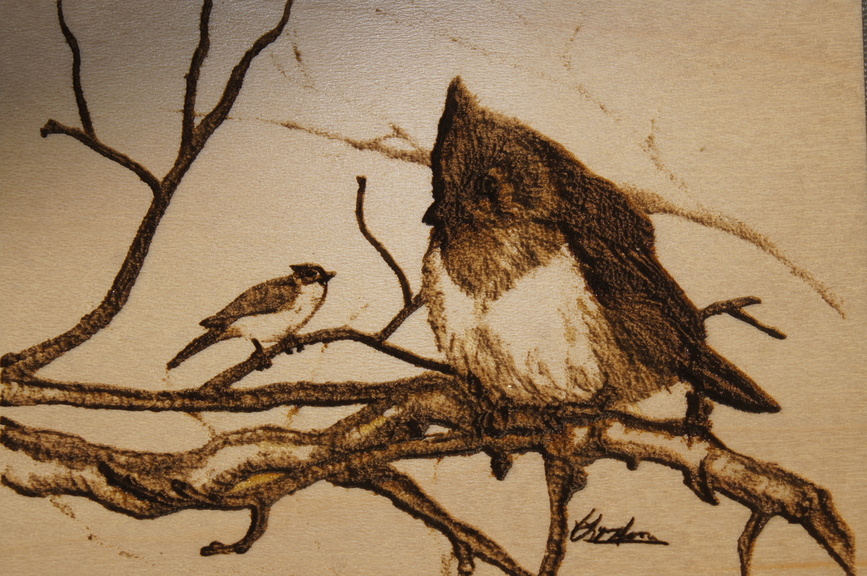
Original drawing

44 Likes

I see what you mean but it still looks wonderful. And I’m a big fan of your wife’s art!

9 Likes

That’s why I do a grayscale test on every material first thing. You can map a photoshop curves profile to the engrave result to get the desired/more accurate tonal result. I think I sent you a link to the svg. Feel free to use it if you’d like.

Your wife’s got skills

13 Likes

Wow! Tell your wife that’s a beautiful drawing, and oh yeah, nice job with the laser rpegg. :grin:

7 Likes

Beautiful artwork @rpegg.(tell your wife). :slight_smile: And great job on the Engrave! :hedgie:

(If it’s not too much trouble, would you mind starting a new Topic for your projects instead of putting them in the same thread? )

It’s going to make it easier for me to not miss them while putting together the Weekly Highlights, and easier for other people to see them who are only popping in occasionally to see the goodies in the category. :smiley:

7 Likes

When I have something useful to show it will go in a new thread. Right now just testing a gazilliion things. Not even projects, just settings and fit tests most of which has been done better by someone else.

6 Likes

Chuckle! I’m going to link it anyway, so it gets shown off either way. (You starting a new topic just makes it a little easier on me.)

You’re famous now…got to come out of that shell a little. :wink:

8 Likes

Infamous maybe. Tuesday night for a concert, a rag tag bunch of us played for about 500 folks. We jam together regularly but don’t ever practice as a group. I didn’t know they were going to go low on this song. Normally I play banjo but was playing the upright bass here.

19 Likes

LOVE it! Gettin’ down with that bass! :grin:

5 Likes

Being a complete novice here… Is the answer here the greyscale curve or power or speed or a combination? And I guess the biggest question for me is, how would a novice like me be able to tell in order to adjust the right thing(s)?

2 Likes

What Philip is saying is that the answer is in how you prepare the file first.

There are things you can do to increase the contrast between the dark and light areas, that will make the grayscale treatment by the GFUI come out the way you want it to be. Making some parts a little lighter or darker than they appear in the original scan will dramatically improve the results.

You would do that in something like Photoshop or GIMP. It’s a simple process with a couple of steps.
(I think we’ve got it in the tutorials, but if not, it’s easy enough to add.)

You really only have two colors to work with in lasering - burned and not burned. The different shades have to do with how thickly the burned parts are laid down on the material…more spacing between the burn lines makes it “appear” lighter from a distance. Tightly spaced burned lines “appear” darker.

What the GF software does is take the grayscale image that you give it and interpret it as different lines per inch (spacing) to try to approximate the effect you want to achieve. But the more contrast between areas of similar gray value that you have, the easier that becomes for the laser to achieve.

(Did that help, or did it just muddy the waters further? That’s the reason we’re trying to put some simple tutorials together…the steps are simple, but unless they’ve been doing it for a while, most folks aren’t aware of them.)

Bottom line:
You’ll get good results just by scanning the image in the GFUI and printing it. You’ll get better results if you do a little prep work to the file first.

10 Likes

Thanks. I’m a long time Photoshop user, so I get how the curves work. But I don’t get lasers yet. So is it always a matter of curve and never a matter of power/speed? I see your point about “2 shades.” In that case would I be better off converting a bitmap to a 2 colored dithered image myself so I have complete control over the result?

3 Likes

So you scanned that sketch in the bed and printed it?
Thanks for the demo!

3 Likes

You have the most control over it that way, (and I prefer to have control over how it turns out), so yeah, that’s what I do. If you use Photoshop, you’re golden. :slight_smile:

3 Likes

Great info! Thanks!

1 Like