Here is my test cut on a “wooden nickel” I got on Amazon. I’m collect various materials to test in the Glowforge.
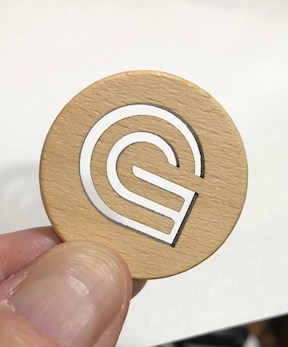
Here is my test cut on a “wooden nickel” I got on Amazon. I’m collect various materials to test in the Glowforge.
Looks great! 
Good job on it. You’re gonna have lots of fun now!
How are you handling alignment? I want to play with those too but I’m afraid to mess up the alignment.
I’m eyeballing the alignment through the interface. I use four strong magnets to hold the nickel. Then slide one away, flip the nickel, and do the other side for 2-sided. I made one of my kids a good luck nickel with Autobot on one side and Decepticon on the other. I cut rather than engraved them since it was vector art. Enough power and speed to cut down a couple of mm. The Glowforge logo I cut all the way through using GF’s vector art.
Ok thanks. I’ve wanted to tinker with these for a bit but the alignment issues kind of turn me off. Willing to give it a try now though. Thanks
For items like that when I am worried about alignment, I make the design with a border (for example if I were doing this design that @MrAtoz did ) a circle the size of the wooden nickle with the ![]() centered. Then put cardboard in your forge, cut only the circle. Don’t move the cardboard, but take the cutout circle and replace with the wooden coin. In the GUI ignore the circle border and turn on the
centered. Then put cardboard in your forge, cut only the circle. Don’t move the cardboard, but take the cutout circle and replace with the wooden coin. In the GUI ignore the circle border and turn on the ![]() cut. Will be in the correct spot. I do this with my tiles as well, cut out the square “border” first, place the tile then I know exactly where the design will be in the border (or rather on the tile).
cut. Will be in the correct spot. I do this with my tiles as well, cut out the square “border” first, place the tile then I know exactly where the design will be in the border (or rather on the tile).
+1 Great comment.