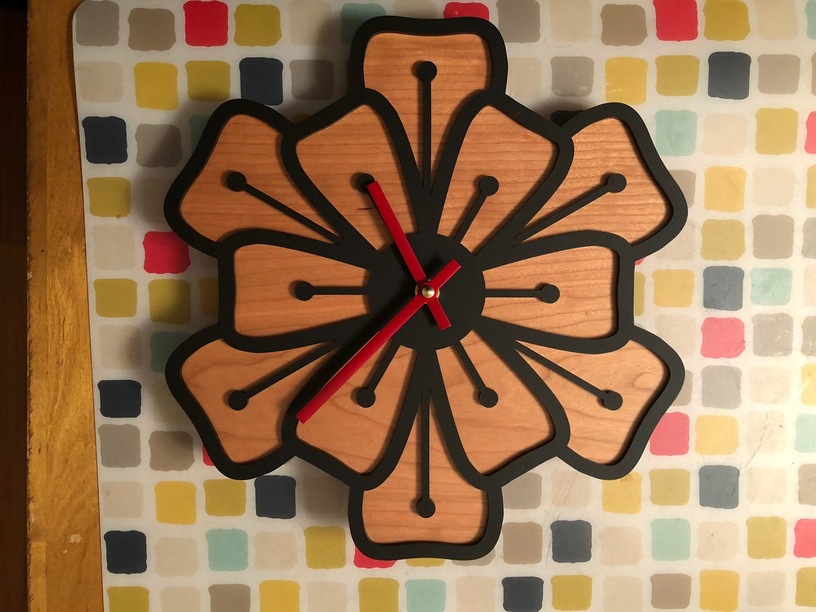
I decided that I wanted to make my wife a clock. Here is the final result:
(EDIT: Looks like the picture is upside down)
She really likes daisies, so I was trying to come up with an idea for a design along those lines. I ran across the following image, which is a design that a number of people seem to have copied.

Although I really liked the concept, I didn’t like that it had 16 lobes (8 on the inner, and 8 on the outer flower). I wanted a design that had 12 lobes so that it would match the 12 hours on your typical clock. Also, the design was such that you couldn’t hide a clock mechanism unless the clock was giant - way too big for the laser cutter.
So I drew my own petal shape in Illustrator, and then used Illustrator to clone and rotate it into a 6-petal design, and then did a similar thing to make a second, outer flower shape. I actually played around with a couple of different petal shapes, but this is the one my wife liked the best.
I cut the flower shape out of black, matte acrylic, and created an outline of the same shape and used that to cut a background out of cherry plywood. The background is there mostly to conceal the clock mechanism, but I also think it adds to the visual appeal.
I purchased the clock mechanism from Klockit. They have many different options, but I went with one that synchronizes to a radio signal broadcast out of Ft. Collins, Colorado. This means that if you’re in the United States, the clock sets itself to the correct time automatically. The only downside to this mechanism is that it only supports dial thicknesses up to 3/16 of an inch.
Unfortunately the max 3/16" dial thickness became an issue because the combined thickness of the plywood and acrylic pieces is around 1/4" - 1/16" too thick. I solved this by using my laser to router (engrave) out a section on the back of the plywood so the rubber washer that comes with the clock can sit slightly recessed. I believe this washer is there primarily to provide sound insulation between the clock face and the clock mechanism, because after doing this, the clock ticking is definitely more audible, but I am still happy with the end result. But if you decide to go with a 1/4" clock face, you might want to just choose a different clock mechanism so you don’t have to deal with all that.
The final touch was to paint the hands red. Klockit had many options for hand shapes and sizes, but not many choices of color. So the hands I purchased with the clock were black. I just got some red acrylic paint from Michaels and spray painted them. I could have lasered a set of hands, but the weight of the hands can apparently have a very big impact on lifetime of the clock mechanism, so I thought it better to go with the lightweight metal ones sold with the mechanism.