Probably better guides out there for things, but I thought while I was making this I would add a walkthrough of steps for those of you just starting out and wondering how to do things in your art program of choice.
The instructions are rather general. You will have to figure out the equivalent actions in the art program you are using.
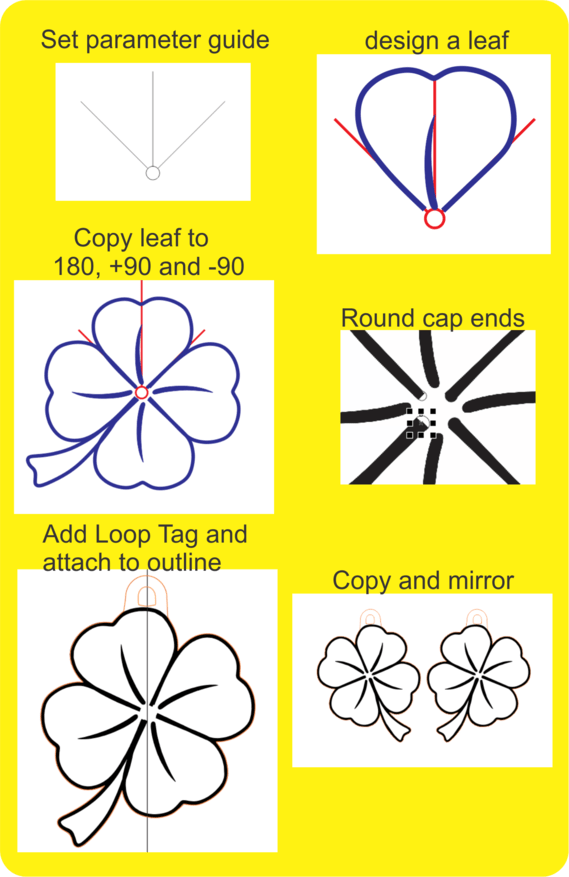
Steps for making a four leaf clover to be used on two color (0.060) acrylic. Base design is just 4 heart shaped leaf patterns.
1- Set a parameter guide to make connecting the copies easier and design a base leaf using a thick line (I used a 4 point but a thicker one would make the outer edge more defined).
2- Copy the design and align to guide in 180, -90 and +90 degree segments. Add a stem.
3- The rounding of inside end caps is not really necessary, but I usually try to do it.
4- Remove the guides and verify size is good for final earrings.
5- Verify No Fills. Make a blk+wht bit map, then trace high quality (should show no fills).
6- Save this image as a palleted PNG (for transparency) and import it onto new design sheet after save (this is your engrave).
7- Rotate it to accept a top loop tag, and join tag to (same color) outline.
8- Copy and mirror, then save as SVG.
9- Should have an 3 step design showing in Glowforge UI that you can arrange for an engrave, small hole cut and then outline cut.
So then, make your own for art program practice, or just use the included SVG. Up to you… 4LClover.zip (408.6 KB)
Hope this is helpful for someone. Enjoy and Happy St. Patrick’s (eventually).