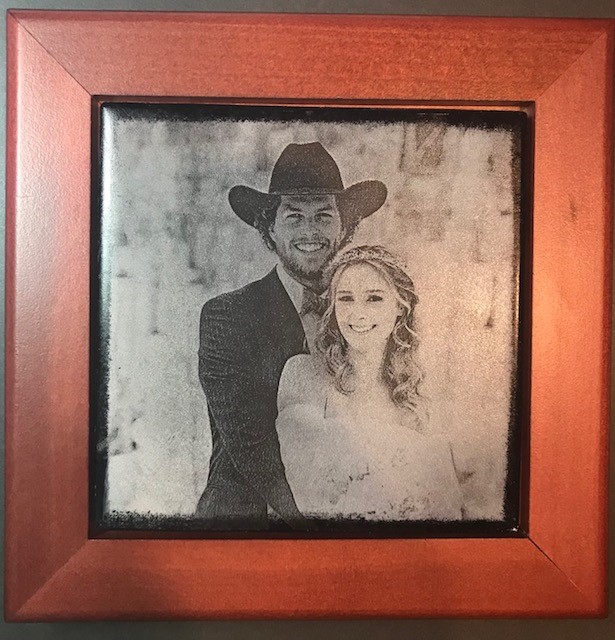
Just an updated photo on the ceramic tile I did a few weeks ago.
Speed 600
Power Full
LPI 450
Focus Ht .29"
I ran my permanent black in over it and when that dried I ran my silver inkpad over it. Wiped it off, taking some of the silver away and then repeated with the permanent black again and rubbed some away. Left it with a beautiful “blackish”, shimmery color. I edged the ceramic tile with the inkpad, just running it around the edges, slightly pushing onto the tile.
Bought about 12 frames from Blick, some 4.25" square and a few 6" square. This is the Rosewood color and I love it. They have several different colors in addition to unfinished ones.
I found the frames a bit cheaper at www.aftosa.com after I had already purchased these. Also found some frames at www.marylandchina.com and they have iron trivets for ceramic tiles too.
That is absolutely beautiful! I can’t believe the detail that you were able to get out of the tile. I think the rosewood is a great choice for the frame too.
Absolutely beautiful! You are really refining the tile technique. Thanks for the frame links also–they really set off the tiles nicely and give you a great finished product.
After removing from GF I cleaned with alcohol and then ran my permanent black inkpad over it and when that dried I ran my silver inkpad over it. Wiped it off, taking some of the silver away and then repeated with the permanent black again and rubbed some away. Left it with a beautiful “blackish”, shimmery color. I edged the ceramic tile with the inkpad, just running it around the edges, slightly pushing onto the tile.
Did you engrave the negative so that the silver remained in that portion? You mentioned rubbing it off, so I assume that you didn’t engrave the positive image.
I engraved the picture as is, didn’t engrave a “negative”. I ran my black permanent inkpad over the engraved tile and rubbed off what wasn’t in the engraved areas, then ran my silver inkpad over that and wiped off whatever wasn’t in the engraved areas, then ran my black permanent inkpad over it again and wiped off. It seems the silver ink shows through just enough to give it “that” look. Hope this helps!