Fun with Texture

After you convert to path and then you break it apart, then use the union command and that will join without overlap.

8 Likes

That happens in CorelDRAW as well when you convert text to a path/curve. Affinity probably does it too but I have not actually used that app much to know.

So in Inkscape:

Object to Path - to convert the text into a path
Ungroup
Union

7 Likes

God I love this place.
Thank you gentlemen!

4 Likes

You’re welcome!

2 Likes

That looks fantastic! Can’t wait to try variations on this idea.

1 Like

So, I’ve been building more texture patterns tonight, should have some squared away and available to use throughout the weekend. :slight_smile:

Also, here’s a nifty trick for clear acrylic… (experimenting night :smiley: )

Engrave a deep texture, then flood it with acrylic solvent and give it a little time to do its magic (just a minute or two). The solvent will smooth some of the finer engraving lines and make it look less frosted, restoring some of the clarity for an interesting effect! This method worked so much better than trying to flame/heat polish an engraving.

12 Likes

Yeah, for Affinity Designer it’s:

  • Convert to Curves
  • Ungroup
  • Layer > Geometry > Add… but funny enough, after you’ve done this, the Undo menu shows “Undo Union” :man_facepalming:
6 Likes

Great idea!
I was playing with defocus to see about smoothing the engrave.

1 Like

Do you have a recommended acrylic solvent? I tried it with acetone and it didn’t do much.

1 Like

I used Sci-Grip #3, same stuff I use for bonding acrylic together. I did maybe 5 or 6 floods on this to see how far it could go, literally filled it completely then let the solvent evaporate on its own before the next flood.

Here’s a photo now that it’s had good time for the solvent to flash and acrylic to setup nice and solid again. If you download it so you can get the full resolution you can really see how smooth it is.

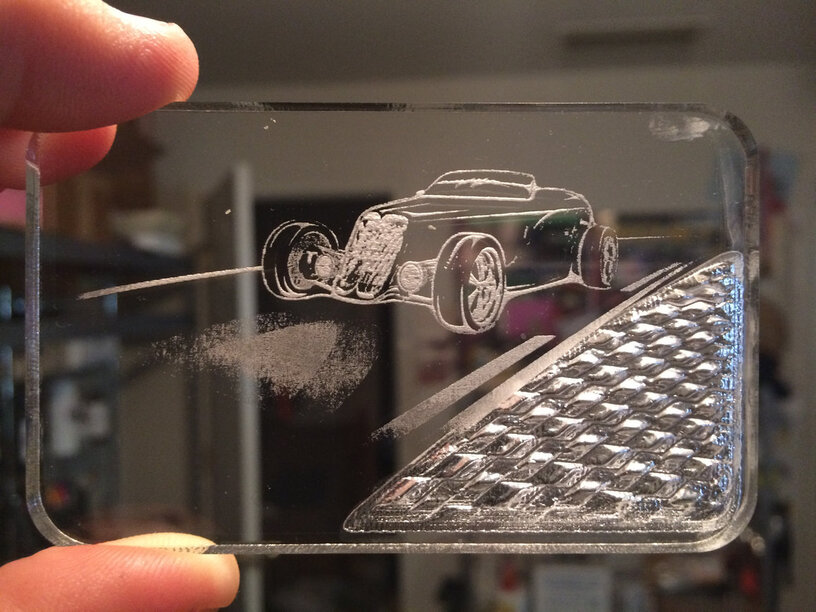
This particular piece was a test sample for the roadster engraving. I originally engraved this a few weeks ago but the textured area in the corner I designed and lasered last night, so that was added way after the fact. It gives a good comparison between the solvent smoothed engrave and a lighter Floyd Steinberg engraving.

18 Likes

I think this is my favorite so far - love the smoothed effect of the engraves!

Brilliant! Just brilliant! :grinning::+1:

2 Likes

Considering how far we’ve come from my first Commodore 64…no , the magic definitely isn’t lost on me anyway. I look at the whole Make movement in rapt amazement.

2 Likes

Ooo, that’s an awesome effect! I will have to try it–thanks!

1 Like

Ooh, that is really cool. I didn’t know that union would do the smart thing on paths. That is going to make a lot of my designs much easier.

2 Likes

We have been around long enough to have that perspective. There is only one way to get it, survive long enough to have a wide comparison. It’s our superpower. :sunglasses:

1 Like

woah! I wanna do this. I added a texture to a font and converted it to shapes, in Sketch.app, and checked it was correct in inkscape.

But the glowforge doesn’t know about the texture.

How was the texture added?

In the SVG I see it adds

<pattern id=“pattern-1” width=“13.0220588” height=“13.0220588” x=“26.47794” y=“938.727941” patternUnits=“userSpaceOnUse”>
> <use xlink:href="#image-2" transform=“scale(0.271292892,0.271292892)”>
> </pattern>
> <image id=“image-2” width=“48” height=“48” xlink:href=“data:image/png;base64,iVBORw0KGg…”/>
> <path d="…" id=“KATELL-JENTREAU” fill=“url(#pattern-1)”/>

You need the text as a stroke and no fill. In Inkscape, if your texture pattern is a vector use “Edit- Make Bitmap copy”.
Then select your texture and the text and use “Object-Clip-Set”. That will clip the bitmap outside of the text. The glowforge doesn’t handle clip paths yet, so select the clipped bitmap and again and “Edit-Make Bitmap Copy”.
That will work in the glowforge. :sunglasses:

3 Likes

That error still comes up about clip paths, but there’s one difference now…you can dismiss it and ignore the actual clip path part (the filled square that shows in the UI) and just engrave the image/text underneath it. I’ve been doing it many times in the past several weeks.

2 Likes

Thanks!

but what happens when you do that? photo pls.