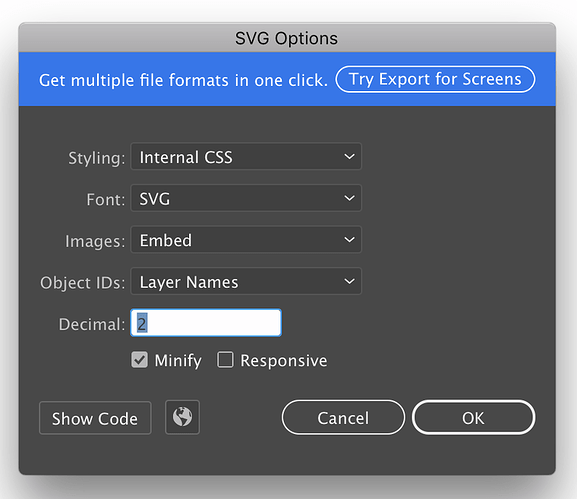
Glowforge Interface - Correctly Save a File as an SVG for the GFUI šŸ¤”

Respectfully, that the opposite of what Iā€™ve experienced over the past 6 months. With viewbox checked, everything appears in the correct location in the GFUI. Without it, all bets are off.

Placement is so good this way, last night I was able to re-cut a piece (still in place from the last job) after power-cycling the GFand reloading the app. YMMV, but Iā€™m keeping it checked. :wink:

2 Likes

Thanks @Jules for all the useful tutorials!!! Studying them in preparation for my Pro, which should be showing up fairly soonā€¦ :crossed_fingers:

3 Likes

one note to add for the Adobe Illustrator settings, in terms of having files that display properly when uploaded here to the forum (not really sure that it matters for use in the GFUI): If you are working in Inches, make sure the Decimal Places is set to ā€œ3ā€ as in the examples in the OP. If you are working in centimeters, set it to ā€œ1ā€.

2 Likes

Whatā€™s the ā€œprintable areaā€ within the 12x20 artboard? Iā€™ve got guides placed so that the PG boards are placed consistently on the bed, and I want to place the objects in Illustrator such that the maximize the area used within the printable area. I have approximately figured it out (from dragging and watching when objects change color) but if anyone knows the exact margins, thatā€™d be awesome.

1 Like

Iā€™m pretty sure itā€™s different for each machine.

Best way to find them for your machine is to drag something over until the boundaries pop up, and then capture a screen shot of where they appear with the rulers up top and to the left.

1 Like

I donā€™t know if itā€™s different (printable area) between production machines or notā€¦ I wouldnā€™t imagine so but I only have one Glowforge :slight_smile:

What I do know, is that if you are doing engraves, your margins are going to change dynamically with the speed of the engrave operation.

You could probably take a screenshot though of the margins as they exist, include the ruler, scale the screenshot so that the ruler matches and then place a guide based on that.

1 Like

FYI that in the very latest version of Illustrator (CC, v22.0.1), the Export Asā€¦ > SVG settings are quite simplified and I found that these settings work great, basically just use a 12x20" artboard and then turn off the Responsive checkbox.

6 Likes

Same here. If you use any text, add ā€˜convert to outlineā€™ so that you get paths that you can engrave.

4 Likes

As may be apparent from my previous behavior, Iā€™m a bit obsessed with trying to understand whatā€™s actually going on under the hood rather than just accepting these rules of thumb. We already know that when a program like Illustrator or Inkscape saves an SVG with physical dimensions in it, everything loads at the correct size in the GFUI, regardless of the size of the artboard. The 20" x 12" trick is needed in that case only as a workaround for not having absolute positioning in the UI.

Affinity Designer, however, is a different story. Thereā€™s currently no way to get it to output physical dimensions, so it has been suggested that setting the page size to 20 x 12 inches will not only do absolute positioning, but also fix the size problem. But how can this possibly work? Setting it to 20 x 12 doesnā€™t magically cause AD to start outputting physical units. So the first question is whether it works at all, and if it does, why?

If you donā€™t want to read on any further, Iā€™m putting the answer right here: The Glowforge UI assumes that any undimensioned SVG of a certain shape (5:3 aspect ratio) is 20" x 12" and scales it appropriately. So the workaround works, but has some interesting side effects.

I started by confirming that the problem is a problem: a 1" square created in AD on an 8.5" x 11" page loads into the GFUI at a different position and size. I then recreated the same 1" square, but on a 20" x 12" page and confirmed that it loads into the GFUI at the right size and position. But whatā€™s the difference in the actual SVG files?

Hereā€™s the 8.5x11:

<?xml version="1.0" encoding="UTF-8" standalone="no"?>
<!DOCTYPE svg PUBLIC "-//W3C//DTD SVG 1.1//EN" "http://www.w3.org/Graphics/SVG/1.1/DTD/svg11.dtd">
<svg width="100%" height="100%" viewBox="0 0 2550 3300" version="1.1" xmlns="http://www.w3.org/2000/svg" xmlns:xlink="http://www.w3.org/1999/xlink" xml:space="preserve" xmlns:serif="http://www.serif.com/" style="fill-rule:evenodd;clip-rule:evenodd;stroke-linecap:round;stroke-linejoin:round;stroke-miterlimit:1.5;">
    <g transform="matrix(0.75618,0,0,0.75618,-44.1227,-101.006)">
        <rect x="455.08" y="530.304" width="396.731" height="396.731" style="fill:none;stroke:black;stroke-width:5.51px;"/>
    </g>
</svg>

And the 20x12:

<?xml version="1.0" encoding="UTF-8" standalone="no"?>
<!DOCTYPE svg PUBLIC "-//W3C//DTD SVG 1.1//EN" "http://www.w3.org/Graphics/SVG/1.1/DTD/svg11.dtd">
<svg width="100%" height="100%" viewBox="0 0 6000 3600" version="1.1" xmlns="http://www.w3.org/2000/svg" xmlns:xlink="http://www.w3.org/1999/xlink" xml:space="preserve" xmlns:serif="http://www.serif.com/" style="fill-rule:evenodd;clip-rule:evenodd;stroke-linecap:round;stroke-linejoin:round;stroke-miterlimit:1.5;">
    <g transform="matrix(0.556927,0,0,0.556927,-392.2,-266.544)">
        <rect x="1242.89" y="1017.27" width="538.67" height="538.67" style="fill:none;stroke:black;stroke-width:7.48px;"/>
    </g>
</svg>

(Aside: Having now tried similar experiments in Illustrator, Inkscape, and Affinity Designer, I can really appreciate how clean and simple Illustratorā€™s SVG output is.)

So whatā€™s going on here? Still no useful dimensions, so how does the GFUI know thatā€™s a 20x12 file? I have two hypothesis: either itā€™s making an assumption about the size of the pixels (6000 = 20"), or itā€™s making an assumption about the aspect ratio (6000:3600 = 20:12). This is easy to test. Create two new files, one 10" x 6", and one still 20" x 12" but with a different DPI (thus a different pixel size). Again, each file has a 1" square, positioned at x=1", y=1". So how do they show up in the GFUI?

In the 10" x 6" file, it loads ā€œwrongā€, with everything scaled up: the square is 2" in size, positioned at 2, 2. So pretty clear evidence that the trigger for special treatment is having a 5:3 rectangular viewport. Just to confirm, I tried the 20" x 12" at 72 DPI, generating this file:

<?xml version="1.0" encoding="UTF-8" standalone="no"?>
<!DOCTYPE svg PUBLIC "-//W3C//DTD SVG 1.1//EN" "http://www.w3.org/Graphics/SVG/1.1/DTD/svg11.dtd">
<svg width="100%" height="100%" viewBox="0 0 1440 864" version="1.1" xmlns="http://www.w3.org/2000/svg" xmlns:xlink="http://www.w3.org/1999/xlink" xml:space="preserve" xmlns:serif="http://www.serif.com/" style="fill-rule:evenodd;clip-rule:evenodd;stroke-linecap:round;stroke-linejoin:round;stroke-miterlimit:1.5;">
    <g transform="matrix(0.571041,0,0,0.571041,-158.786,-76.7215)">
        <rect x="404.15" y="260.439" width="126.086" height="126.086" style="fill:none;stroke:black;stroke-width:1.75px;"/>
    </g>
</svg>

The numbers are all different from the 300 DPI one, but they represent the same square, and indeed it loads into the GFUI exactly the same: 1" square at 1, 1. So this is not a fixed pixel size, but rather an aspect ratio scaled up.

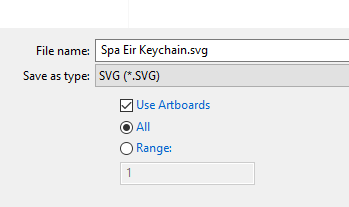
So that mystery is solved. But wait a minute, now that we know this, what about going back to the original assumption that 20" x 12" is needed for absolute positioning? What happens if you use a program like Illustrator that actually puts the units in the SVG file? ā€œTurns outā€ that the 20 x 12 trick is completely unnecessary! If you export your SVG with ā€œUse Artboardsā€ checked, it includes enough information for the GFUI to correctly position objects, and this whole 20 x 12 thing is superfluous. I leave you with an example of a file I set up with arbitrary dimensions of 3.456" x 6.66", and again positioned a 1" square at 1" from the left, 1" from the top. Illustratorā€™s beautifully tidy SVG:

<svg id="Layer_1" data-name="Layer 1" xmlns="http://www.w3.org/2000/svg" width="3.46in" height="6.66in" viewBox="0 0 248.83 479.52">
  <title>weirdart</title>
  <rect x="72" y="72" width="72" height="72" fill="none" stroke="#000"/>
</svg>

That couldnā€™t be any further from 20x12. But guess what? It loads at the exact size and position specified. I know, right?

So Affinity Designer users need to know this one weird trick. But the rest of us have a bit more flexibility, and I believe itā€™s worth understanding what the buttons actually do.

22 Likes

Thank you for doing this and explaining it so well.

I prefer understanding why things work rather than just accepting that they do.

2 Likes

Whenever I make an SVG in Affinity Designer that I intend to distribute to others I always open it in a text editor and insert the height/width attributes with the correct dimensions.

More recently Iā€™ve just started exporting as PDF instead.

2 Likes

Glad you worked it out .
(And great that you shared it for the others who want to know.)

1 Like

Iā€™m having trouble with one step in Save As SVG from Illustratorā€¦ When I upload the art into the GF app, the 12x20 artboard doesnā€™t come along for the ride. I get my little 1.5" object and I can drag it around the preview image as with the Founderā€™s Ruler.

Whatā€™s the trick to get the app to see the whole 12x20 artboard so my desired print is locked in the right place? Do I need to draw (and ignore) a 12x20 box too?

Also I saw one Save As SVG option in Illustrator which is not mentioned in the tutorial. The Save As dialog has a Use Artboards checkbox, at least on my Illustrator CC 2015. This box defaults to not selected, which didnā€™t smell right. (I did try Save As with and without this box checked and it didnā€™t solve my problem.)

image

1 Like

No, the artboard stays behind. You can still drag the image around once you get it into the interface, but if you place the image exactly 2 inches to the right of the origin on the artboard, and 2 inches down from the origin on the artboard, when you open the file in the interface the image will be located in exactly that position. If you donā€™t move it, it should stay where you placed it in relation to the origin.

2 Likes

Ah hah, thank you!

2 Likes

Related art placement questionā€¦

I see now how to use the artboard to place designs, but two small details escape me.

One, what is the actual size of the largest possible cut area? If you wanted to make a rectangle on the 12x20 artboard, how big can it be before going out of bounds? I searched here and found dimensions, I think from @Jules, but it was a hair too big in one dimension, and too small in the other. (I ended up dragging handles in the app to resize it by eye, so I got my maximum size cut doneā€¦ But thatā€™s not the same as knowing numbers!)

Two, is there an accepted minimum margin around the inside edges of the artboard? For example, if I place a square exactly aligned with the upper left corner of the artboard, itā€™s technically out of bounds in the app until I scootch it in a bit. I can eyeball it but knowing what ā€œa bitā€ is in numbers will help me make an optimized template with live area guides, etc.

Apologies if this was covered earlier. Iā€™ve read almost everything here for 2 years, but itā€™s hard to absorb all the tips until you have your unit and can use the software.

2 Likes

That has been a moving targetā€¦currently itā€™s just a shade under 19.5" by 11", and itā€™s going to change a bit more when they finish fine-turning. (I suspect your method is just about as good a method of determining what it is as any.)

But those are the rough numbers.

2 Likes

If rough numbers and moving targets are all we have, so be it. Thanks!

3 Likes

@Jules - In AI, do you need to put a bounding at the 12x20 border (and then ignore it in GFUI) to make the SVG have a 12x20 dimension or just make the artboard that size?

You may have answered this by exclusion. You said that the artboard is left behind, but you didnā€™t specifically say that one does not have to create a bounding box. Iā€™ll assume that the bounding box is not needed.

2 Likes

That is correct. Place your art on the 12x20 artboard and it will appear in the same relative position in the GF app. No bounding box will appear.

Of course where the object is placed on the material is not as clear. You will need to find a way to denote how the printable area maps to the work surface. I put blue painterā€™s tape around the edges of the crumb tray, resized a simple square to the maximum possible size in the app, and then cut the corresponding box out of the taped area. The tape is already losing grip so I need a better planā€¦

2 Likes