I’m the wrong person to ask here, mostly because I go back to the “why” of it. As stated it was:
And to me the solution there is a printed checklist that you reference before every job, not a complex game of mousetrap using error-prone, failure-prone, IT-security-hole-ridden IOT sensors and devices.
Don’t get me wrong the IOT solution seems fun and interesting but if you really want to be sure everything is ready and safe, a checklist and a timer is all you need and would be far less prone to failure.
There’s even precedent for this: pilots use hard copy checklists all the time. There are good reasons for it, paper doesn’t run out of batteries or get radio interference or break if you drop it. As a plus nobody’s going to hack your network via your paper checklist.
So… my suggestion would be to develop a really good general purpose decision flowchart with checkboxes, get it printed into a pad, and fill it out before every job. Heck you could get super fancy and have a section for job notes/log info if you really wanted.
Use the aforementioned timer to ensure that you check status of the machine as it runs, like set it to go off every 5 minutes so you can inspect smoke levels etc. Lastly it can be a timer set to the length of your job to remind you to turn your external fan off.
It may not be as interesting or fancy as the IOT solution but it sidesteps so many issues and arguably achieves the initial goal more directly.
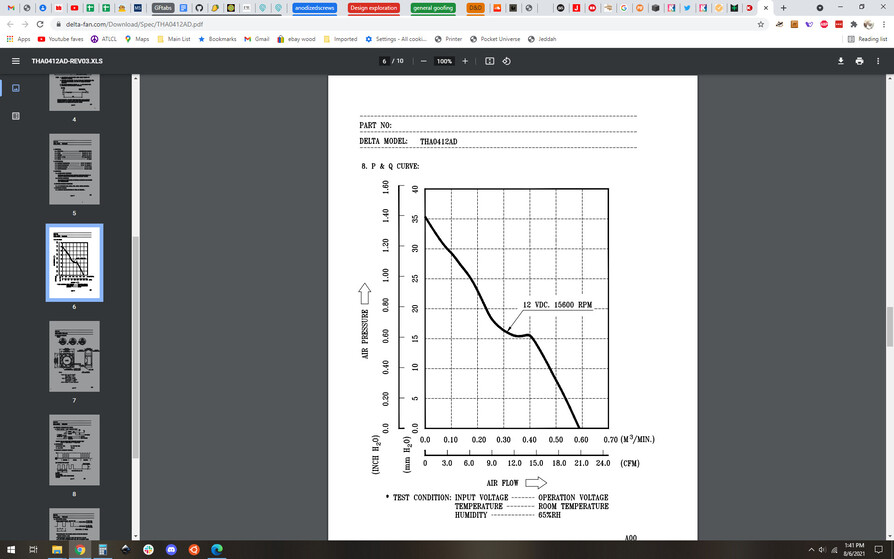
The exhaust fan? About 200CFM, a little under if I recall correctly. Maybe in the 190 range. Someone else had the part number and stated that as the number.
The tricky part about CFM though is that it is entirely dependent on static pressure. So your CFM rating will not match the actual throughput without knowing what your pressure differential is. Or, to put it another way, you can’t know your CFM value in a vacuum.
CFM rating of a fan is usually expressed in graphic form, Take the air assist fan:
Which shows that air flow is highly dependent on static pressure.
So. If you wanted to get the actual true CFM performance based on that graph, now you’re in for two pressure sensors, one inside the GF and one outside the GF past your fan in the exhaust line. Both of them should be as close to your fan as possible.
Alternately, you could set up an anemometer and do some calculations on the exhaust…
This is why I recommend, if you are using an inline fan like the Cloudline, to have it as close to the machine back as possible. The stock fan isn’t a high performing fan, but it’s in an ideal location to get the maximum performance. The Cloudline fans pull very little vacuum/water inches, so every disturbance between the machine and your fan (spirals in the tubing, stretched or compressed hosing, bends and turns, and so on) is working against you.
For me, a tool for measuring exhaust flow would be more about the trend rather than the value. Kind of like a dummy gauge on a car. The absolute value isn’t necessarily as valuable as an indicator that it’s not in the normal range, unless you were just trying to develop the most efficient exhaust system and that absolute was used for comparison.
All of that said, from a tech perspective, it’s kinda neat. But you can generally tell just by experience and observation when something isn’t working as it should - this is why we have the 5 (or more!) senses.
yeah, visuals inside the machine while the fan is running, and how much you can actually actively smell while the machine is running, pretty much tell you if you’re getting enough flow.
i totally get making something to tell you a lot of the info. it’s very much about just “making.” and sometimes making for the sake of making is both fun and informative for future projects, it’s how we learn.
I spent the evening trying to get an ESP32 and a thermocouple going. And trying to get Home Assistant going and ESPHome to make it easy to program my thingees.
Evidently I need something with a bit more heft to it than the rPi. I’ve done all the stack for IOT with Docker containers, but when it comes to Home Assistant and ESPHome, there is a bit of a disconnect here.
I can’t quite get everything going. So I installed ESPhome through python and it kept choking when I tried to compile and load the sketch.
I have a beefy computer waiting for me at my old parish that I bought last year. It’s still being used as the streaming computer until the parish buys a new one and configures for the new permanent streaming setup (that I don’t get to play with because I am no longer there.)
So I will use that for my office computer and repurpose my office computer as the home server.
The rPi is running off and SSD and so far does great with Node Red and the IOT stack from Peter Scargill. I don’t think I really need to do home assistant because Node Red really does some amazing stuff in getting it all to work together and Grafana is a good display.
But we will see. I don’t know if the MAX31855 that I am using is not working. Could have gotten blown 10 years ago when I first used it. Maybe the thermocouple is messed up. It’s just reading zeros now. Power and ground and the pins all check out with the meter. So I’ll dig through my stuff and find my other one that still is in the package. This little guy has been floating around free for a while and maybe the wires or the chip got damaged. The ESP32 Works though.
I had a rPi Zero running OctoPi for my 3D printer, but it was not keeping up so I got a new rPi. Did the old hand me down… The ender got my rPi 3 from my HA setup and now the new rPi 4 is running a HA OS image. ESPHome does make using ESP8266s and ESP32s easier
I don’t quite understand the Home Assistant ecosystem and platform options. I read about starting with an OS image based around Home Assistant. That seems to be the full stack.
But I already have an rPi set up with Docker and all the other parts of automation. The container setup leaves out some of what I see as essential parts of Home Assistant.
So what you do is start with the OS image and then add the components like Node Read, Grafana, and InfluxDB. Do this without messing with containers and Docker?
Is the OS image kept functional and is not a dead end? It seems there is an active base supporting it.
There are a lot of terms to understand, like the Supervisor.
I am just so used to installing a regular distribution on my rPis and then adding what I need.
I guess I can try it out with an SD card first and see what’s it like installing the OS. My existing setup is on an SSD and I am loathe to mess with that. Although there is no data that I need to preserve and I can pretty much recreate everything. I’d want to save my flows in Node Red though. I’m not quite sure I am familiar enough to recreate them without relearning them.
Although I have gotten to understand InfluxDB a bit better and now understand the role of tags in the measurements. I’m so used to relational databases and I really don’t have to make a separate database for each temp and humidity sensor since they are measuring the same things, just from different locations. Although last night I must have had some spike on one of the sensors because there is one measurement that shot through the roof and that made the other graph lines appear flat next to one enormous peak.
Anyway, stay tuned. I’m going to tackle ESPHome again. I has an ESP32 with an OLED and I can’t get it to read a DHT11. It still gives a measurement as zero. Not sure if it is the ESP32 hardware, the wiring or not.
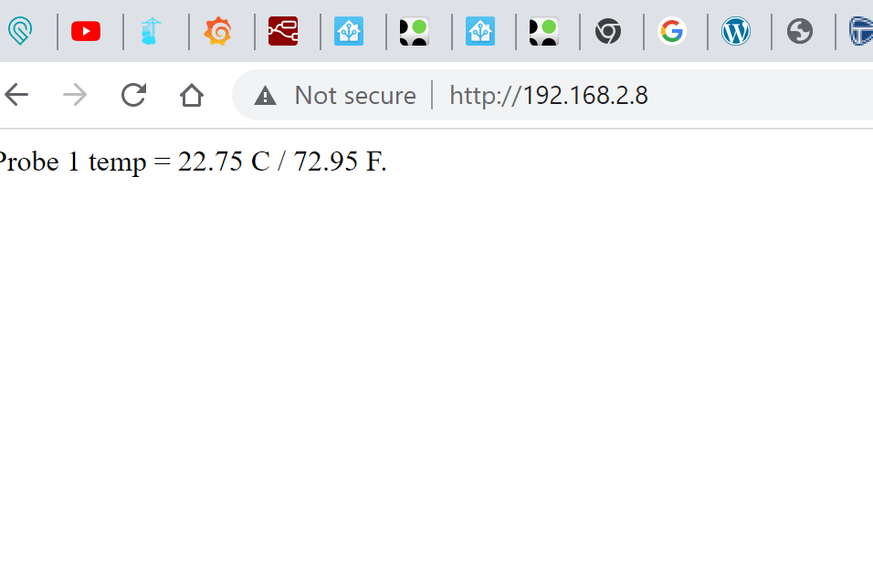
Success: At least on the ESP32 devkit v4. I can publish to a web page and access. Now I can configure Node Red to get the data and graph it. Also can monitor my oven now from my phone.
For the good of the order for folks who are curious about home automation and don’t know where to start.
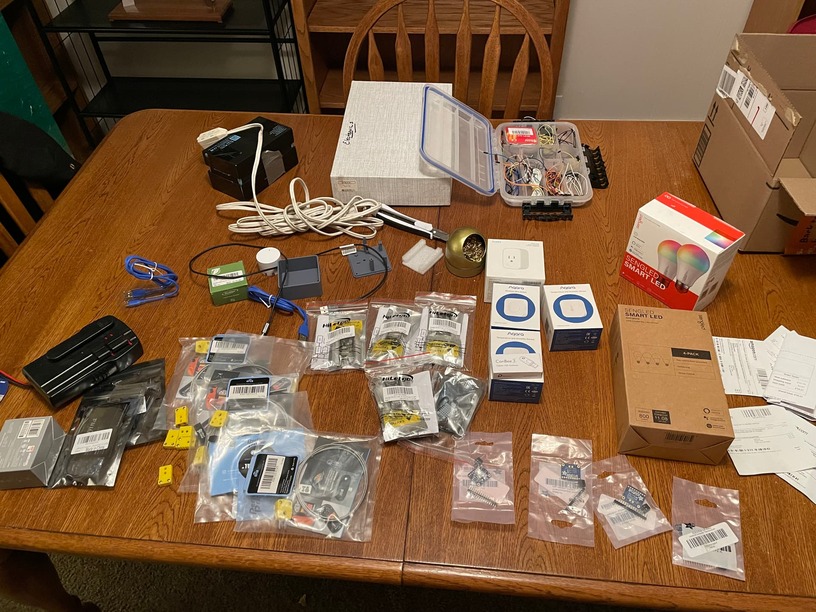
I got four Sonoff S31 smart wifi plugs. They work great. I am awaiting my ftdi board and pgo pins to reflash my board but I didn’t go ahead and use the eWeLink app to get them going. Have to tell you that I have a little apprehension with a cloud app for this. I am all for the Glowforge mothership and cloud service, but I am a bit more apprehensive about this setup with this company and ecosystem. I guess I have a little more sympathy for the anti-cloud people in the forum.
And I certainly got a taste of connectivity issues that can plague some folks. Trying to make a scheduled for the outlet for my espresso machine was a pain. It didn’t want to save the schedule. My home wifi isn’t the best. It’s one of the cheapest belkins out there and my cable internet is spotty at times.
As soon as I can, I’m going to flash with different firmware that I can control locally. but it is cool to use siri to turn off the lights, when that sketch works without siri jumping in and saying I don’t have Homekit installed.
The energy monitoring part is good.
I’m expecting a bunch more things, some zigbee sensors and some more ESP32s to roll my own stuff. It’s nice to have some agency in my otherwise disappointing home.
All my clothes are now musty like this house. Ugh.
@marmak3261 Do you think HASSIO would be a the right platform for creating a Glowforge companion monitor/device? THat other people could use, or is it too much overhead?
I am trying to figure Home Assistant out as a platform. They have to be ready to deal with a Linux based system and provide the hardware for it to run on, but everything I see indicates that it would manage everything. Would be interesting to see if an integration could work with Glowforge to snipe the use data and the sensor data. Seems such a waste that they get to use our machines for their data purposes and we can’t access it. Something as simple as tube use would be great.
I guess with a smart plug you could monitor power consumption and trigger a timer when the power level rises above a certain level and then goes back off when the laser stops firing. That way you can keep a running total.
I got to get mine out of the box and set up. I have one more smart plug that I can use for the Glowforge and I’ll try to set something up for this after I flash it with something more accessible.
Got lots of goodies so I can explore this IOT stuff. I have some Sonoff stuff and a bunch of esp32 dev boards to roll my own with some high temp thermocouples. Then I have some zigbee devices. Got a new microsd card to redo my raspberry pi. Hate to redo what I have already configured but I can restore a lot of the data and configurations. I also don’t have any security set up and want to redo with home assistant from ground up.