You’re friggen awesome, thank you!!
2 Likes
That “connect the dots” looking trace will be engraved just fine by the forge?
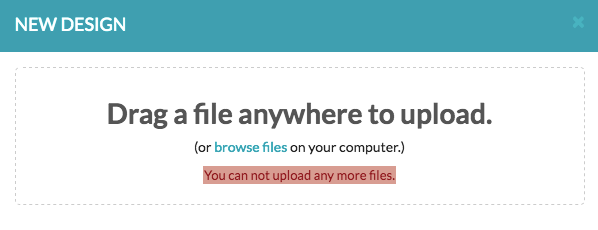
well I went to test it to make sure, but I got this error:
4 Likes
whoa, they taking away your pre release?!
2 Likes
No I think I made the file to be uploadable to the forums, but that makes it not work in the GFUI. Let me upload a zip for you. (thats the first thing you start to think though! haha)
flag.svg.zip (34.3 KB)
Hehehe, scary, right?
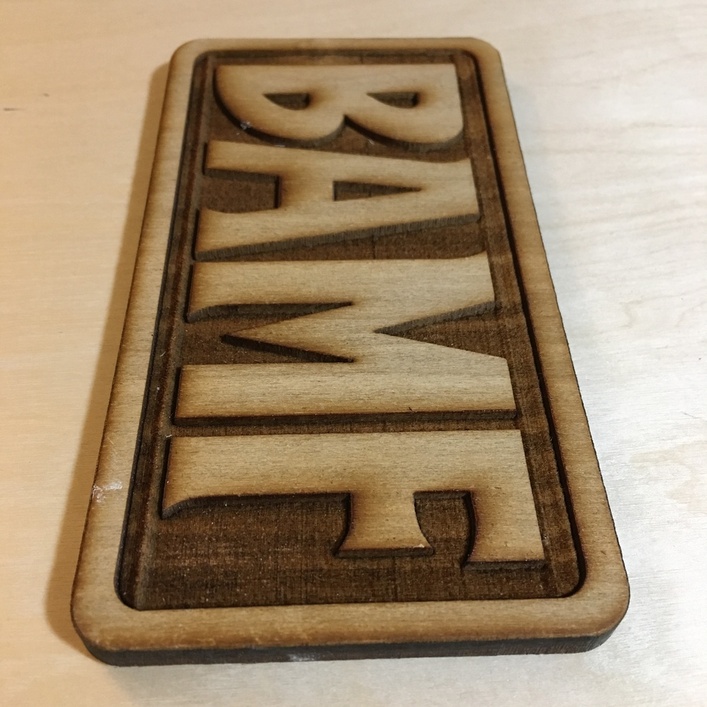
AND HOLY COW, THAT’S SO CLEAN!! Thank you!!
So that is just from using Illustrator’s Trace function??
1 Like
I see it somewhat differently. I don’t see it as banding above/below EMPIRE, I see it as overly darkening on the left and right sides of EMPIRE. You also see it happening right across the window of the Tie-Fighter, where you’re getting some denser dark/white spots. The above/below being lighter looks to me that it’s ‘recovering’ more.
I think the laser or PSU is having a hard time switching states. It’s either staying energized for too long, or the amount of energy is collapsing too quickly, like a curved amount of energy output rather than linear.
yeah super easy and quick. Thats why its my favorite thing in Illustrator =)
2 Likes
I’m blown away, changing my world…
Thank you SO much
2 Likes
There is a thin border that goes all the way around the outside of the image. In the raster version you can see the power loss propagate even out to that outer border, so it really is a loss of power. Im almost 100% sure it has to do with the design of the cooling in the tube in my unit. It has way fewer coils than the newer models.
My k40 experienced similar issues when too much water from the cooling pot evaporated causing the heat dissipation to drop. It would start banding in areas that required more output.
I have a few more examples I can probably show. Ill have to dig them up. I bet if I amped up the cooling in this pre-release version I could get it to engrave without those issues.
2 Likes
Here you can see a consistent depth across the piece, except right before and after where the letters sit.
You can see the ramp up at the beginning from proper height to that peak that is created right before going back down to the correct depth when it hits the lettered areas.
5 Likes
Yeah, you’re probably right it’s more related to cooling than drive power. Thinking about it harder, if it were drive power then your edges of dark/white transitions would be more inconsistent (and probably more zigzaggy, since the head flies in both directions)… With better cooling, it would affect the heat transfer more, letting it be more consistent.
Have you tried letting one of the newer PRU’s burn your files?
1 Like
Yeah, they run perfectly now. Maybe even a bit too much power. Really good to see. Cant wait to get my hands on a working on. So many things Im waiting to make… I literally have shelves of materials waiting
1 Like
Not a problem man. Ive been a photoshop user for most of my life. I never really had too much of a reason to use illustrator very often until now. Im really loving it when working with the laser (one that can accept vector images at least =) )
2 Likes
@nunzioc - Oh! And one more thing about JPG artifacts, and if you absolutely must use a bitmap rather than put the effort into making a vector with it… Save it as a PNG or TIFF. Don’t just clean up a JPG, clean up the artifacts, and resave it again as another lossy glitchy JPG. 
4 Likes
Sometimes autotrace adds a whole bunch of extra nodes where they really don’t need to be.
That means larger file sizes and so longer upload/download/cut times.
In such a case, the Smooth tool can be helpful, although it is not totally intuitive.
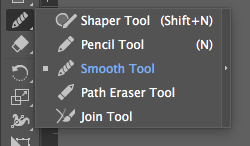
- Find the smooth tool stacked in the sub menu under the shaper tool and select it.
- Now select the Direct Selection Tool. Using the Direct Selection tool, click once on the shape/path you want to smooth to display the adjustment nodes (be aware of which side of a filled or expanded line you click on; for compound shapes, the inside and outside must be done in separate operations.)
- Now select the Smooth tool again, and click-drag along the path to smooth. Sometime you may need to smooth it back and forth in alternating steps.
-OR- - Double click with the Smooth tool to auto-smooth the selected section. This often does too much smoothing, but for some shapes it can be a huge time-saver.
6 Likes
Omg, I can’t believe that I forgot to mention this part…will add it to the OP as well…
The protective paper sticks pretty hard to the acrylic, and can be a little tough to get off everywhere, especially in the small, scratchy engraved sections.
And it can leave a film of sticky residue, even if it looks clean. I went to wash off my fingerprints with soap and water, and that is when the residue made its presence known, with a vengeance…
After I dried it, everything went frosty and I could see that the whole surface was slightly sticky and smudges everywhere…more soap did not help.
Soooo, I grabbed some lighter fluid and some paper towels, and after a short while and some rubbing, it fully cleared up.
I think next time, I will just soak it with lighter fluid (OUTDOORS & AWAY FROM FLAMES & LASERS; SAFETY FIRST!) for a few minutes while the paper is still on; that should permeate through and dissolve the adhesive, making the peeling a piece of cake, and then also much easier to wipe away any remaining adhesive.
Then a quick wash with soap and warm water, and she’ll be shiny & bright!
2 Likes
Can’t wait to brave that new world of Forgetopia ![]() , sleep deprivation and all!
, sleep deprivation and all!
1 Like
I’d be curious to know what the melting point of the adhesive is, compared to the acrylic. A lot of times if I have stickers or labels I want to remove, but exposing something to GooGone or other chemicals isn’t necessary, I’ll just take a heat gun to warm up the sticker so the adhesive softens and loosens more easily.
Now, whether you can accomplish that before the acrylic starts melting… that’s the trick. 
Definitely. The acrylic doesn’t start to deform until up in the 350F range. The sticker backing is softened under 200F.
2 Likes