Hey guys!! Itttsss me again!
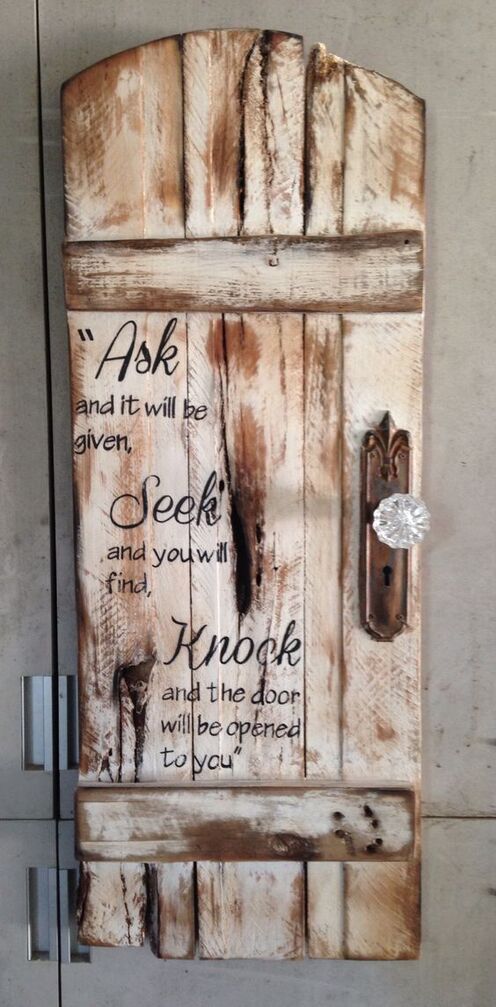
Haha, I have a customer wanting a sign like this with this type of finish. They provided a door made of unfinished pine. Any suggestions? I’m seeing a blow torch, and a hammer and white paint…?
4 Likes
I’d search ‘rubbed finishes’
3 Likes
Tim Holz line carries a lot of those distressing inks and finishes too. (Bit on the pricey side.)
Maybe just a dry brush technique and sandpaper. (Should be cheaper for one order.)
3 Likes
Maison Blanche paints are made specifically for rubbed/aged finishes. I think you could accomplish this without even burning it.
Also, Plaid and some other, more common paint companies have started carrying lines of “chalk” or “milk” paints.
Something that Maison Blanche has is waxes that have a slight color to them…you typically apply them with a stencil type of brush after all of the paint treatments. It really takes it up a notch. Go look at Jenna Sue Design Co…she does a lot of this type of thing and I think just just put a YouTube video on her channel about it: http://blog.jennasuedesign.com/2018/04/one-room-challenge-week-4-2/
3 Likes
If you need to “age” (dent) a wood surface, one thing that’s better than a hammer is heavy steel chain. More random/genuine appearance.
Use the chain like a bullwhip, taking care to not break your arm or orbital ridge as the case may be.
6 Likes
Tons of techniques to do this. My sister is the regional distributor for Annie Sloan chalk paints and they have lots of tips, techniques and products to achieve this.
4 Likes
The texture of the wood is not easy to achieve from plain old pine. I would recommend you use rough pine or better yet rough cedar (best bet would be fence pickets). Cedar is much easier to work with if you cant find it rough you could use wire wheel on drill or angle grinder to achieve the saw marks. You could also achieve it by using a bandsaw and or table saw but those techniques could be a bit unsafe just to achieve a look so if you find those techniques I would avoid them. Once you achieve the roughsawn look you could use hand plane to get some of the smooth parts or instead of burning I would use iron acetate (Vinegar and fine steel wool let it sit for at least a day then use as stain) to react with wood and make it dark/old/rusty.
As far as the color/paint/stain you can dry brushing the main paint color I would go with a more tinted paint towards the light yellow barely not white if that makes sense. Followed by a light sanding to open up some high spots. then applying clear finish like laquer or polycrilic. once dry I would use General Finishes pitch black or van dyke brown glaze effects to get those dark aged fills of the low spots. This could be achieved with dark stain as well but much harder process. Good luck
2 Likes
Thanks everyone!! I’m nervous about this one. Haha. I’ve been looking around locally and having trouble with it haha. I’m gonna change the customers mind. 
There are so many different techniques to do this!
The videos I’m linking all use colors, for this project you would go with a light and a dark brown instead. It is the distressing techniques themselves we are looking at. I have used the orbital sander technique with spray paint several times.
two colors of paint and an orbital sander:https://www.youtube.com/watch?v=xtSB7d6hE4Q
Rough-painting, staining, then re-painting: https://www.youtube.com/watch?v=RrP2aWXDoqo
painting with vaseline: https://www.youtube.com/watch?v=3iQq8ZvCvv8
4 Likes
Thanks everyone!! This is what I ended up with! ![]()
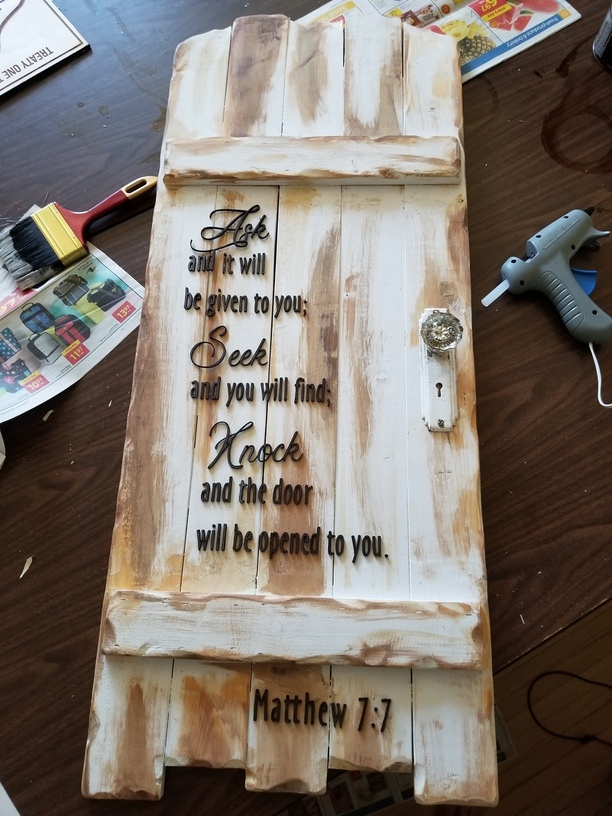
White chalk paint, rough sanding, then a couple different stains strategically placed.
7 Likes
Whoa! Great job! 
1 Like