Helping Blind and Low-Vision People - Using the Glowforge for Accessibility

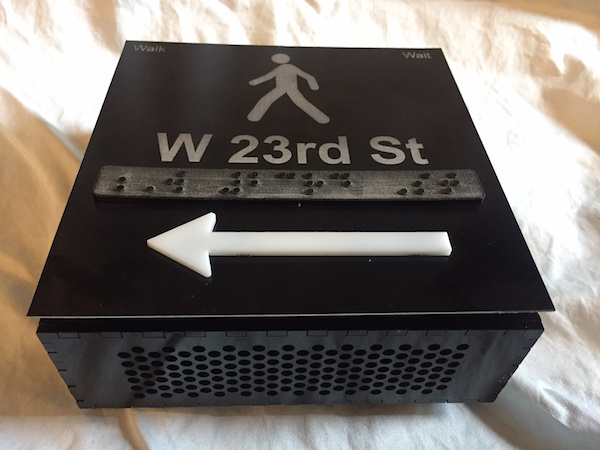
I used my Glowforge to prototype a low-cost “talking” sign that helps low-vision and blind pedestrians, and submitted it to the New York City Call for Innovation — Enhancing Mobility for Blind and Low Vision Pedestrians challenge. Wish me luck, I’ll know next week whether this wins!

Sign Prototype

Here’s some things I learned about using the Glowforge to create tactile and highly visible signage for blind and low-vision people:

  • Braille etching works quite well! The dots must be raised, so you’ll need to subtract the acrylic around the dots. To do this, I used a Braille font in Inkscape, and used the path-difference function to “punch out” the dots from a rectangle. Note that Braille signage encodes certain common words and letter combinations as special characters, so you’ll want to use a Braille level 2 translator on your text.
  • You can use your Glowforge to etch the top layer of anodized aluminum, which looks really terrific for signs. You’ll need to fiddle with manual settings so you’re not spending much time pointing the laser at the bare metal, otherwise it causes it to heat up and warp (as other threads have discussed, you can’t cut metal, but you can etch it).
  • Laser-cut QR codes (which can encode website URLs, serial numbers, or other data) work surprisingly well on most materials, and are a good way to make creations computer-readable.
  • I suppose it’s a bit obvious, but white acrylic shapes glued onto a black background really stand out visually and are excellent for tactile signage.
  • Glowforge + Raspberry Pi = all sorts of new rapid prototyping opportunities

I wrote this article which gives more project background and accessibility considerations. Let me know what you think!

81 Likes

Wow! Truly wonderful and amazing.

I not only wish you luck - I’ll even qualify the hope for good luck!

5 Likes

Yeah, great idea and excellent execution! Good luck with the contest! :grinning:

3 Likes

Now that is exciting! Great job and writeup. Good luck, I am rooting for you.

2 Likes

Very cool!

1 Like

Next time instead of engraving around the “dots”, try cutting them out. I imagine would need to use a sacrificial bottom layer of draftboard. Then use tape to cover the dots and acrylic to transfer them over to the piece that has the adhesive already applied. Carefully remove the tape and then the acrylic background.

2 Likes

Another thing you can do – which also provides longevity for the sign from people running their fingers over the sign to read it – is make dimples into the plastic with the laser, then crazy-glue small steel balls into the dimples.

The steel balls will wear longer than the plastic bits, which might snap off… and if you need to replace a missing steel ball, it’s easy to glue in a replacement. Also, it’s easier to clean for sanitary reasons.

11 Likes

That’s a really great suggestion - thanks!

1 Like

you rock man

Great job on your prototype. I truly hope that you make an impact on producing a cheaper alternative to the current APS implementation.

I’ve read your article, and as a traffic engineer, I have some thoughts. I have been designing traffic signals for over a decade and I have recently worked on a location that uses APS as well. I hope you take my comments as constructive and informative as they are meant to be.

You have a good start, but there are some issues that inherently make your system, as proposed, unfeasible. I don’t want to discourage you from attempting to innovate, but I also want a safe, functioning system for pedestrians and drivers alike.

So here are some thoughts and suggestions to hopefully give you a better system:

First and most important of all, every traffic signal has a traffic signal cabinet which contains (among other things) a traffic signal controller and a conflict monitor. Every component of a signal (including crosswalk lights and buttons) are connected to the cabinet via wiring through underground conduit (overhead span wires in some cases). The signal controller dictates when each light turns red, yellow or green. The conflict monitor ensures that if any conflicting movements (i.e. northbound and eastbound vehicles at the same time) are given green lights at the same time that it instantly places the signal on red flash until a tech can come fix it.

Existing APS systems have their own APS controller in the traffic signal cabinet (which is a significant percentage of the cost of the APS system). This takes the direction from the signal controller and translates it into the lights, speech, beeps and vibrations at the buttons.

My first suggestion is that since your device has to communicate with the controller anyway, consolidate it into one box inside the controller cabinet. Make smaller boxes at the signal poles that just have the communications electronics. This lets you have just one controller at each intersection.

You mention weatherizing your case, and that’s great. Definitely a must… but you also have to weatherize your components (we call it “hardened”). Even in a weatherproof case, moisture or extreme low or high temperatures will cause standard electronics to fail in short order. This includes the R-Pi, even if you put it inside the traffic signal cabinet. This will increase your cost exponentially. For example, an Ethernet switch for the home can be had for under $100. An Ethernet switch for a traffic signal is $5k plus.

You can generally find cut sheets of the available systems to know all of their specs and such on their websites. (Here’s the latest from Polara: https://polara.com/accessible-pedestrian-signals/)

Good luck in your competition, and feel free to ask any questions you may have. I’m happy to answer anything that I can.

Again, I’m hoping only to inform and not discourage.

13 Likes

I know nothing about this subject at all…but just want to say what a knowledgeable and kind post this was…I would think very helpful.

2 Likes

Wow, really great response; I can’t thank you enough for this thoughtful and detailed reply. This all super-helpful.

Yup, it would take a lot of work to produce “street-ready” physical hardware. In addition to the points you lay out, other challenges include the long sales cycles to municipalities, and the many standards / compliance bodies. As a side point, the Raspberry Pi doesn’t have a great reputation for long-term reliability; it’s great for prototyping but isn’t what I’d advocate for production.

Our hope is that we could create a free and open data service that produces all the “ready-to-print” assets (signage, flash images, QR ID lookup API) leveraging public records data and open services like projectsidewalk.io. Anyone (or any agency) with a CNC machine could more affordably and quickly produce signage specific to each intersection. We want to take two recent trends - open data and the affordability of maker machines - and make it dramatically cheaper for cities to serve blind and low-vision people.

Still, from a rapid prototyping perspective, I hope we showed that it’s possible to cheaply demonstrate new ideas that spark these sorts of useful conversations! :smile:

8 Likes

You’ve just illustrated one of the things that make this forum wonderful. Thanks for the reminder.

3 Likes

Thanks for sharing. What a compassionate project!

Hi Chuck,
Can you give me more info about how you were able to produce the Braille in Inkscape? I thought I found a solution but it isn’t working. I work for a Special Ed department and we would like to include Braille in maps of schools, etc. Thanks!