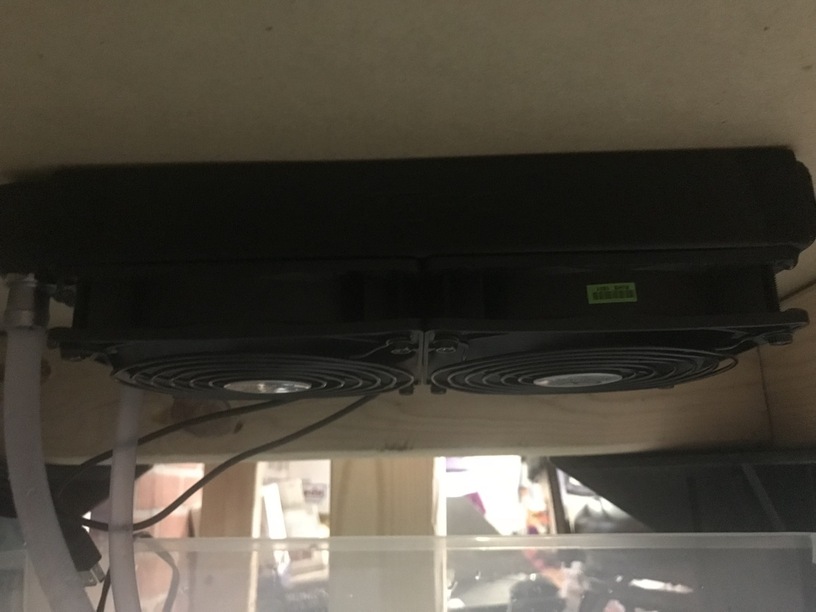
I finally got my cooling system up and running and it works great. It was 82 with the humidity in the room and with this running i got the GF well within the operating temp. I used a 240 mm radiator with 2 120 mm fans operated by a separate switch so I can control the speed. The cooling is done with a tub of water cooled down with ice from the fridge being pumped with a small fish tank pump. While the water will eventually warm up to room temp, i have a thermometer in the water to monitor the temp and can ice as needed. I will need a little big pump though so the tub doesn’t have to be right under the GF but that’s a easy fix. All parts purchased through Amazon for less than $100.
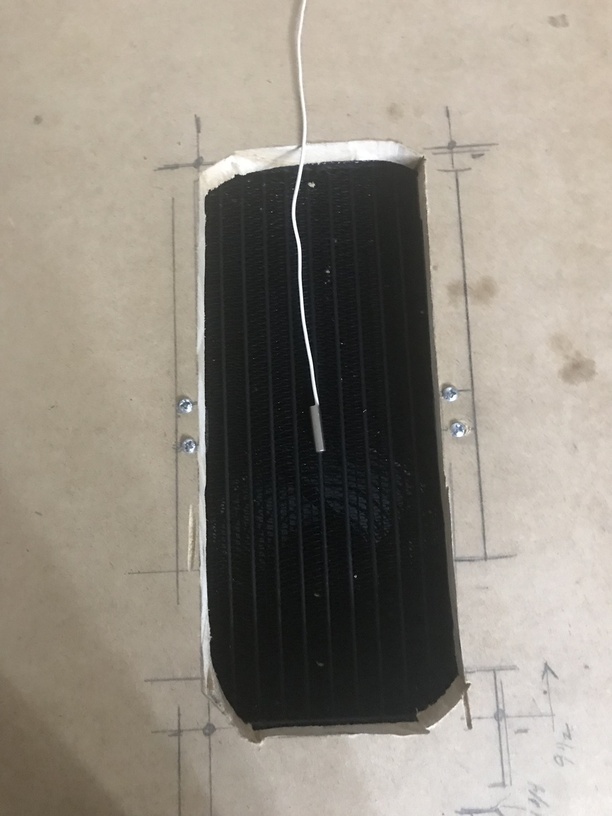
I covered the vent on my table and tested the temp, within minutes it was down to 68 well within the needed range to work. I think it would have went even cooler but I was just testing to ensure the air coming through was being cooled enough. I took the cover off and it did warm up some to 70 with the surrounding air but still within the needed operating range. I figured once the GF is placed over the cooler, the air being blown into the GF should still be fairly cool and still well within the operating range.
I moved the GF back to the table, set it up and ran the deciding test…
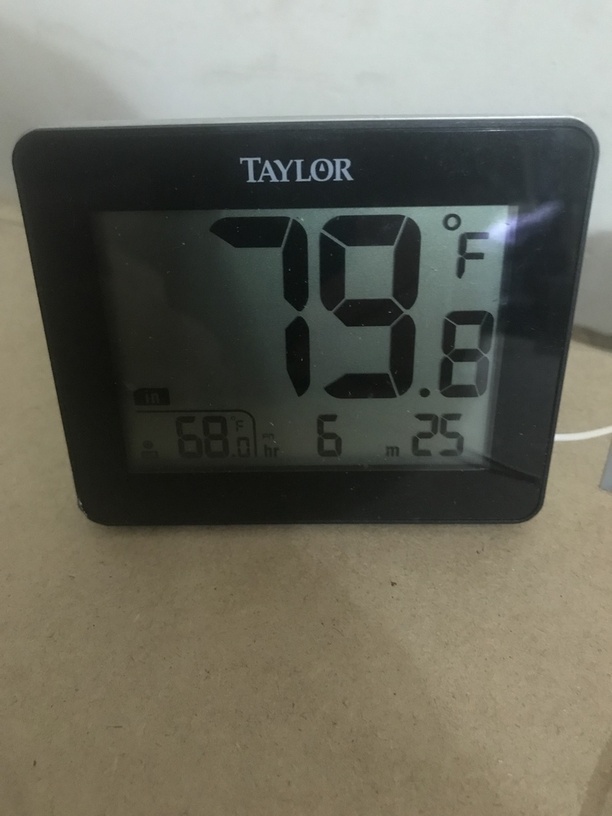
When i conducted the test run the temp inside the GF was 79 so I turned the fans on high and started the cooling, 5 minutes later the temp inside the GF got down to 71. I turned the fans to low and turned the GF on and ran my print by this time the room temp was up to 83 with all the humidity. Before i would have had to wait while it cool down on it’s own. The test print was a 45 minute test i first used when i got the GF to see if the GF really operated the way everyone said it would. It passed then and i can say with joy it passed again.
After the job since I can’t leave the wire inside to see the temp while printing i put it back in and the temp was still within the range needed, 72. I also checked for any condensation inside and out and found none.
Looks like a robust solution!
There are a lot of individuals with heat issues who might benefit from your ingenuity if you could post links to your hardware.
Got any data on how long this takes yet? How large is your “tub of water”?
Also I wonder if using a cooler would be better than a fish tank/tub? It would probably extend the time until the ice melts. Some coolers even have a drain valve, which could be viewed as a good thing or another point of failure, depending on your optimism index
these come with a USB power cable and adapter. You can either plug these into a wall outlet or your computer. Mine is plugged into my USB port on the computer
What would have been nice is to have a way to cool the coolant directly. They could have moved the power supply to where the coolant is and then incorporated everything ( coolant and intake fan) on one side. That would have keep the cross flow of air and allowed for a cooling system with had the connections on the side of the case.
One of many things they could improve. There are threads on this that go deep into people’s armchair engineering. Personally, my two things are:
I would like a removable fan, cleaning it is a ridiculous process.
I think the honeycomb should be 1" wider than the work area all around so that we can magnet/clamp the work pieces down reliably. The front edge has no slack space so if you’re working a full sheet it’s hard to secure the material without impeding the laser.
When i got up this morning the room temp was already 75 and the water temp was at 70. My tube is actually a storage tub from Home Depot i had just laying and it’s a 16 in x 12 in x 7 in. I fill it half full then put in the ice which takes it to about 3/4 full. Yea, a cooler would be better it would keep the water temp lower longer but didn’t have one around. That will be my next upgrade when i get the stronger pump. I will drill a hole in the top and put the hoses through that and then seal with rubber grommets or something else.
Right now it’s 79 in the room and humid the water temp is at 74
I’ve tried the simple running the fan across an ice bag–not very effective yet as really need the ice open to the air, since most of the cooling comes from the evaporation…
Yeah, cool. Kinda backwards from how water-cooled PC works - you’d use a heat-sink of some sort that the fan would blow through - the heat-sink would have water flowing through it, and pump circulate the water through the radiator (with fans) to cool the water. Does not get much below ambient, but for a CPU that runs HOT - (66c) that’s fine.
Great adaptation. Use a chest cooler to contain your ice water. You could use another radiator then - a closed system - inside the cooler. You’d change out ice a lot less frequently, I think…
I installed 1/2 inch tubing and a bigger pump 600GPH to ensure i had enough to push the water uphill., I also too @Bigjohn’s suggestion and used a cooler. Drilled out two holes one on each each end, one for the supply and the other for the return. It stays colder much longer. The latest test shows the interior of the GF now down to 64 warmed up a little over an hour to 66. Warmed up once I started printing and stayed consistent at 70 for the rest of the day after 10 prints. In between prints it did cool down back to below 70…