Hello fabulous Forge Fam. I am learning all things Adobe Illustrator and am pleased so far. But i am struggling to figure out how to set a file up to have the outer shape cut, and the inner lines and details engraved. After I did the “trace” thingy and got it all set with that, there are SO MANY lines in there that i don’t know how to select them without the outline so i can group them or whatever i need to do, and then have the GF magically notice that they are another piece for me to choose to engrave. When i got the thing all settled, some of the lines that weren’t attached to the outer “path” lines automatically stayed separate. But the … Ok, i’ll attach the image. Sorry if i’m too wordy here. Not sure how to explain.
I included the image of just the shapes to show what i want “cut”. that is the black and white image. I want that to be a piece that is the shape of just the black part.
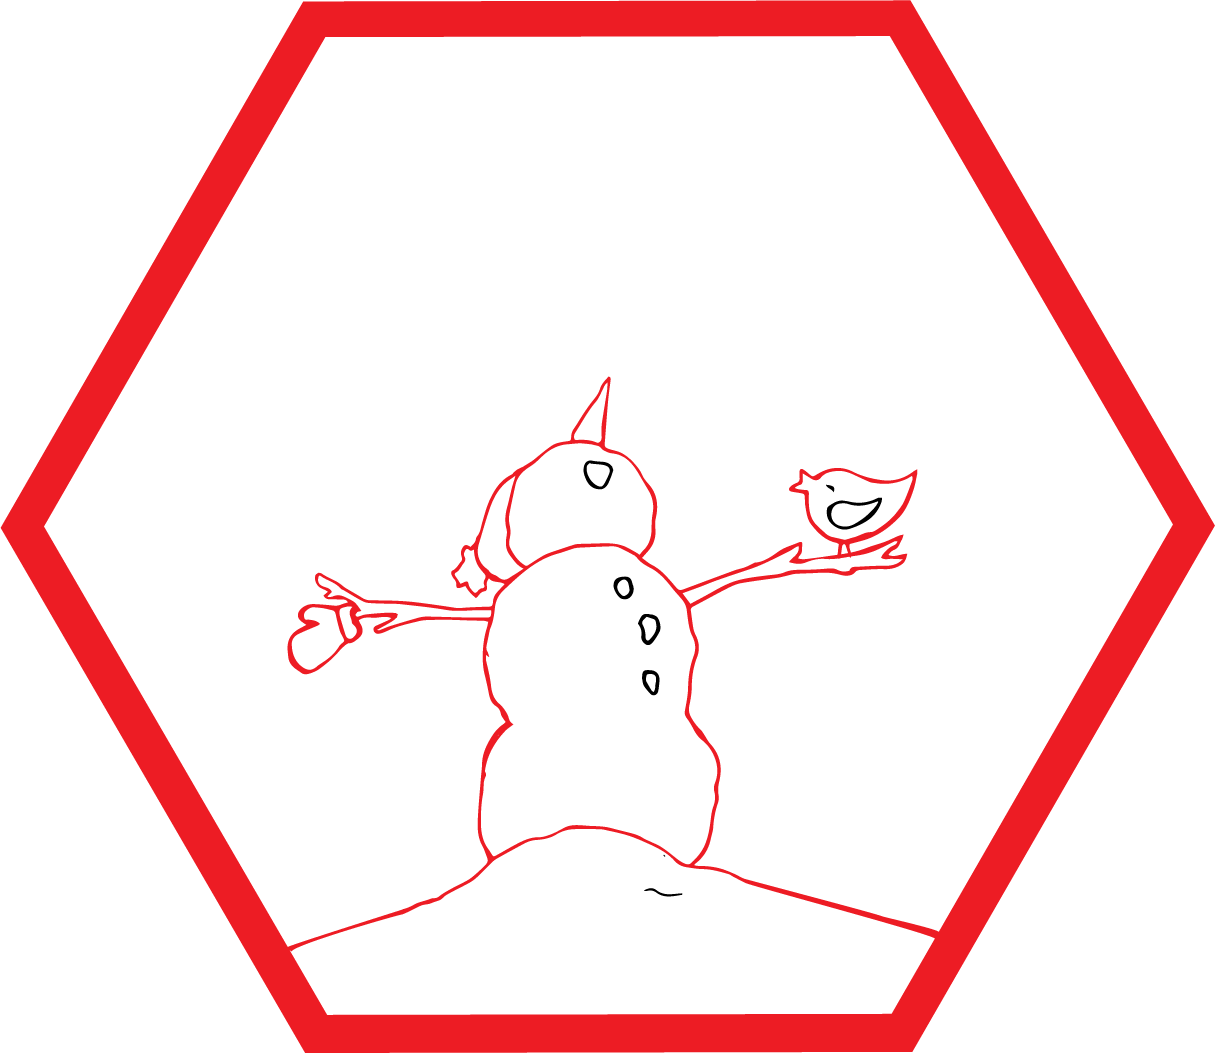
The other image has the detail. I want all the inner lines to be engraved, including the lines between the snow man sections, the lines on the mitten cuff etc. without engraving the outer shape.
the parts on the detail image that are black are the ones that automatically are doing what i want. Thanks for any guidance.

Generally speaking, the way the GFUI groups things is by color.
When you are making designs in Illustrator, the best practice is to use one color for what you want to cut, one color for what you want to engrave and one color for what you want to score.
(You can always make things more complex if you want or need to, like if there is a design you want to have the ability to set at a different setting, you can always make that a separate color also. But for this example I’m trying to keep my explanation simple so as to not be confusing.)
thank you for the tips.
For this image, i drew it, then uploaded it. Is there a way to select just part of a line and make it a different color? I think that’s why this is getting complicated for me. The lines that go around the outer edge also cut through the image. The parts that cut through the image are the ones i want engraved. If i can somehow select just those parts…
No but you can make a second line and put them on top of each other.
(I realize my first response didn’t fully answer all of your questions but it’s just that it’s kind of complicated to explain, so I tried to keep it to the basics.)
i appreciate the trying to keep it simple. I was thinking about that option, to make another line following the same path. I’ll try that.
But thinking about other images, if i had a more detailed image, that could get very time consuming. Would i just be better off at that point letting it engrave the entire outline? I guess it would just cut over that same line when it cuts it out anyway… ? no harm no foul, i suppose…
The other thing i tried that worked ok, but again would be a lot if i had a much more detailed image, was to “erase” the lines that i don’t want to be engraved, so only the engrave lines remain.
I’m not really clear on what you mean when you say:
Your outside cut line should not go through anything else. Then it would just cut the material off.
like this, the edges of the star that go outside the circle would just be cut off by the laser.

what you would want to do is something like this

and if you look at just the lines, here’s what it looks like:
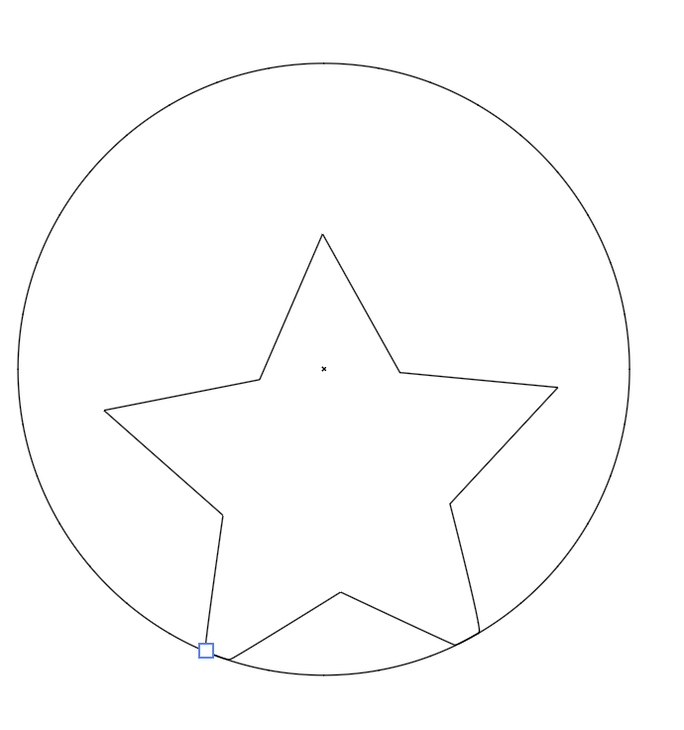
If you want to score a line around the engraved star, you could just copy the star and change the color then put it on top of the first one.

Unfortunately I’m kind of reaching the limit of what I can explain easily here. lol There are lots of classes you can take though. In fact, I signed up for an advanced class on udemy just for the fun of it to learn the more advanced things I haven’t learned yet. (There is always more to learn! lol) A class might be just the thing to help you!
I don’t know if seeing it done will help - that helps me. I separated (manually) the snowman and the snow from the edge, and then coloured them so the snowman is filled so he’ll engrave first, and then the outline is only has a stroke so it’ll cut second.
Let us know if that helps!

Ah I could have been misinterpreting the design.
Sorry if I did that. Hopefully some of what I explained was still helpful.
Thank you for taking the time to do this. This would work well for a few of them at a time. When i’m doing a lot at once, it does add a lot of time to the process, having to engrave the whole thing. But it’s a good solution if there’s not a specific feature that does what I want. The erasing was good because it eliminated the need to engrave the whole thing. Thanks again.
No worries! I appreciate your time. There IS so much to learn and i love the idea of classes. I’ve done some tutorials and watched a bunch of YouTube videos for Illustrator support. That has helped a lot.
Thank you Trually! I’ve been fussing with the same thing in Illustrator for 2 days thinking it was a grouping, merging, layers, compound path thing.  But it’s a color fill thing! You are awesome. Thank you!
Oh! I’m so glad this was helpful! Much of what I learned was from trial and error  and spending too much time on things like you described! At least I don’t typically repeat those things again later! Lol thank you for the kind words!
This topic was automatically closed 32 days after the last reply. New replies are no longer allowed.