The conventional method is to assign a different colour to each object but this won’t work with cloned text objects.
Glowforge seems to ignore inkscape layers which is a shame.
Any ideas? Thanks
The conventional method is to assign a different colour to each object but this won’t work with cloned text objects.
Glowforge seems to ignore inkscape layers which is a shame.
Any ideas? Thanks
Why would you want to?
I’m not saying that you don’t have a good reason, I’ve just never wanted to after several years of doing this. I’m a big proponent of using clones, usually having them all as one step is a strength.
Hmm you apparently can do it with tiled clones. Still trying to figure out if you can with regular clones.
Thanks for the quick reply!
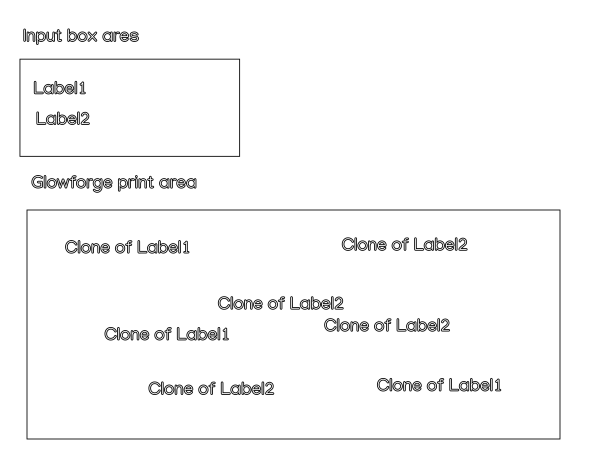
There are several cloned text zones in different parts of the print and I want to add the text in an off print ‘input’ box area with multiple text boxes that clone to the rest of the document. Obviously I can leave as standard but the user (won’t always be myself) will have to learn which boxes need to be edited.
From your initial response looks like I’m stuck with this…
Well I think your bigger problem in this scenario is that text objects don’t work in the ui. You need to convert the text to a path.
It may be possible. I have an idea but I need to try it before I take all the time to write up the idea. It’s got a few steps.
If you’re OK with it a screenshot would go a long way to helping me understand your scenario. (Either here or DM)
I always get the text ready, then ‘select all in all layers’, path > object to path, save as a print ready svg.
I guess I could then delete the input box areas since the object to path step destroys the clone associations but I’m after as few technical steps as possible to ease production.
You can always select the text and then right click on it and say select same… object type to get all the texts. There’s no reason to do select all in all layers I don’t think.
That being said, I also have never even heard of these select all in all layers option, that’s pretty cool to know it’s out there. I never use layers for design purposes because Glowforge ignores them. I only use layers when I have an image that I don’t want to edit but I need it underlaid on something; I’ll put it on a locked layer so that I don’t constantly accidentally select it when I’m trying to move other things. (Such as when manually tracing a photo)
Yeah that’s a good trick, be careful if you ever do it when you have hundreds of complicated clones though. Inkscape absolutely panicked when I did it with too many objects ![]()
This is what I’m after but it looks like a no for now!

Not so fast.
I still don’t know why you’d want these to be different steps, but since you do:
In short: unset the color of the original and then clone colors can float.
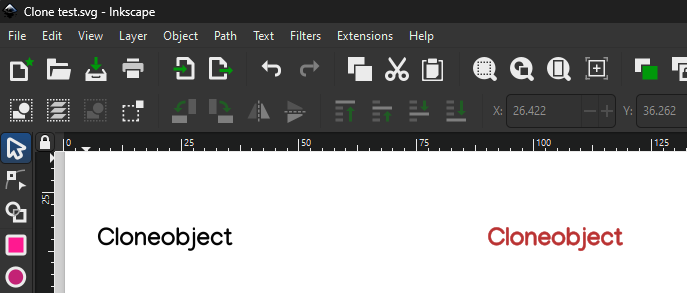
The “black” text is a text object. In fact the stroke and color are unset.
Here’s a screenshot after converting to path and modifying the path. Everything is still cloned, and the colors stay different.
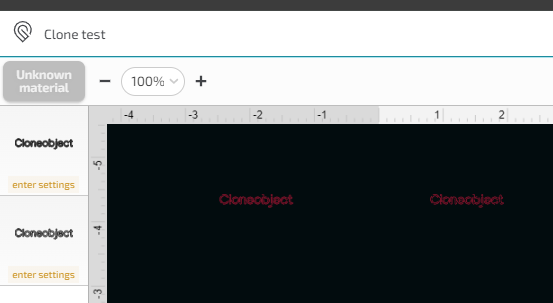
This is some sort of trickery though, because Glowforge ignores the color differences as it is now.
Annoying. Apparently a clone’s visual colors don’t apply the same way. Let me destroy the original:
And then upload:
![]()
I had some trouble getting this to work if the text color was ever manually set. Like if I set a color and then made the clones, and then unset the color it didn’t float correctly.
It’s a really weird thing. I type text and don’t assign a color and it looks black. Cool. Then I look at the color selection at the bottom and it looks like it has black as a fill. If I then select a separate object, and then select the text object back, it says there is no fill even though the text looks black. This is very strange. Then I clone it and the colors float. This does not seem to work if you ever set the color. So weird.
A quick note on your approach. There’s a concept in glowforge called auto-grouping. When you have a lot of non-intersecting objects, the UI will auto-group them and your idea of having a separate input area and a main design area will not work as intended. The glowforge won’t print your design if part of your autogrouped design if off the print area, it considers it one big thing and your artwork won’t be completely in the print area.
Just something to keep in mind, depending on the complexity of your design. The limit is 200 such non-intersecting items, also known as hull groups.
Oh here’s a question, why not just make the text different colors and thus their clones different colors?
I’m still not sure why you’d want this but there it is ![]()
OK even more fun: You can do this with tiled clones to make each clone a different color.
I couldn’t get this to work with rectangles, because they always have a color set when created. I wonder if I can unset stroke and path and make one… let’s see.
Nope. It says it does it but it actually doesnt work correctly. You can see a clone here with a fill and stroke as per the tiled clone feature, but it’s not actually displaying it. Destroying the original makes it a rectangle with no fill or stroke.
Oh, Inkscape.
EDIT:
OK I solved it!
The problem is that if you click the red X on the fill or stroke you are actaully setting the fill and stroke to be “none”. What you need is to entirely unset the fill/stroke and only then it can float.
To unset the fill or stroke go to the fill/stroke dialog and click the question mark, look at the upper right of the fill/stroke dialog here:
The blue guy with the red stroke is a clone.
And that is problem solved. This is good to know. I still can’t imagine a scenario where I need this but I can imagine some weird edge cases where you might.
Ok thanks for your great replies.
I now think there are two ways to fix this:
a) use colour clones as per your method


b) Use layers and only convert object to path the clones in the ‘print’ layer so that the input box text boxes are eliminated when importing into the Glowforge
I think I prefer the second method since there are fewer steps to setup on the Glowforge and I found that the clone was creating unwanted stroke style settings if undefined on the clone source. But saying that I don’t like the Glowforge ‘this design has text’ message since it might indicate a mistake in selecting the right number of objects to make into paths, so maybe clone to colour is the way to go!
So while this is abfab, as my desire for differently coloured clones is that I like to set up a test cut and having it a different colour means I don’t have to move the actual piece off the cut area.
Wouldn’t that work for your test case @dapab? Drag the original box off the cut area (if you set your workspace to 12x20 it’s an easy visual) then even if it’s the same colour it won’t try to cut.
The Glowforge interface completely ignores layers, so the layers aspect is a bit of a red herring. You can select all of the clones at once by right clicking on one and selecting same object type, same effect.
Lots of ways to do it, the question is which method has the right balance of ease of documentation and simplicity for the end user. For me, avoiding layers seems like a good idea just for the documentation process.
As you say lots of ways to do this but I like layers!
What I particularly like about layers is that it is easy to lock all objects in a layer and this is particularly important when using jigs so that the Inkscape template isn’t messed with.
So put all alignment marks, outlines, colour cloned text objects in a locked layer.
Then have the adjustable text in another unlocked layer which is the clone source.
The neat thing is that when you convert the clone sources to a path it also updates all the locked objects too (even though they are locked). Save as a copy, import into Glowforge, ignore the clone source step, and all is good. Looks like a workflow to me!
sounds like you have a solution.
If you still have issues with locking it down for other users or need parametric or non-destructive editing. I would recommend Cuttle. A cloud based design tool.
I use this jig maker file here. You have to have a Cuttle account (free for personal use) to export.
(edit: added links)
This topic was automatically closed 32 days after the last reply. New replies are no longer allowed.