I have a relatively simple project to make 50 neckerchief slides for an upcoming Cub Scout event. It has a jpeg image in the middle and text surrounding it. When it uploads, it gives separate settings in the UI for each, and so they will engrave separately, greatly increasing the print time. Is there a way to combine them so that there will be only one setting and print all at once? I’m using Inkscape. thx!
Perhaps this tutorial will help? Inkscape - Converting Objects and Strokes to Paths
Otherwise, check the matrix of user tutorials to see if there’s something that’ll suit your needs: Community Glowforge Tutorials: Table of Contents
2 Likes
Well, essentially, what @drea said is part of it.
You’ll arrange everything just as you like it in inkscape, your embedded jpeg surrounded by the text.
Then, once that’s all set, you will select the entire thing and rasterize it. Use the File->Export PNG image option and export the image out at a nice high dpi (300 or so). This will export the entire collection of selected objects out to a file.
You’ll then reimport that new PNG you just made. Once that’s in your SVG, scale it as appropriate, draw whatever cut lines you might need as vector lines, and you’re pretty much ready to go.
There are a lot of handwavey steps I skipped here. Thing you’ll want to be able to do:
-
Prepare a JPEG/PNG for engraving (using curves to adjust contrast)
-
Embed an image in an svg (in inkscape, it’s as simple as click and dragging the image to the open SVG window)
-
Understanding engraving settings to get the result you want (I like using “vary power”), but if you’re using PG, you’ll want to fool with the chosen settings until you get what you want.
Engraving is a complicated interplay of lots of variables, but it’s really not as tough as it looks to get dialed in once you experiment a bit. Good luck, post pics!
3 Likes
Not an Inkscape user, but in Photoshop this is the type of thing that you can combine the objects and “flatten” the layers to make just a single image, which if you can do in Inkscape, might help here.
I just have issues trying to combine cutting shapes (SVG) and images for etching into a single file–so far just easier for me to combine on the screen, and once have one I like, select them & copy & paste to create multiples in the GFUI. But sounds like Inkscape may be easier to do this vs. CorelDraw+Photoshop…
1 Like
Thx so much! Looks like the step I was missing was exporting as a PNG and bringing it back in. I’d done the other steps you mentioned. I just imported and it’s all in one item like I need. I’ll try printing to make sure it works as expected, but looks good! Thx again. This forum rocks!
5 Likes
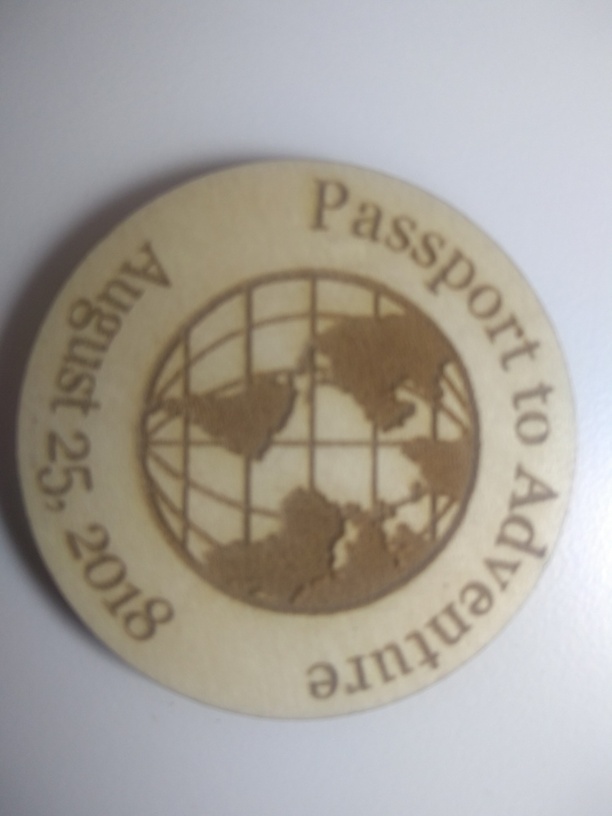
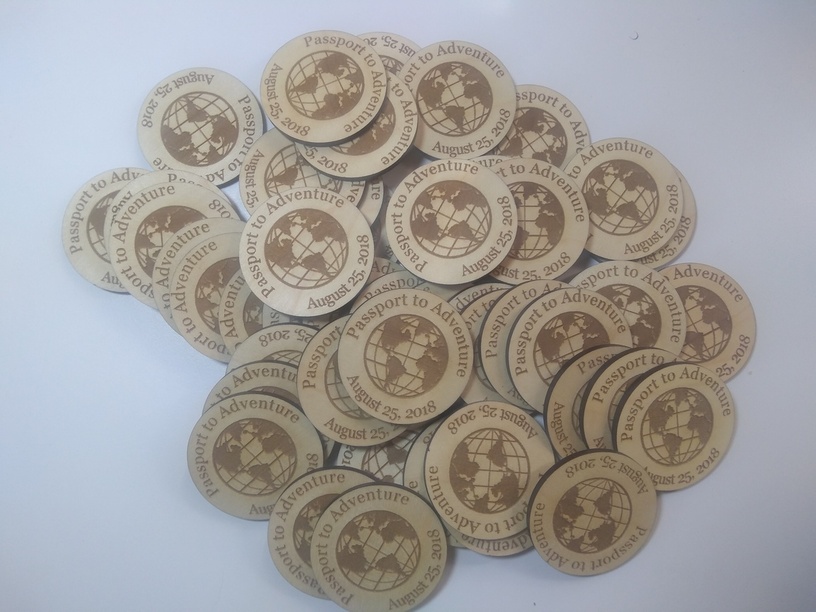
Here they are. Not terribly fancy but it should be a nice momento for the boys to remember their day camp. Thx again for the help!
7 Likes
FANTASTIC!
I haven’t seen a lot of neckerchief slides discussed on here; but I’ve made a lot.
Several designs just for my pack and then some pretty fun ones this summer for bigger events.
Those look great.
2 Likes
Thx! What do you use for the slide on the back? All I can think of that’s easily available is PVC pipe…
For plaster I use metal rings from the party supply store.
For lasercut I have been using PVC but I don’t absolutely love it.
I’m just saw this last week, though, and I will try it out on my next slide.
It presents the same challenge, though… will it hold. Scouts (and leaders) tend to grab on by the front and not the ring. I’ve pulled a large number of slides apart just trying to get them on and straight - because hot glue and milk-carton plastic don’t bond well. E6000 doesn’t keep the PVC down every time.
It’s my biggest problem.
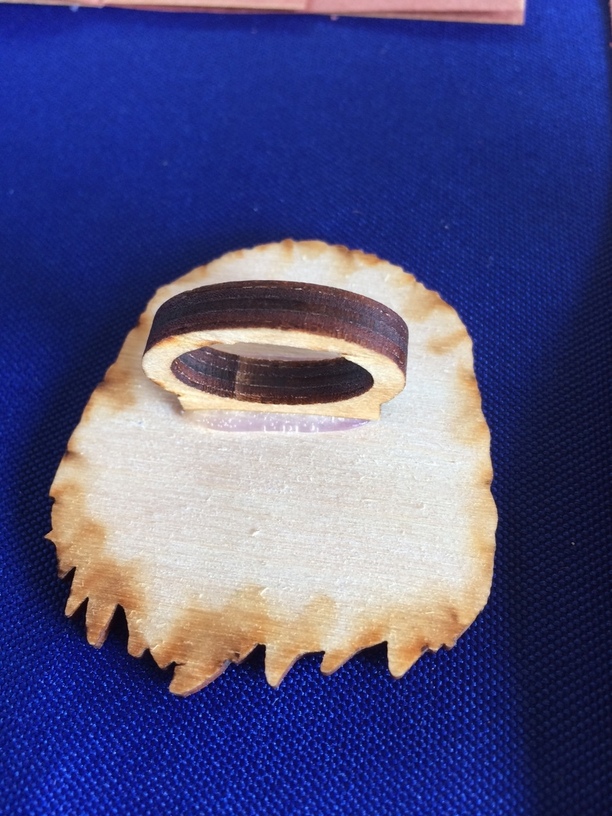
Still… this back I’m planning to try is really almost attractive where a slice of PVC is undeniably ugly. If you try it out, let me know what your results are. It’s two layers of 1/8" ply glued together and then glued to the front. (in this case with hot glue… making me question the strength of wood glue or question the aesthetics of the maker.)
1 Like
Thx for the quick response. Feeling a little stupid. Didn’t even occur to me to cut out rings of wood! Duh! I have some 1/4" in the shop, rather than glue two pieces of 1/8" together. I was thinking that it might need to be thicker than that, but maybe not. I’ll let you know!
I hope your day camp goes fantastically.
I have made a hundred slides before I saw that, and I didn’t think to make a ring myself, either. I was feeling pretty stupid when I saw it, too.
I have a basic, and 1/4" ply is tough for me to get consistent cuts through, so I prefer doubling my 1/8" when it’s called for, same as this maker did.
I’d modify the design, though and get all the surface area that is reasonable. like this:

If you like it, it’s yours. If you hate it, make one that you like.
4 Likes
Ooh, I do like it. Much more surface area, and I think wood glue would work better with this design than hot glue. Although I’ll have to sand off the proofgrade finish a little before glueing so that it’s wood to wood. Thx again!
2 Likes
Project complete! I used your design but stretched it about 3/16" taller to make the hole a little bigger. Wife’s happy. Hope the boys like it!! Thx again for your help. IMG_20180820_132649033|375x500
1 Like
They’ll enjoy them!