So…
Is this amount of offset normal?
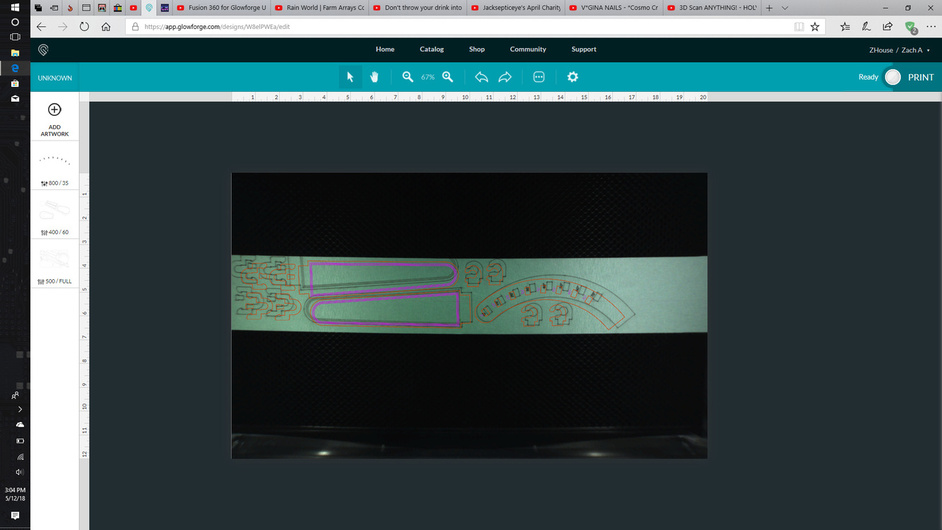
I should add that it’s hardwood measured and height put in.
on a side note on full power it did not cut out after 5 passes at Full Power setting last two where at slowest speed “100 or 150” how many passes for .25" leopard wood, a hardwood at full power min speed should be needed.
1 Like
Before cutting, turn off the Glowforge push the gantry back to make sure it is parallel, and turn back on. this will reset the zero point and be more accurate. it is always a bit off and in a big piece off by the same amount in opposite directions but if off at the center of the screen, Rebooting the Glowforge should put it back to as good as it gets.
1 Like
Yes, unfortunately right now that amount of variance is within spec. 
Hate to see it happen on an expensive piece of exotic though.
Just a suggestion for a method that might save you some material while we wait for Glowforge to finish tweaking the placement…
Check to see where the edge cuts are going to actually fall by setting them to Score first with a very low power (1 or 2%) and highest speed, so that the masking is just marked. Then you can catch problems like that before cutting in the wrong place. If it marks off of the material, you can shift the final cuts down a little before actually cutting it out.
2 Likes
ya i had done that before with aligning copper to etch the mask off of before chemical etching but thought that placing it that close to under the camera it would not be THAT far off. I’m more upset that i could not get it to cut the parts fully but wanted to get input on the alignment.
Infact a low power run is how I’m going to try to get it aligned enough to try finishing the cut as right now it a $20 chunk of fire wood and would like to get what i can out of it.
Since it’s firewood, try cutting it again with three or four different colored lines aligned perfectly on top of each other. The different colors will make separate operations, and for each successive cut, tell the interface the board height is lower. That might focus the beam down in the cutline, and make progress through the board with each pass. Then again it may not work at all, but as long as it doesn’t catch fire it should be quick and easy to try, and who knows, it just might work!
1 Like
hmm… I have another board not as pretty but I think I may do that full power two passes and 3 layers stacked with lower heights. At worst would keep me from running multiple individual cuts like i had done on my first try.
But I’m hoping to recover it. If need be and I cant get it lined back up i will just enlarge it and cut it out and sand the extra off.
1 Like
Also start with clean lenses. Mine stops cutting through if I forget that step for too long.
I was real sick for a bit and was out of town for most of the time I’ve had my GF, this lamp is the only thing besides 2 etchings of tape off of copper so I would hope that It would not need cleaning that often as I have cut the entire lamp out of draft PG, the 2 copper tags and the attempt at cutting the hardwood for accent bits for the lamp as I think it will go well with the black vinyl I will use to cover the PG draft board. I can’t find any info on settings for leopard wood but I did see some one say that for 1/4" padauk they use 120/full pro/1 pass and padauk is a wood with similar density so I don’t know how much the extra 5w the pro has helps for this but I would have thought that 3 passes at 100/full would be more than enough to make up for the extra 5w.
I don’t have empirical evidence for this but when cutting an exceptionally hard, or thick, piece of wood that will require multiple passes, I feel (from what I’ve seen) that char is definitely an enemy to the laser. If you’re getting to the point where char is developing, you’re going to have trouble with any subsequent passes.
I don’t see any details on how you set up your passes as far as focal height… the Proofgrade settings set the focus height below the surface - not at the actual surface. I think for the thick materials, they are all set at .208" focal height, which is below the surface.
Personally, I would probably test this by making a small cut that crosses from the inside of the material to the outside edge, that way you can see on the edge how deep your pass is actually getting. And, I would start from the inside so that the pierce is actually made before it gets to the edge. If you cut from the outside in, it’s going to have to try to pierce the wood when it reaches the edge and you won’t get accurate results.
2 Likes
hmm… that’s an interesting thought on the char. I did see where some one said something along the line of using faster cuts with more passes was faster “and better looking” than fewer passes with slower speed and this kinda plays into the char hurting cutting ability idea.
I’m sorry you ran into trouble. Thanks everyone for the help! Since this problem is being seen on materials that were purchased from another company, we can’t offer support for prints that don’t come out as expected. I’m going to move it to Beyond the Manual so other folks here can continue to help. Should this happen with a print on Proofgrade materials, please open a new ticket in Problems and Support and we’ll help you right away!
The stated issue was about alignment. If you wanted to address the actual issue you could ask for a test on ![]() material.
material.
2 Likes
How flat was that piece of wood?
I ask because the offset between the overlay and the actual changes quite a bit within one piece of the design, like it’s crowned quite a bit in the center.
Ok. It is just as bad using PG but I only thought about getting a screen shot this time. I will post again next time I use PG.
super flat, using a strait edge there was light between the grain but that’s it.
Further to what others have said, I stick in some draft quality scores at the four corners of my piece of wood. I set them as the first operation and set the cuts / engraves to ignore. Run the edge markers as the first operation (normally takes 10 seconds), and adjust your actual cuts / scores based on the position of the markers. It’s quick and dirty but it stops me from now running over the edges.
1 Like
Leopardwood is fairly high on the janka scale. Some of the denser woods won’t be cut, now matter how many passes if you have a thicker piece.
As to alignment, something that wide in the bed might be a bit hard to use the camera. If I am going for perfect accuracy, I always use a jig. Easier to cut a piece of cardboard than anthing else.