Have you tried The Ring Lord? I’ve gotten decent results with his stuff and cheaper than Amazon.
2 Likes
No…I’ll take a look next time I’m thinking in aluminum terms. Thank you. 
Looking and seriously considering an order.
1 Like
That’s where I got mine. I ordered a close out variety pack of different colors. All were in good shape, but a few colors were slightly different sized than the bulk of them. Still a great value and engraved well. I was very satisfied. Just placed an order with them for a few different shapes.
1 Like
Just a thought re special shapes in anodized aluminum.
Some time in the near future I shall be needing smallish (10’s/100) quantities of anodized aluminum blanks for experiments with inlay work, cut to odd shapes - think tapering ellipse.
Anyone with suitable kit to laser cut blanks for me ?
@bill_laba So on these Batman tags, the original coating was black and you etched all the way off the curved edges?
Yes, I inverted the Batman image (the bat was “cut out” of a black background) and engraved with a slight overlap of the tag shape to make sure it etched to the edge.
For alignment, my graphic was put together in 3 different colors and I fired the laser 3 times. The graphics were stacked on top of each other in the graphics program. They didn’t look pretty if the program.
-
An outline cut of the tag shape in color 1. I cut just this color out of card stock that was secured to the laser bed.
-
I placed the tag in the cut out, turned off the outline cut and turned on color 2 to engrave the front.
-
I flipped the tag and turned off the front graphic color and turned on the back color for perfect alighnment without fussing with placing the image each time.
Edit: If you are engraving out to the edge, like the Batman logo, engrave the other side first. The recommended overlap for the Batman logo engrave will mess up the placement template.
5 Likes
Can you share where you sourced those blanks, more specifically (like the Amazon link would be super awesome)? I need to make some exclusive membership cards and want to use aluminum cards like that. There are a lot of options so if you found one that works well I’d love to know!
1 Like
Sure…
Also, there are a couple other sources that op’s have mentioned in this thread. These cards from Amazon are really beautiful, though…it’s the one pictured in my post above.
4 Likes
“Halloween is just the beginning.” I like the sound of that!
2 Likes
What are the settings?
2 Likes
I posted my settings in Beyond the Manual. They prefer us to do that when we’re using other than proof grade stuff. There may be some posted by others, too.
1 Like
I tried looking for it, but couldn’t find it, can you link here?
1 Like
Appears I lied…sorry!  I couldn’t find it either! I just now added the settings at the very bottom of my post. I’ve used the same settings on any anodized aluminum I’ve done. They work consistently well and the outcome has been mostly very good, depending on the quality of the material
4 Likes
Thank you. I’m curious, would I have to set the height of the object I want to engrave?
1 Like
Yes. And if the material is somewhat lightweight, you may need to anchor it to make sure it doesn’t move when the fan is running.
1 Like
@Xabbess Thanks again! So on the GF setting for material, what should I choose? I don’t see an option for aluminum, just wood and acrylic. Does that matter? I’m worried it will engrave down really thick, when I just want to “scratch” the surface of alumninum. I selected veneer because it’s thin, but not sure.
1 Like
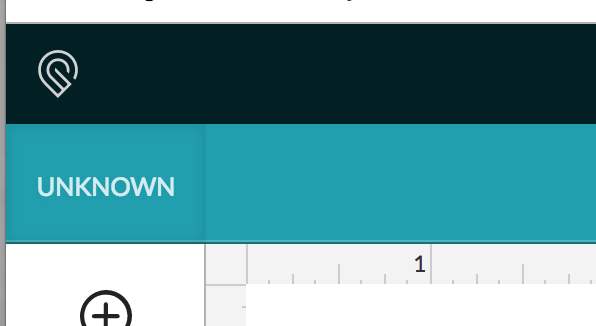
You’re most welcome. Anytime you use a non-proofgrade material, you must enter settings manually, beginning with this; click on the word ‘unknown’
Then you will see this;
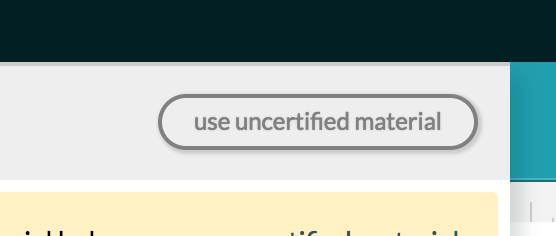
click on ‘use uncertified material’…
then you will see this;

You then enter the thickness of your material and click on SUBMIT, then down the left side, enter the settings that I gave to you for speed, power, and LPI.
You should be ready to go! Post back and let me know how it worked for you, please.
6 Likes
Thank you, thank you, thank you!
1 Like
