My Glowforge has been pretty “good” at cutting inconsistently. I’ll have my settings saved and they’ve worked a bunch of times before but at one point it’ll no longer work. For example, i was cutting
¼ mdf
Speed: 220
Full power
.15in
3 passes.
Made a bunch of cuts but on my last cut, it cut everything good but one whole side, it wasn’t cut all the way through.
Also, when I was cutting some semi smaller things, I was cutting one of the sample pieces of plywood I got when I ordered my machine (the super dark one, maybe walnut??) and because I knew my GF was having issues with passes and cuts, I went up to 4 passes. I used the same settings as listed above including “medium walnut hardwood” and it still wouldn’t cut all the way through, it was tough to get my cuts out and broke most of them.
I never know what my GF is gonna do until after it’s made the cut and it either did or didn’t turn out.
Does it need a cleaning? What can I do to help resolve this problem? I’m so clueless lol.
I am very curious about how you arrived at the settings you are using. Did you do tests that showed these were the best options for you? The reason I ask is that I very, very rarely use two passes on anything, and I have never used three. On a pro, the settings for thick draftboard call for speed 132, so I am wondering how you came up with a speed of 220. Also, why would you set the focus height at .15 if you are using material that is .25"? The Glowforge is a very predictable machine, but material is variable. Finally, if you cut lots of mdf you need to clean the machine very often.
Cleaning the lens is reasonable, especially as you can double-check that it is in right-side-up and not upside down. Saved settings not being consistent on non-proofgrade material is consistent. Most materials are designed for mechanical cutting and therefore don’t have the internal consistency necessary for good, repeatable laser cutting. MDF, however, should be a consistent material.
You state your walnut proofgrade is not cutting with the proofgrade settings. Assuming the material is laying flat (not warped), you need to cut a gift of good measure using it and contact support by emailing them or opening a new thread in the support part of the forum. They diagnose issues using proofgrade, and if the one material guaranteed to just work isn’t working your other issues aren’t surprising.
I’m actually pretty new to the whole laser cutting thing. I’ve had mine for a few monthsk (since may) so when I would first do cuts on just the most basic settings they weren’t really work so I’d try and youtube + read online, fb groups etc. about what settings to use and to be honest, what I ended up with just worked so I went with it and didn’t really try any other settings until they didn’t work.
On another forum someone reccomend typing in 4-5 passes which was new to me, I thought you could only do 3.
Is there a link or some sort of learning place you’d reccomend me going to help me learn which settings are best for cutting?
First and foremost, Facebook is not a good place to get accurate information. This forum will help you so much more.
Did you do the first three prints as recommended by Glowforge? Do you understand how to view the Proofgrade setting in the interface as a starting point for settings? Have you read through this information: Make Your First Prints – Glowforge
Within this section is information regarding manual settings (settings you choose rather than those that are automatic for Proofgrade material) Working With Manual Mode – Glowforge
Thank you for providing those helpful links! Usually my brain processes information better when I have somewhat of an understanding of the topic I’m learning about.
When I read “about” the GF before I got it, my brain never absorbed anything because I couldn’t see with my own eyes (aside from youtube videos) what they were talking about. Going back now after I’m more familiar with my machine, it makes so much more sense. I’m actually excited to take it back to the basics and make a bunch of sample cuts
I’m so thankful for the time you spent to help me. I’m sure I’ll be back.
Have a good day!
I was using the proof grade material when I noticed the cuts were really inconsistent but after reading more information about different settings, I’m going to give it another try and hopefully get some better results. If not, I’ll definitely head over to a different section of forums.
Thank you for your help!
The Glowforge is a great tool, but you need to understand how it works or it can be really frustrating. I have a feeling you are going to be having a lot more fun now that you are mastering some of the elements of the interface. Good luck.
Thank you, I sure hope so. I’ve made a good amount of cuts and after reading more about settings, I’m kind of surprised they’ve turned out as good as they have considering. But other times, I mean it would make sense. Kind of. Lol
But I’ve been reading all over the forum and I’m seeing people use close to the same settings as me and other people reccomending 3-4 sometimes more passes.
I know you said the forums would be the best place to learn and I don’t fault you for every single thing every person has said but I guess I’m kind of back to square one with settings. I’m not self taught so I don’t do that great reading a book and understanding it. I’ve come to realize that I learn from simple teachings methods and seeing examples for my specific needs. Like settings to cut ¼ mdf board. Something along those lines because I know mdf can be a bit inconsistent depending on where you got it from.
I feel like you fed the stray dog by responding to my message so now I’m just going to keep coming back to you for help.
The purpose of this forum is to share information and help one another. It has been adding to its knowledge base for nearly 6 years - which is longer than the actual Glowforge product has existed. It began during the presale and before Glowforges were manufactured. I tell you this only because whatever you are feeling, many of us have also felt. We didn’t know for sure what we were buying until we got our hands on it and started creating. As we expand our experience, we share it so that others can benefit from our successes and failures.
Here is a great resource if you want more reading, and by all means keep coming back to the forum. Common problems/questions
Your help and patience has been greatly appreciated.
I didn’t check the date but it would make sense that it could have been a while ago.
So made a few cuts this am and up in the left hand side where you add your material, I clicked on “thick draftboard.” It set the settings to 132 for speed and full for power. I made a cut using 95, 90, 85 and 80 (cuts made on GF sample products. All cuts were made good except the 80 power and all was made using 1 pass.
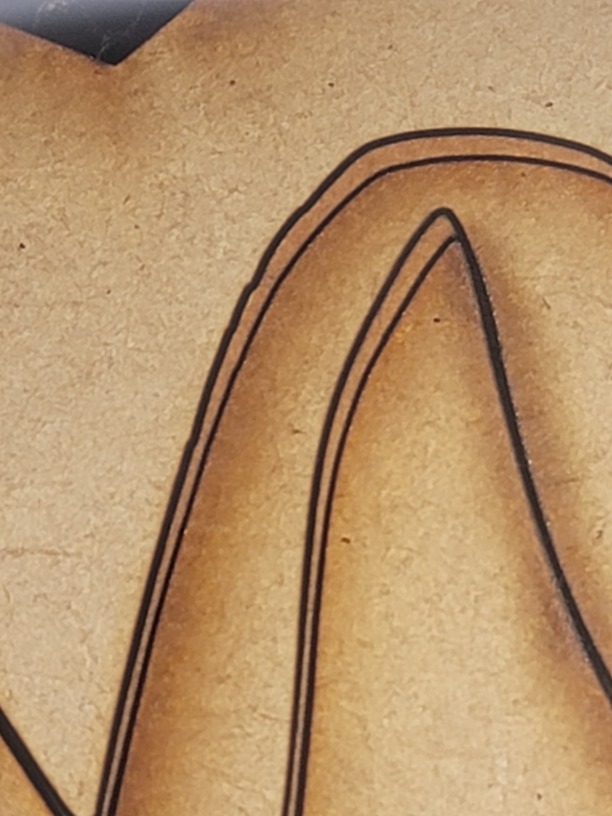
I put the ¼ MDF board in from homedepot since that’s where I’ve been getting my wood from and I used the same “thick draftboard” option, 130 for speed and “full” for power because when I tried sample pieces of that, anything less than “full” wasn’t cutting all the way through and anything more for the speed seemed to not be working either. Some of my edges turned out jagged which isn’t a problem I’ve ever had before. Would this be a focus problem? I left it on auto trying to make less changes than I have been. I took a pic and I hope it uploads so it can be seen. If it shows up, don’t mind the second cut, it’s a sample cut so it was whatev to me that it overlapped but the jagged part is what’s throwing me off.
The jagged cut is not normal behavior. It means there was something causing the printhead to not move smoothly around the bed. You should closely inspect the wheels on the printhead carriage and look for a bit of debris or tape or something in the belts.
You don’t have to take the carriage off to inspect the wheels, and you can look at the belts by turning the machine off and gently sliding the laser arm forward and back.
Seems like it did the trick. When I push the header to the left, it seemed to go smoothly but when I pushed it to the right, it seemed to need a bit more pressure.
However, when I made the cut again, (¼ mdf from HD) same settings as the last few ones (thick draftboard, auto focus, 132 speed and full power) it wouldn’t cut one of my letters out all the way.
If almost everything cuts except a small area, it could be that the board is slightly warped. If there is even a slight warpage, the laser is out of focus in that spot and might not cut. If you haven’t already cut them, you should cut some honeycomb hold down pins to secure your material securely and flatly to the honeycomb tray. Honeycomb bed holdown pins
Slowing the speed slightly (like maybe 10 less) would probably also help in the short run.