Here’s an example of why it’s worthwhile to pursue Affinity Designer…
Two notebooks ago (pre-Glowforge), I spent time with Inkscape to see how suitable it was for a post-Adobe (Illustrator) workflow. Text-on-a-path is a critical must-master tool for any (vector) illustration program. Inkscape’s implementation was just downright crude after a decade+ playing in Adobe Illustrator and Macromedia Freehand before that. Granted I must’ve been tinkering with version 0.9x at the time where Inkscape wasn’t out of it’s beta yet… Along with other idiosyncrasies, I couldn’t NOPE my way out of Inkscape fast enough. Right now having Googled a tutorial of how it’s being done in 2020, it’s STILL maddeningly primitive.
For anyone who’s watched a quickie tutorial on how Affinity Designer does text-on-a-(complex)-path, I can’t imagine wanting to devolve back to Inkscape’s implementation.
Using the new CONTOUR TOOL in Affinity Designer, I create a more difficult path. Glowforgers NEED to play with this tool way more as it can generate some amazing geometry or happy accidents. Here’s a queued up tutorial: (start at 3:35)
")
Once you get the desired geometry, have Contour Tool BAKE the shape, then do a LAYER > EXPAND STROKE if you want two perfectly offset paths. Select the TEXT tool, hover directly over the path and click to lay in text… none of Inkscape’s additional select & apply steps needed. The text path control shines at THIS point because Affinity Designer (and other high-end apps) will provide triangle handles to let that text slide along that path in real-time. It’s a text-path party train!
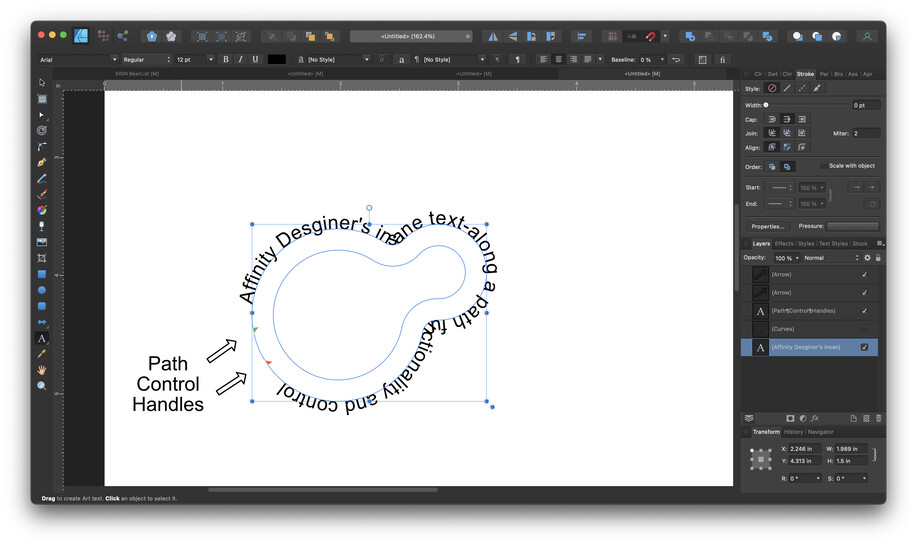
Looking up “Text Path” in Designer’s Help section will bring up all the ways to manipulate the handles including how to get the text to flip to the inside of the path.
Not happy with the font face, size, or spacing? Just click the path using the basic selection tool (V) and pull down the font listing (top left). All the text inside that selection updates in REAL TIME as you hover over each font name. Much of Affinity’s tools show you the results in real time like this as opposed to making a change in a dialog box and hitting the Apply button.
Clear example of how a “free” program (Inkscape) can sap away my time repeatedly clicking & adjusting something that SHOULD offer more control and real-time live results. I can understand not hemorrhaging ~$600/year to have Adobe anoint me with Illustrator, but when it comes to Inkscape or Designer? I’ll put up with a few instant Ramen lunches to go with the latter. ![]()
Beyond this, the fact that Designer is also available for the iPad shouldn’t be overlooked. The ability to create organic vector shapes using an Apple Pencil can quickly elevate artwork beyond what a mouse-only workflow can provide. Because the same program spans across different hardware and OS bases, it shouldn’t be difficult to imagine the ways the strengths of each platform can be used to contribute to the same project.