I had a bit of a neat thought and I was wondering what some of the folks here might think.
I was looking at doing some hex scales on my 3D printer: http://www.thingiverse.com/thing:255924
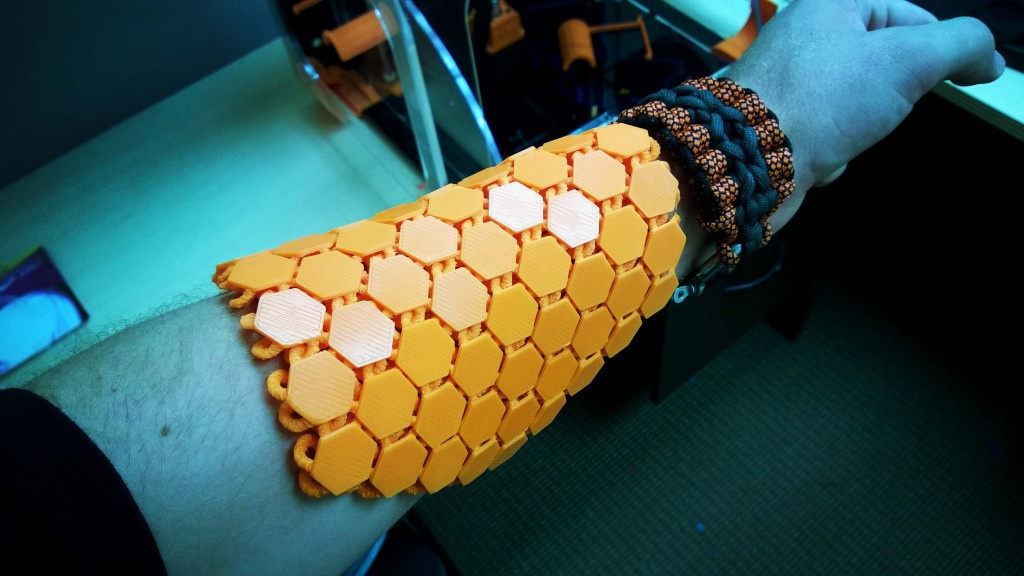
I’ve made myself a metal scalemail shirt in the past and when I saw the following image I thought it would be cool to reproduce it using hex scales.
I started reading the comments on the project and it looks like a lot of the problems people are having is with how fragile it could be after being printed.
I was thinking “you know what. I’ve got a laser coming in a few months. I bet hard wood and acrylic would be a lot sturdier than extruded plastic.”
Now here comes the question of the thread. How? There are a lot of smart people here and I thought this could be something cool to share in the design of. I figured given enough design know how and trial and error we could come up with a way to create a single hex tile that when fully lasered (either single side or two side engrave) could be linked to another, and so on and so on until you’ve formed a full sheet.
As a side question. What inspiration, if any, do you folks plan on taking from existing 3D printer designs? I know I’ve designed a few board game tiles I’d love to use the 3d engrave functions of the Glowforge to reproduce
More and more I see cnc, 3d printing and laser cutting as just different facets of the same paradigm. STL files are STL files, design work is design work. The more options you have the better you can choose the best way to make your thing.
If you want it to be flexible enough to wear, just laser a small hole in the center of each edge and use jump rings. We likely can’t go deep enough with the laser to get anything that will hook together with any flexibility. (It would break under stress).
(Or you could sew them together with heavy fishing line.)
I’ve re-worked a couple of my old 3D designs for laser. Mostly just making new stuff as I go though.
The big difference between laser and printer is subtractive and additive. The hex-mail works because of additive manufacture, letting you have links which are not rigidly attached, but are linked.
With a laser cutter, you cannot really pull off the same feat. You could get kinda halfway there if you did some dogbone trickery, but one miscalculation and your suit falls apart.
I think to do hexmail on a laser cutter, you really have to cut the hex tiles, and then use twine or something else to link them together.
Maybe you could do hex under hex, with an offset. Then connect top layer to bottom layer with something laser made. But that would mean the connections are all poking through the bottom layer, and into the wearer. Not a comfortable prospect.
I was thinking that would be where the whole thing would fall down yes,
Right now my idea is to design it in two parts. First part being the hex that is shown on top and then the second part being something that gets glued underneath that will help with the linking. Something similar to Japanese 6 in 1 chainmail. (a quick google search brings up lots of good images)
The trick , if I’m going that route is to reduce the amount of ‘connection’ space between each hex. I think something like this would look a lot better if the hexes were closer together.
The 6 in one looks the most promising. But only because I cannot think of any way to fasten to a second layer which is rigid enough to stay connected, but flexible enough to permit flex.
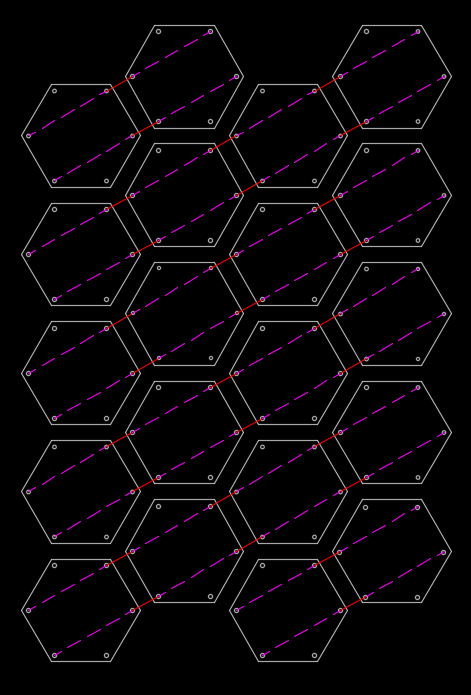
Making holes in the hexes for linking is easy. Tying the twine or whatever you use to link would be a nuisance. Maybe instead of one loop for one join, you can weave all the way across the segment of “fabric”. Then you only tie off at the end points.
Something like this? Red solid lines on top pink dashed behind, tie at the ends, run the same patter of threading along the other symmetries and boom, flexes like fabric, looks like scales.
I like this approach! I would think there would need to be some sort of tool/spacer lasered to make sure the gaps are the right distance apart. Place the tool, stitch, remove the tool and then your hex is in the right spot
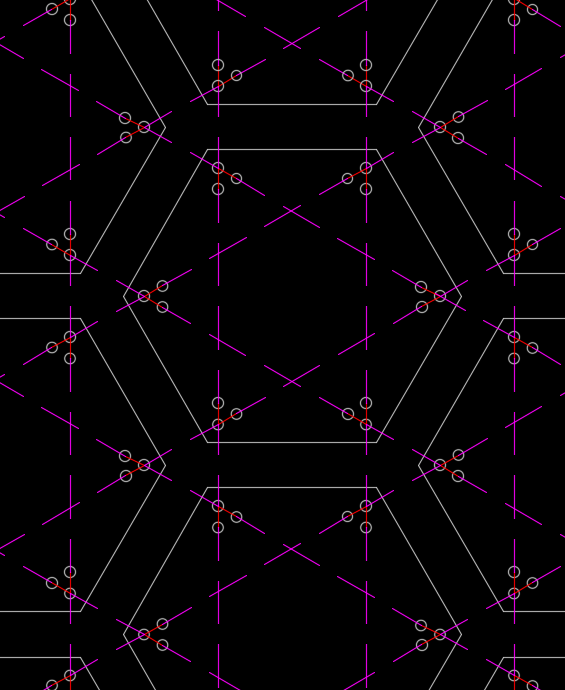
A spacer would help, and I was also thinking if you did three holes instead of one per corner you’d be able to tie the thread in a knot around the little bridge between (if that makes sense, I can see it in my head which doesn’t mean that I’m explaining it well) and that would keep them from sliding closer together on the thread. It gets a little messy but it would look something like this
The 3 holes is a neat concept! The first thing it reminds me of is button holes. I bet if you took a set of hexes cut like that and then used a spacer you could sew each corner like you would a button onto a cloth backing. I think it would be pretty sturdy!
laser-cut your mosaic pattern, leaving some small amount of connecting material between the tiles in order to retain spacing
glue or melt a flexible backing material with suitable connecting grid structure onto the back of your laser-cut pattern
after setting together and suitably strong, break the connecting material between your tiles to loosen their individual rigidity.
Edit: The benefit of using a backing structure is that if you have one tile that starts to break away (becomes unglued, or perhaps a connecting thread gets cut), you still have structural support from the backing material to hold the other tiles in place. If you only use string to connect individual tiles - and one breaks - you could put more stress or forces on the other tiles to prevent further breakage.
That is a great idea! I think there would be a little waste of whatever material I’m using to cut the hexes because they are pre-spaced but gluing a whole sheet to something like a flexible/strechy fabric and then breaking the support/connectors would allow it to sit nice, be spaced right and move with the actual fabric.
“PVC coating makes the material waterproof and resistant to dirt, mildew, oil, salt, chemicals and UV rays and gives the material added strength and durability”, and that
“it can be sewn or heat sealed by way of … hot-air welding”
The problem being, of course, good luck getting any MSDS on it.
Ha! Probably not much of a market for anti-slip mat colours that sit underneath rugs.
If you want to paint PVC, you need to use plastics-loving paint. PVC is basically so smooth that general types of paints can’t adhere to it, and even if you manage to do it, they’ll chip off easily. Good thing there’s Krylon® Fusion for Plastic®!
Occurs to me that you could cut out the whole sheet leaving each tile attached, glue it to some laser safe flexible sheet, and then position back in the laser and cut the connectors.
If fragility is the issue then people are using the wrong plastic. People don’t use the wide array of plastics to their best advantage. For that I’d try nylon 910 due to its extreme toughness and intra molecular hydrogen bonding making it have extreme intra layer adhesion. I’ve towed cars with nylon 3D printed parts that aren’t very thick.