Introducing Snapmark (September 2018)

@bonny Any ideas of what might be going on? I’d love to get this figured out!

Hi lizz, I’ll take a look and get back to you.

If you ran the design as a cut and went all the way through then the design would be on both sides and as it does not seem to enclose an area it should be readable on both sides though mirrored on the other side.

I do not have Snapmarks, or at the moment even a Glowforge, but I would like for others to experiment (or @dan to make it work) and have it possible to work when I finally get there.

I tried this just yesterday, in fact. It worked to a degree. I was unable to get exact snap and it was off by about 1/16 of an inch. ( looked off in the preview too) I plan to continue to experiment. It certainly should work in theory.

1 Like

I used it for the first time today and I’m loving it!
It was super useful to engrave aluminium panels. Cut the panel contour out of wood and placed the panels in the cutout. Snapmark did the rest and the engraving was spot on with the openings I milled in them. Perfect for combining CNC milling with laser engraving :slight_smile:
Really pleased, please keep this feature!

2 Likes

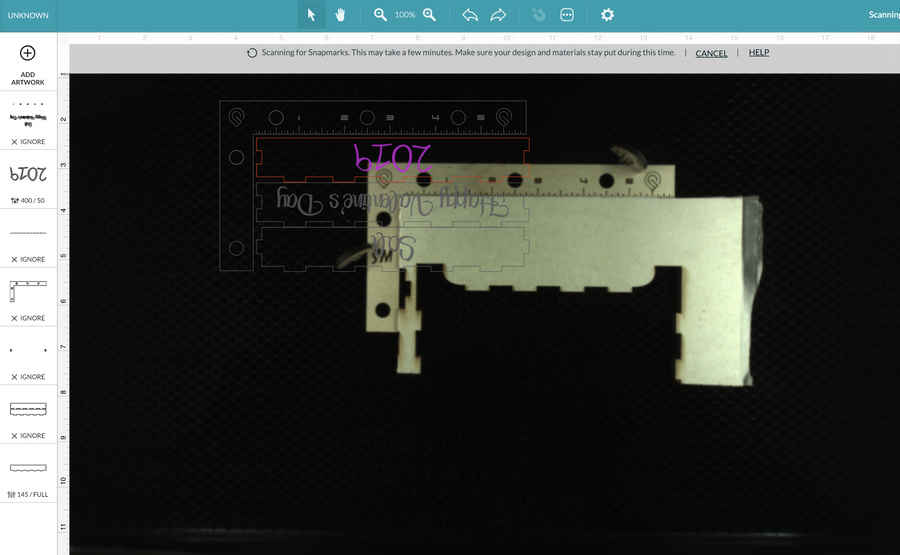
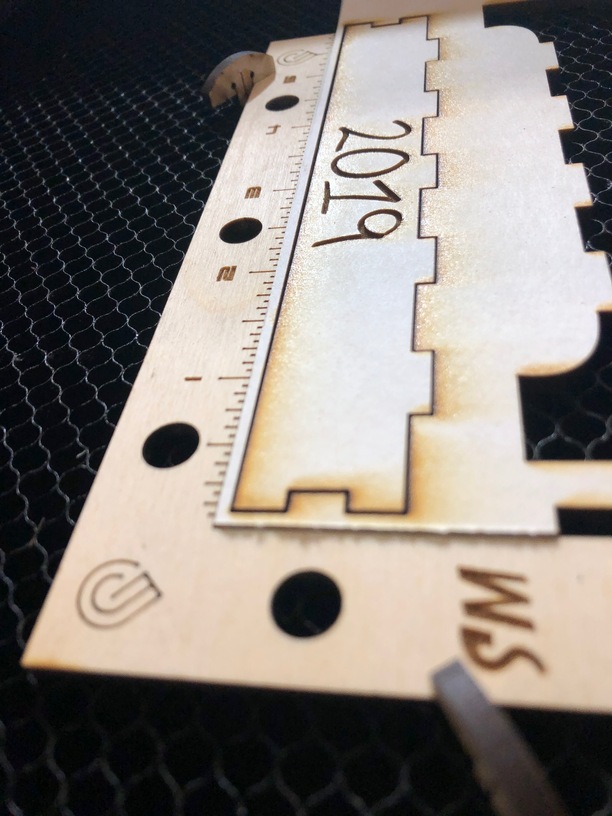
I don’t even think I’ve even posted in the forum ever, honestly I’m not much of a poster. But, I do peruse through this forum quite a bit and for Christmas, GF gave me Snapmark(s). I did the tutorial a couple weeks ago, but today I actually took the time to learn it and apply it. As you can see, just making some V Day boxes for the kid and I forgot to engrave the lid components with her name etc. I really wanted the text to fill as much of the piece as possible and was about to toss the pieces (cause there is no way to be this accurate by just engraving over this smaller size piece), when I remembered the SM tutorial and the jig I downloaded a while back thinking “this looks like it’ll be useful.” :thinking:

Anyway, I got to test out cutting a part as well.

…Due to thinking it’s still 2018 apparently (I think we all do this for the first two weeks of January). I was confident I could cut the piece I needed with this SM tool.

So - this is a feedback post to staff regarding my personal impression. Today snapmark proved to be invaluable (I’m forward thinking about all the saved material and ability to be very, very accurate). Not too complicated and a feature definetely worth having. I really hope this is something Glowforge is leaning towards keeping and completely rolling out. Thanks for letting me test it out!

I’ll also take the opportunity to thank the ideas I stole here/pictured as well. What awesome additions to the GF workflow and a very generous contribution. Hopefully I do this correctly…

Perfect Alignment Every Time - The Fiducial Alignment Ruler

Honeycomb bed holdown pins

6 Likes

Here’s my new snap mark ruler. Pretty, but apparently filling the GF logo was a bad idea, I’m not sure why.!
This is a double sided ruler for registering prints on both sides.

1 Like

I think I read in here somewhere that the Snapmark logos must be scored and not filled. I don’t know why that would make a difference either, but what do I know. :wink:

I also probably need to remove some of the tick marks around the logos.
But a second ruler I made works with the tick marks as well.

I know it’s not going to matter. I just want to vent. :smiley:

I’m currently laid up for medical reasons and have been making tons of snapmark templates for my etsy store items. I just got a replacement unit today and the snapmarks aren’t enabled yet. My etsy store is basically closed until I get the snapmarks back. Hopefully it won’t take too long for them to re-enable them. Hopefully.

2 Likes

I don’t understand why the store would be closed? Is it for passthrough or just jigs?

Jigs. I’ve got the placement down for the snapmarks. Never tried creating a jig.

Sounds like the perfect time to figure it out rather than closing your store down!

I think the easiest way is just making some crumbtray rulers, getting a 12x20” piece of chipboard, aligning the chipboard to the zero mark on the rail, and cutting your jig. Almost same principle as snapmarks. You are just using a known point of reference.

3 Likes

I’ll have to give that a shot tomorrow and see what I can figure out. Doesn’t sound too complicated. Thanks for the tip.

Hello community! Hi @bonny - My twice fortnightly cry - “May I please have some snapmarks, please?” unit TW-297 (or tvv? that font… :frowning: )…

5 Likes

@bonny, I received an email in November saying I should have Snapmarks and hadn’t really paid too much attention at the time as I was busy, but I now have some projects that it would be super useful on and I don’t have it in my UI. Have only ever had one machine.

Have been using snap marks now for a few weeks. This is the single most amazing update to the machine in the year+ I’ve had it and that doesn’t say enough. It provides a path to correcting some of the biggest frustrations I have had with my daily forgery. Not just in that it allows a process by which to work on projects requiring more engrave space than the accessible tray area, but because it provides a manner to use up scrap material efficiently! I can print to paper and then tape the paper onto the scrap whose available real estate is just hairs larger than the print I’m after. In the past I had to concoct all sorts of jig type solutions or multiple attempt speed 1000 power 1 test prints to watch the laser traverse the surface. My most routine print is a membership card for my instructor’s martial arts organization, which used to require so much more work, thought, and waste prints to accomplish. Thank you @dan and GF team! If I can make a suggestion to improve it further - is there a way for the software to disable by default the burning of the snap mark logos on prints once you have chosen to align? I fear one day I will forget to do that and end up messing up my jig (yes, I know it should theoretically just reinforce the score marks on the jig since it aligns so well, but I have been hesitant to confirm that any minor variance in alignment wouldn’t mess up the marks, and it seems like an oft used jig could eventually get burned all the way through).

4 Likes

You don’t have to burn the snapmarks after it’s been aligned. Just ignore that operation.

(Sorry, I see now you said by default)

So glad the feds aren’t monitoring this forum.

3 Likes

Or are they?

1 Like