I’m in the same boat, @cchhun. I was stumped until @bonny let me know that was the case with my machine. So I’m sitting tight and hoping they’ll get back around to my machine soon. ![]()
Nope, I have my one and only unit still. Didn’t mean to cause trouble but I got excited when I got the email.
Then if you’re still not seeing the magnet icon I think @bonny is the one who needs to know. I tagged her in this post to get her attention, so she should be dropping in soon. ![]()
Cool, thanks for the help
Very basic question, but did you cut or score the snapmarks?
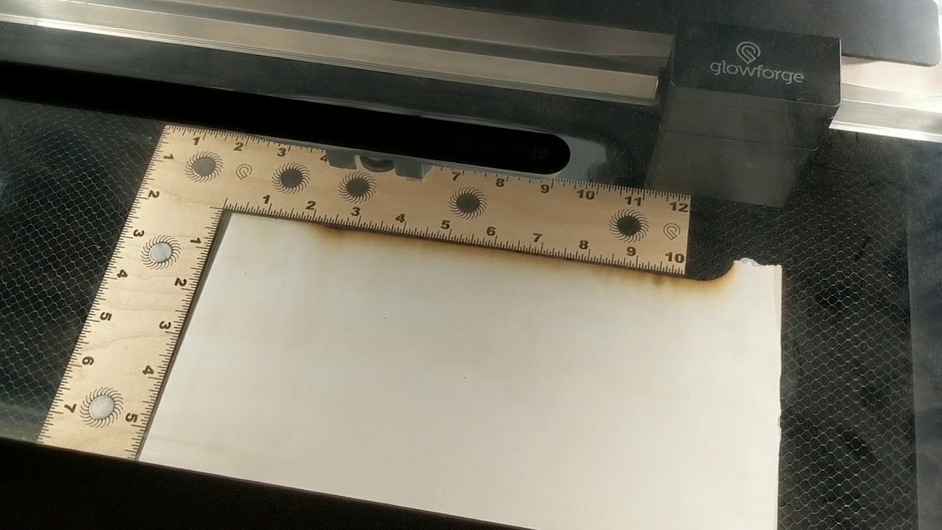
I have experienced this terrible noise too. The head seemed to find the snapmarks, then went to the left and made this terrible noise and the snapmark canceled itself. I was able unfortunately to repeat the failure several times. Tech support pointed me to this forum.
video below:
I have used the snapmark successfully before on other projects, but I have not found a fix for this. The ruler was laying on top of a 1/4 inch plywood (free snap ruler design here).
Some thoughts are maybe it is messing up because I’m telling the thickness to be 1/4 inch, but laying the ruler on top increasing the thickness and messing up the “ideal” snapmark image the machine is focusing in on. Or maybe the strong magnets are messing up the head when it passes by. Or maybe this is why it is still in beta… I dunno.
Scored the snapmarks. I eventually got the snapmarks to work. It was a resizing thing inside Inkscape.
I think you’ve hit on it. Pretty sure it needs to know the thickness of the snapmarks piece in order to be able to find them accurately.
Interesting? We use a lot of cardboard for making jigs with SM and they are always .16 but our material that we are engraving on is sometimes much thicker. We put the material tickness that we are going to laser in the GFUI and when we press the button the GF will find the SM then when it hovers over the the material that is getting zapped the red laser comes on then it starts the job.
Huh. Maybe my OCDness has been making me work too hard! Again. 
Again my plea…
Might we have the snapmarks please?
Yes, we can do things w/out snap marks, but only at a waste of lots of cardboard…
@bonny unit TVV-297…
Thanks. My first plea in 2019… may it be my last! 
I think the release is automated now… Your fate will be decided by an unsympathetic machine, analyzing punchcards of calibration data.
Email announcing we were getting snapmarks came back in November…no snapmarks?? Would love to have them.
Posting here upon advice from Jules
My husband already posted in this thread, to no staff reply (aaron.nance)
We have the same machine, tried different browsers, use the machine a lot.
Thanks!
Received email several months ago. Snapmarks were enabled on my returned machine. Put my name on the wiki that was started in this thread. @bonny, just trying another way since nothing has happened yet.
Thank you.
I was so excited to get these, but they are totally not working, and actually made my machine act crazy in general.
I’ve spent a handful of hours trying to get the pencils to work, I’ve gone over the tutorial, read various troubleshooting threads, with no luck so far.
I made the jig, put the pencils in it. Drop in the artwork and click the Snap button. It says it’s scanning for Snapmarks for several minutes, and thinks, but then nothing happens. Artwork doesn’t shift at all, nothing happens.
I figured maybe it just doesn’t look different, so I hit print. The machine then starts engraving all the way on the far right edge of the bed, off the jig and everything. It’s not even going where the artwork is placed in the GFUI. And once I do that, it now has screwy alignment for anything I try to print, it moves off to the far right edge and starts working, even though there’s nothing there to do according to the GFUI.
Have you tried just the default file that you downloaded originally?
You need to make sure the bottom of the head is clean. It uses the camera down there.
Yup. Tried all the obvious troubleshooting… it’s like Snapmarks throws the whole thing off inside. Just trying to recut the jig and it’s off by like 8"
Here’s a screenshot shows where the artwork is placed, and you can see one engraved Snapmark on the material. That’s the LEFT one. (You can also see where it started to cut the jig holes too, before I cancelled it) https://drive.google.com/file/d/1cTy39vsGsQ5UzFVZXGDMt8fgKSCf741W/view?usp=sharing
I wonder if the snapmarks are too far apart in your design? I typically put mine quite a bit closer together than that, like maybe just a bit wider than the pencil slots themselves… I hope you can get them working!
Did you start with the template the company provided?
What design program are you using? Is there a chance this is an SVG DPI issue?
Even if you’re sure things are kosher with your file, I would try running a file that someone else can vouch for–a completely finished file that you do not need to run through your design program at all, but load directly into the GF app.
If someone else’s known-good file won’t work, then you certainly have an interesting problem!

