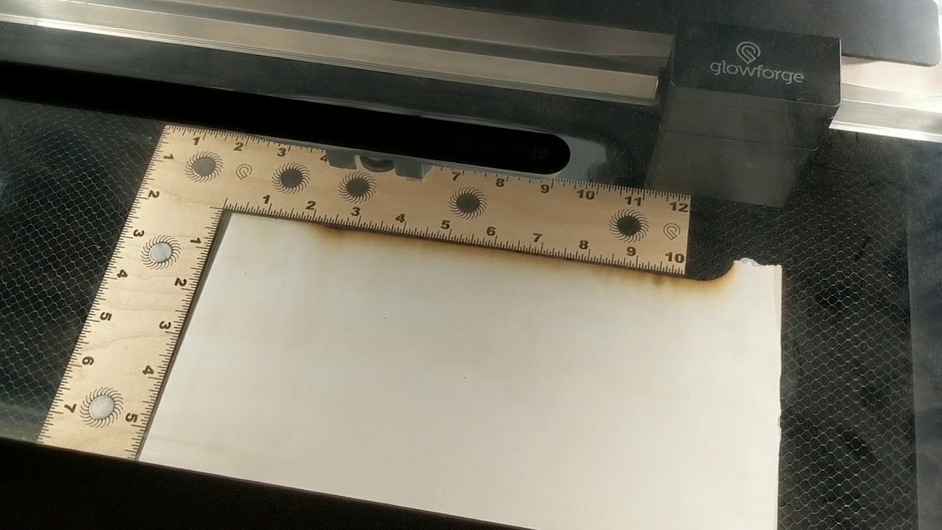
I have experienced this terrible noise too. The head seemed to find the snapmarks, then went to the left and made this terrible noise and the snapmark canceled itself. I was able unfortunately to repeat the failure several times. Tech support pointed me to this forum.
video below:
I have used the snapmark successfully before on other projects, but I have not found a fix for this. The ruler was laying on top of a 1/4 inch plywood (free snap ruler design here).
Some thoughts are maybe it is messing up because I’m telling the thickness to be 1/4 inch, but laying the ruler on top increasing the thickness and messing up the “ideal” snapmark image the machine is focusing in on. Or maybe the strong magnets are messing up the head when it passes by. Or maybe this is why it is still in beta… I dunno.
Interesting? We use a lot of cardboard for making jigs with SM and they are always .16 but our material that we are engraving on is sometimes much thicker. We put the material tickness that we are going to laser in the GFUI and when we press the button the GF will find the SM then when it hovers over the the material that is getting zapped the red laser comes on then it starts the job.
Again my plea…
Might we have the snapmarks please?
Yes, we can do things w/out snap marks, but only at a waste of lots of cardboard… @bonny unit TVV-297…
Received email several months ago. Snapmarks were enabled on my returned machine. Put my name on the wiki that was started in this thread. @bonny, just trying another way since nothing has happened yet.
I was so excited to get these, but they are totally not working, and actually made my machine act crazy in general.
I’ve spent a handful of hours trying to get the pencils to work, I’ve gone over the tutorial, read various troubleshooting threads, with no luck so far.
I made the jig, put the pencils in it. Drop in the artwork and click the Snap button. It says it’s scanning for Snapmarks for several minutes, and thinks, but then nothing happens. Artwork doesn’t shift at all, nothing happens.
I figured maybe it just doesn’t look different, so I hit print. The machine then starts engraving all the way on the far right edge of the bed, off the jig and everything. It’s not even going where the artwork is placed in the GFUI. And once I do that, it now has screwy alignment for anything I try to print, it moves off to the far right edge and starts working, even though there’s nothing there to do according to the GFUI.
Yup. Tried all the obvious troubleshooting… it’s like Snapmarks throws the whole thing off inside. Just trying to recut the jig and it’s off by like 8"
Here’s a screenshot shows where the artwork is placed, and you can see one engraved Snapmark on the material. That’s the LEFT one. (You can also see where it started to cut the jig holes too, before I cancelled it) https://drive.google.com/file/d/1cTy39vsGsQ5UzFVZXGDMt8fgKSCf741W/view?usp=sharing
I wonder if the snapmarks are too far apart in your design? I typically put mine quite a bit closer together than that, like maybe just a bit wider than the pencil slots themselves… I hope you can get them working!
Did you start with the template the company provided?
What design program are you using? Is there a chance this is an SVG DPI issue?
Even if you’re sure things are kosher with your file, I would try running a file that someone else can vouch for–a completely finished file that you do not need to run through your design program at all, but load directly into the GF app.
If someone else’s known-good file won’t work, then you certainly have an interesting problem!
First thing first, if alignment is ever off by anything like that, you need to turn the machine off and back on to recalibrate the head location. Once the head is “lost”, it won’t know where it’s at until you reboot.
So, reboot.
Second, I’d start over with the default file that is provided. Didn’t you move some things because you hadn’t accounted for the eraser? Not sure if I saw that on Facebook or not. Don’t even add anything to that file, just score the snapmarks, move the material a bit, hit the Snap icon, and score the snapmarks again.
You mentioned an engraved Snapmark? Was it actually engraved, or scored? It needs to be set up as a stroked object in the design, and it should be scored when printing the snapmark for future alignment.
After that, assuming that will work, please show us your SVG export settings from AI. Since you’er using AI I’m going to assume you have issues with your Save As (or Export) settings.
I use AI, as do a lot of others, and no issues once you get your settings right
OK, I uploaded the jig template directly to the GFUI, and it cut OK, but when I try to use the Snapmarks, it does the same thing where it moves all the way to the right edge of the bed and starts lasering.
The issue appears to be that once I hit the Snapmarks button, it throws off the alignment entirely.
It’s like scanning the Snapmarks makes the machine that that the home location is in the middle of the bed, and it orients from there. I can’t even get it to stay in the location where the artwork is placed in the GFUI, without resetting the machine and starting over.