not sure why it wont connect
What color if any is the button?
its green
Hopefully Teal? That definitely sounds like it isn’t connected to WiFi and needs to run the setup process.
You’ve opened a support ticket by posting here in Problems & Support, so it will speed things up if you can provide some actual details about what’s happening.
I am going through the exact same thing. There is a bar preventing me from doing anything stating "Ready for wifi setup ! visit app.glowforge,com/setup …I have done this at least five times … my machine is connected to my wifi .My wifi is connected … Im so lost
You need to start your own support ticket by creating a new post here in Problems & Support. They can’t support multiple customers on one ticket, for obvious reasons. 
If your button is teal then your machine is not connected to WIFI. It’s a little counter intuitive but connected to your computer isn’t the same, it’s just a step on the way. When setup is complete the GF connects directly to the wifi independently of any computer/devices and the button stops glowing.
Thank you . Today is my first day .I will keep that in mind for future . I did resolve the issue though . Not quite sure how , i just restarted everything and it was fine , Thank you again
I’m so sorry to hear that you’re running into trouble. Based on the description of the snag, I’d like to have you work through the Wi-Fi setup steps, and let us know which step is causing the behavior you’re seeing.
Could you please try the steps below and let me know which step you’re having trouble with?
-
On your computer, close any open tabs in your web browser and exit the browser completely
-
Turn your Glowforge off, and wait about 30 seconds
-
Turn your Glowforge back on (do not touch the button on top of your Glowforge for this step - only the switch on the back)
-
Wait about 30 seconds
-
Open your web browser, and navigate to setup.glowforge.com
-
You may see the following page. If so, scroll to the bottom of the page and click “Continue”
- Before moving to step 8, make sure you are on this page:
-
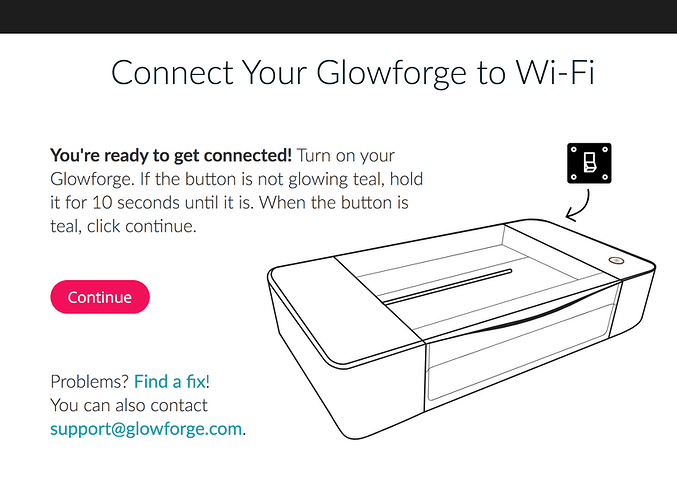
Press and hold the button on top of your Glowforge for about ten seconds, until it glows with a teal color. Then release the button.
-
In your web browser, click “Continue” to go to the next page in the setup process.
-
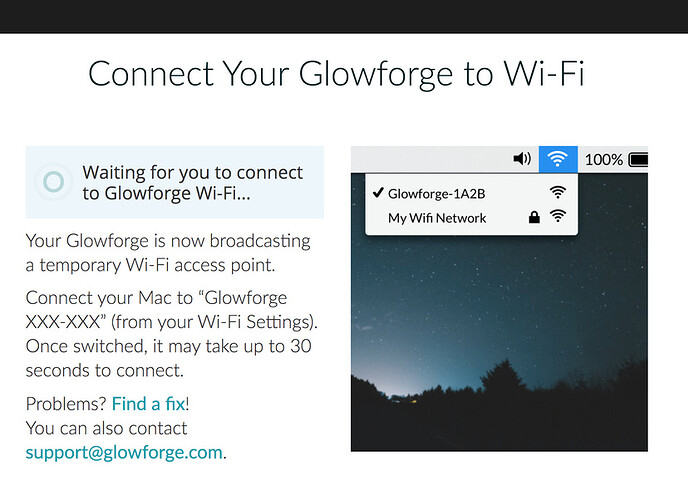
You should see this page next:
-
When you see this page, connect to the Wi-Fi network “Glowforge XXX-XXX” (from your Wi-Fi settings).
-
It may take several seconds, sometimes up to a minute, before your browser recognizes the change and loads the next page automatically. If you connect to the “Glowforge XXX-XXX” network on any page other than Glowforge - the 3D laser printer, the next page may not load and setup may not be successful.
-
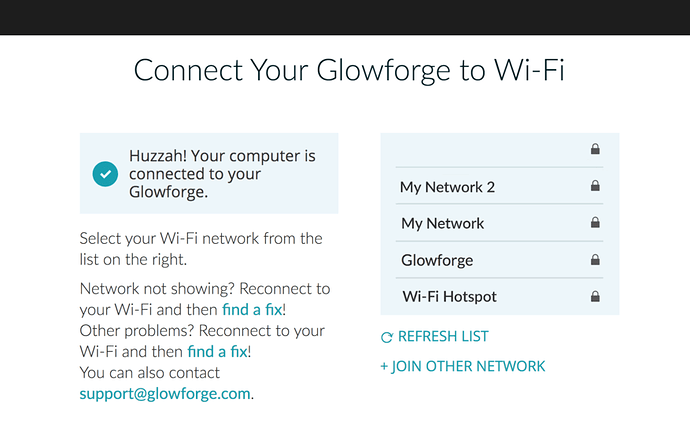
When you see the following page, stay connected to “Glowforge XXX-XXX”, and choose the Wi-Fi network you want to use from the list that appears in your browser screen:
- When you select your preferred network, you’ll be prompted to enter your password. This will disconnect you automatically from the “Glowforge XXX-XXX” network, and your Glowforge will then be associated with the Wi-Fi network of your choice. You’ll only need to go back through these steps if you want to change Wi-Fi networks, or if your network name or password changes.
Let us know how it goes!
It’s been a little while since I’ve seen any replies on this thread so I’m going to close it. If you still need help with this please either start a new thread or email support@glowforge.com.


