Jagged cut edges

I’ve been doing some prints for a client and getting a consistent result has been hit and miss. About 67% of the pieces cut on a single piece of acrylic are accurate, and the rest have some sort of flaw where the edges are not straight. Any ideas on what might be happening? Is there an alignment issue? Cutting speeds need to be adjusted? I’m at a loss and a 67% yield on a sheet is lower than I would like.

I’m using canal plastics for the most part and using either the Proofgrade equivalent settings for similar colors or slightly modified custom settings.

Settings:
Teal: 145/98
Red: PF 163/Full


Thin plastic warps, melts and rehardens in the heat of a laser. If you can…break the shapes up into different colors and let them cool a bit between passes to cut the thin shapes. (Distribute the heat. Work on opposite areas to let an area cool before proceeding.)

8 Likes

Thanks! I’ll give that a try and report back.

1 Like

Maybe also check for small bits of debris on any of your rails/belts, to rule out mechanical. Although you’d see it on wood too, if that was the cause.

1 Like

No go on breaking the shapes up. 50% of the cuts with the new design still had flaws. Maybe I need to break it up even further.

Was it better than before? It’s hard to tell how thin those arms are in the earrings…you might need to speed up the cuts and do a second pass at lower power.

How thick is the acrylic?

(Definitely a balancing act with the plastics.)

3 Likes

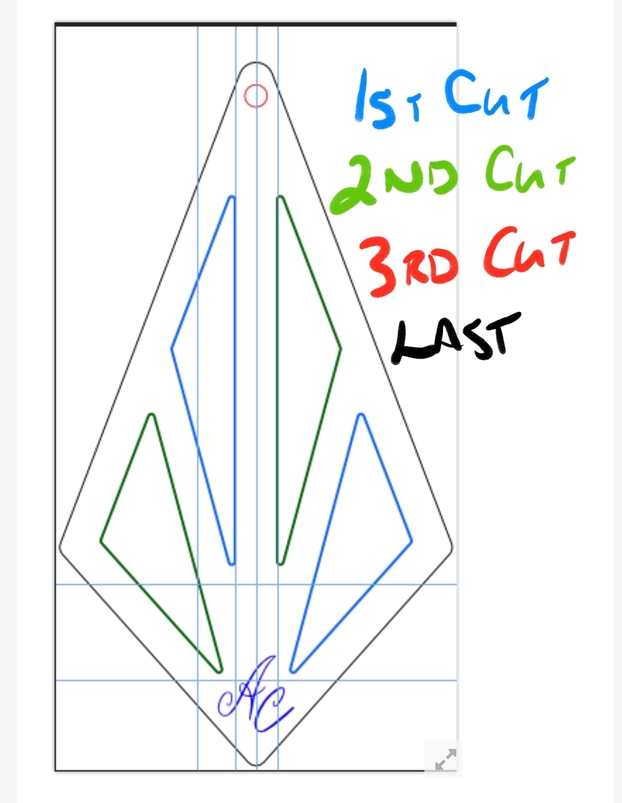
Like @Jules has said the breaking up of cut orders will help. I tend to make a lot in acrylic and I’m learning there are tricks and snags. The biggest snag is the closer a cut is to an “edge” the larger chance of a warp and misaligned cut. I noticed this a lot with the nameplates I made. The closer I placed a cut to an edge, even when held down with the crumb tray pins, had enough heat to shift it’s cut line.

I know you’ve tried Jules suggestion, and I’ve added my thoughts on cut order with the attached photo, but the next solution which is a pain and time consuming may help. You could cut some of the inner shapes, then remove them without moving your main acrylic sheet, and add hold down pins to “strengthen” the small strip of acrylic for the next cut.

6 Likes

This edge related tip is super helpful for the work I’ve been doing, glad I stumbled on it here!

1 Like

Yup! This is exactly the cut order I have laid out! For testing, i’m doing a grouping of 6 pieces, so each piece has PLENTY of time to cool between cuts, as it’s usually a minute or two before the laser swings back around to a piece for the next cut in sequence.

I’m no expert but nobody has asked whether this is cast material, vs. extruded.

The first thought I had was inconsistency in the material

This was a smaller test (6 pieces instead of 26), so hard to tell. Material is 3mm. I’m going to print out some crumb tray pins and pin the material down to see if that helps, otherwise i’ll screw around with speed/power settings a bit more.

All the material I’m using is cast (or listed as cast anyway).

I still think you may have a mechanical issue, most likely a tiny bit of debris stuck on a rail or belt somewhere, causing a tiny jiggle when it hits that spot. Have you tried cutting these in wood to see if the same thing happens?

2 Likes

After looking at @janerlea’s SUPER intricate acrylic earrings last night, with even thinner and closer together cuts than yours, all perfectly straight and even, I’m even more convinced you have a mechanical issue, most probably a tiny crumb of masking stuck on a belt, rail, or wheel somewhere in there.

3 Likes

I have cut wood and didn’t notice the issue. It’s only on acrylic as far as I can tell. Regardless, I’ll do a thorough cleaning of the glowforge and do some more testing.

This topic was automatically closed 30 days after the last reply. New replies are no longer allowed.