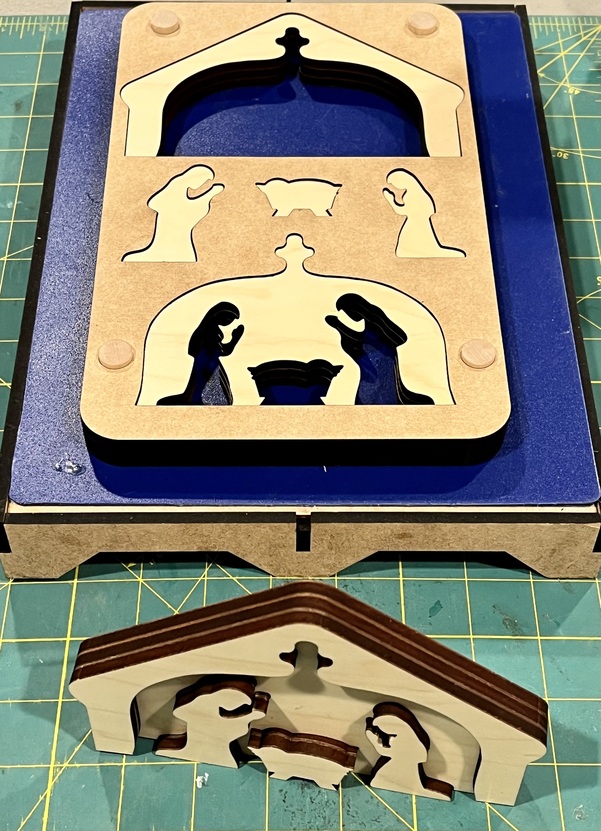
The Christmas rush came early this year with a commission to make seven bespoke nativity puzzles for an existing client. Client wanted them 3/4” or 1” thick and more detail than is feasible with a cnc, so GF to the rescue. The only problem was how to glue up three copies of the five pieces and align them so that they still slide together…
Went back to the product design, “exploded” the nested parts, added registration holes for .50” dowels, and cut three copies from thick Draftboard. Tolerances are so tight the pieces glue up perfectly. Hit any imperfections with a sanding twig and et voila— perfectly fitting Nativity puzzles.
Note the slight lip above each piece in the jig — that’s the cumulative difference in the thickness of Thick PG ply and Thick Draftboard.
Ever had a problem with glue squeeze-out? Seems like if you apply too much glue it might stick in the jig and you wouldn’t know it until you try to take it out. Are you taking any precautions against that?
The jig is up!
This is a great idea. My attempts at gluing many things together always ends up needing sanding due to the lack of a solid jig. So cool.
And great design!
Squeezeout was definitely a worry. I used Titebond Thick that sets up in <15 min, applied with a small paint brush in as thin of a layer I could manage. Any squeezeout from initial assembly was wiped off before sliding into the jig.
All pieces were removed from the jig after 15-20 minutes, checked for squeezeout, then reassembled together in the top opening. I used the cutout from that opening as a press, adding a 5-lb weight, for about an hour.
Never had pieces come out of pressing stuck together.
I’m a big fan of a gluing jig! What I do to combat glue squeeze out (or at least to prevent glued parts from sticking to the jig), is to weave a piece of release paper between the part and the jig.
I’ll try that next time. I thought about rubbing the sides with bar soap (harkening back to the balsa airplane models of my youth), but could not have treated the detailed areas that most likely to stick.
I’m using the kind of slick paper that pressure sensitive labels, or vinyl, come on. I don’t have any waxed paper. I’ve tried parchment paper but it is affected by the moisture in glue, which I see less of when using release paper.
I always save release paper for this purpose and also for holding small amounts of glue or uv resin that I’m going to apply with toothpicks.
I’m reusing scraps but you can certainly buy it. Some of my scraps are treated on both sides, some not. A search of Amazon found this, don’t know if it’s treated on both sides though: