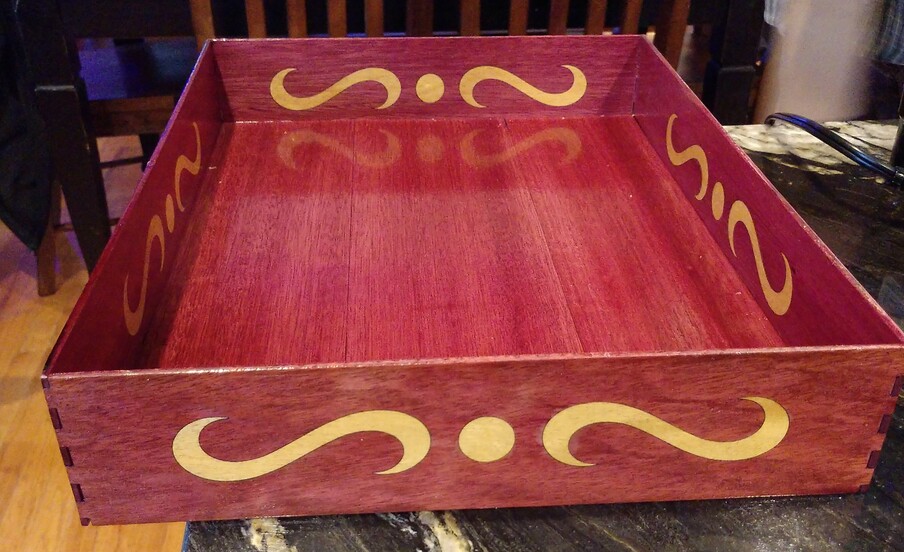
I made this for my mom for her birthday (which isn’t until May, but since my trip to see her is cancelled, I just sent it to her anyway). The funny thing about it is that I made it to go next to her chair where her medications are, and other things she needs to keep in reach because she is currently using an overturned lid of a plastic bin. So, I sent it to her, and she declares that it is much too nice to pile all her junk in it, so she’s going to put it on her dining room table. That she only walks by maybe once or twice a day. Sigh. But all is well, she was really happy with it, and I had lots of fun making it.
I did purpleheart because purple is her favorite color, and the inlay is yellowheart.
Question on technique - did you reverse the inlay to compensate for the angle of the cuts? If so, did you calculate the kerf, or “work up” to a perfect fit by testing?
Yes, to both. I actually have about five of the swirls on my desk, leftover from testing with different kerf values. And I have a piece which was just a test of the inlay that I finished. All that to say, everything I do is full of trial and error. It makes for an interesting scrap box
Yeah, it is kind of funny, I see those swirls on my desk, looking like the S-hooks that many have made and wonder if they would work for that. And to think, I was doing all that before the world changed!
Thank you, I think the finishing is my favorite part of this one. I used tung oil, and was worried as I was applying it that it would irritate my mom. She’s very sensitive to smells and man, that stuff SMELLS! But as it turned out, once it dried, no smell at all, and ended up in a mirror like finish. This is the project where I used the last mask I had (which I had purchased years ago and found in my garage-- as it turned out, it’s an N95 mask, who knew?) sanding the wood though. I guess it’ll be a while before I can find more to do other stuff with real wood.
@eflyguy, since you mentioned it, I thought maybe I should share my trials and tribulations with the kerf. All this time, after reading all the tuts, I thought that you start with somewhere between .006 and .009 for the kerf value, testing for each material. But as it turns out, I have been doing it ALL WRONG. I tested with lots of different values and they were all too small. Where I went wrong I guess, is that I was only compensating for the cut out pieces. It was never really clear in the tutorials I read that you have to adjust the surrounding cutout AND the cut out pieces by the same amount. So my kerf on this one ended up being about .016 when all was said and done because I only adjusted the cutouts. I am not sure if it makes a difference, but it is something I am going to experiment with if I ever do another inlay project.
That’s so true about the acrylic, and also, I wonder how the hummingbird thing I did for my mom would have worked if I had known what I was doing. Back then, all the pieces were really loose, but I just glued the crap out them to make them fit. It probably would have been better if I had known any of this and had time to really dial in the kerf to make it fit better. But it’s highly possible I’ll get to redo that one since I’m sure she’ll have some of them fall out at some point.
I’ve only done ‘one-sided’ kerf adjustments since day one. I understand the process now (it took me a very long time to ‘get it’), but I found it easier (for me) to just adjust one side or the other for the entire kerf. For acrylic it’s almost always .016, but occasionally I have to change it a wee bit. I’ve been very successful with acrylic press fit pieces, but wood is a bit more difficult sometimes.