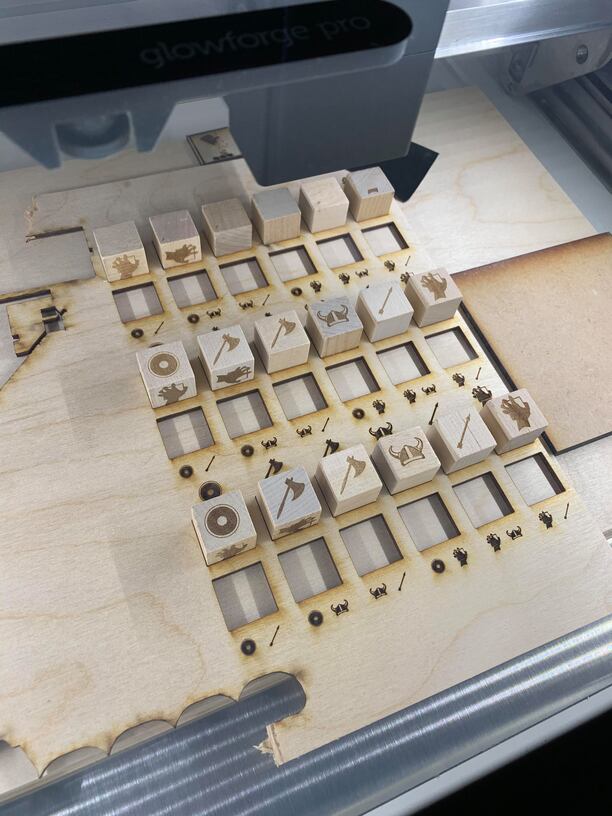
So I’m working on recreating a game using dice. I know you could probably laser cut a tiny box but i wanted something with a little weight and balance. So i found these wood dice on amazon and tried to laser engrave them.
The set up is pretty cool and i wanted to share it to spark ya’ll imagination. First i cut some scrap for the dice to sit in and labeled which markings are where (the second set of dice holes is for a different pattern). Like a conveyor belt, once a print is finished take the dice out, flip it, then place it to the next hole moving each dice over by one on a fresh face. That’s why there are six holes. With this set up i can do three sets of six dice all at once. I guess with this method you would at a minimum need to print six dice, not wanting to leave an empty hole, so keep that in mind when trying this.
The dice are too big for the focus height so i took out the crumb tray and elevated it all with some more wood and measured the new height to be within the glowforge limits. Once everything is set up it took some micro adjustments to make sure the template was in the right spot, after that i taped to down. VERY IMPORTANT, it if this thing moves im screwed.
However once everything was secured its just a matter of print, wait, flip, over and over until every face is done.
Just curious, Would you have cut the dice yourself instead of ordering them if you had the right tools? Like a table saw or miter saw? Or do you have those but there is another reason for ordering them instead of making them?
I’m curious because I’ve learned a lot about making jigs lately and I think this is an awesome idea but I’m hoping I can just make the cubes from scraps in my woodshop.
Dice are not simple cubes. They have rounded edges and vertices and they need to be pretty symmetrical in shape and weight distribution to be truly random.
If you like spending time on that kind of thing, then you can save a couple of $$ for sure.
I printed some wooden hangers using a jig of sorts, and found it frustrating how far off the camera image was from the actual print, but at least it replicates. Still, about two centimeters northwest of true takes some doing. My printer is new but does not have the snapmark feature. Nice job on the cubes and solution to the problem at hand.
I actually do own a lot of those tools and did attempt this. However my feeble human eyes could not get the square dowel i had perfectly square. Sure the dice i bought weren’t perfect but they were heck of a lot closer then i could get.
That all being said, im not the best person in my shop, still pretty new to it all. so if you have better skills it is possible. Just know i attempted quite a few times and go maybe one good square dice out of ten.
Welcome to the forum.
Wood is variable, and what people want in their engraved appearance is variable. To understand the relationship of speed/power/lpi I suggest you read this: Working With Manual Mode – Glowforge