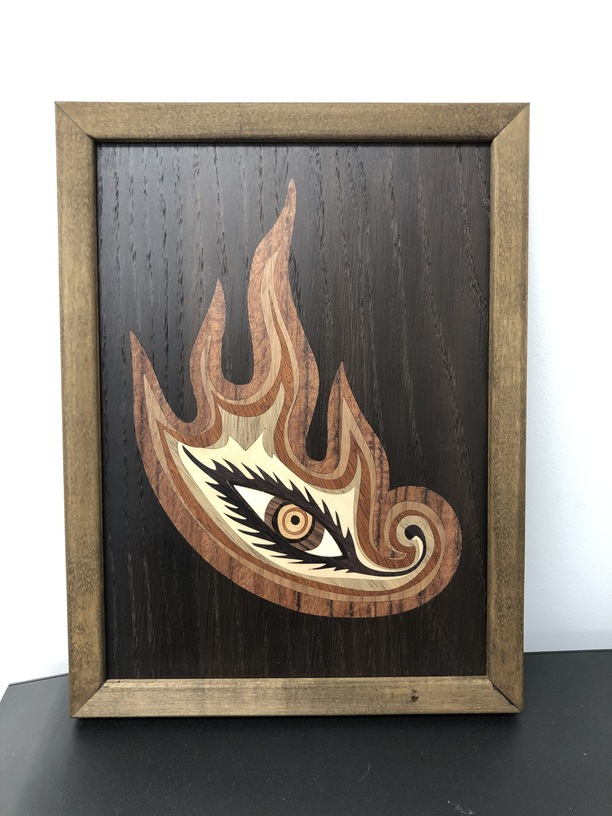
I made this with a dozen or so types of veneer (commercial sliced, about 0.020" thick, no backing). It’s mounted to some 5/8" ply with a dyed maple frame. I’ve been cutting marquetry on the scroll saw and chevalet for several years, thought I’d give it a go on the laser. I’ve got a couple more projects in the works that push the detail further, enjoying it so far!
55 Likes
Not a bad introduction! Welcome.
4 Likes
Very nice.
3 Likes
This is really cool! !!
3 Likes
Really nice!
3 Likes
That is awesome!
4 Likes
Think what your next monopoly board could do… 
6 Likes
Super job, looks fantastic.
1 Like
Your marquetry fits together so well. I have tried a couple of times without having the great results that you have. Beautiful work.
2 Likes
Outstanding results!
1 Like
very cool! Awesome detail!
1 Like
Wow, very impressive!
1 Like
Thanks! I’m still working on my process to get it even better fitting, but I’m happy to outline what I did on this piece.
I’m usually cutting my veneer at a speed of 225 and power of 50. The only time this hasn’t worked so far was a piece of what I believe was ebony veneer used in one of the rings in the eye, it was so dense I had to slow the speed a bit.
After that, there are three main things I do to work towards a tight fit. The first two are kerf related. I’m finding that given the cut settings, using a value of 0.003" to account for kerf is working pretty well. I’ll expand the outline of each piece by this value. Secondly, I will make sure that any sharp corner has at least that radius. That’s a pretty tiny radius, but it can be pretty noticeable when the corners don’t match up.
Finally, I mirror everything before I cut it. The kerf on the laser side of the cut is slightly larger than the kerf on the bottom, enough to make a noticeable difference when everything is assembled. There’s also a little more char on the laser side, which can emphasize the lines more than you’d like.
You can do all these things manually in whatever program you use, but I often use an Illustrator plugin called ImagePaint. It can handle the kerf, radius, and reflection in a single button press. You can also scan in sheets of veneer and place each piece exactly on the veneer where you want it and have it generate SVGs to cut them that way. When doing that, it’ll also render the design using the veneer scans so you can see what it’ll look like. This plugin is not free, though (and I have no affiliation), so it might not be worth just doing it manually.
If I’m just doing a one off, I think I’d still prefer just using the scroll saw and the double bevel technique. It’s much faster because I don’t have to spend so much time on the computer getting the drawing ready for the laser. If I’m doing more than one of a piece, though, the laser starts to be worth the effort.
8 Likes
Thank you, that’s a lot of great information. 
A very striking piece. Great write-up.
2 Likes
That’s great detail, thank you.