For the handmade (ok, Glowforge made) Christmas gifts this year, I made leather notebook covers for 3 1/2" by 5 1/2" notebooks. A Youtube video that inspired this years gift was from 2013: https://www.youtube.com/watch?v=Yju82AwTb_M. He also sewed his own signatures, but I just used Field Notes notebooks.
I started the design in Fusion 360 as a parametric sketch which I exported as dxf. I imported it into Inkscape and edited it somewhat (joined nodes, deleted construction lines, etc.) and saved this plain SVG. I intend to share the parametric model, settings and more info on how I finished the leather and the inside in Beyond the Manual at some point, but I’m often short of round tuits, so who knows.
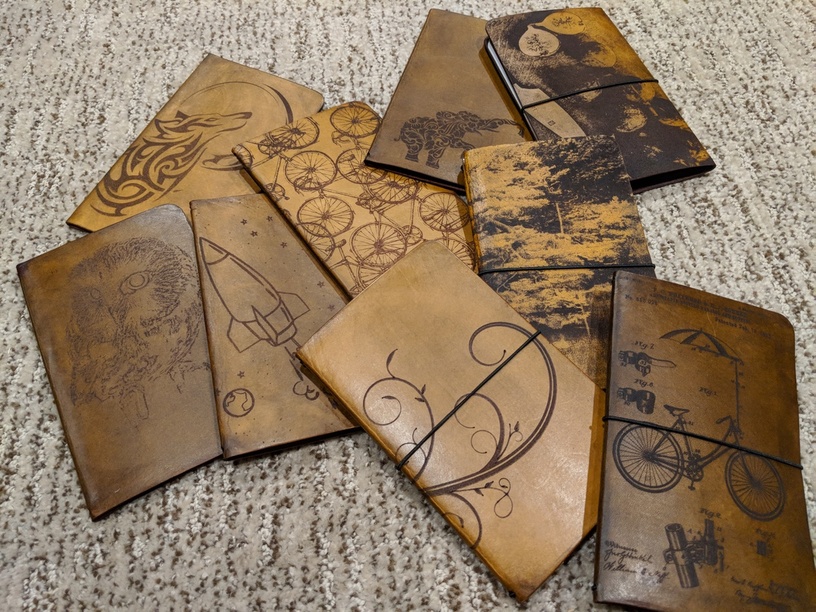
The artwork on the gifts came from various sources. The order is approximately left to right and top to bottom in the image: Tribal wolf tattoo by AKV purchased license on vectorstock.com (Tribal wolf tattoo Royalty Free Vector Image - VectorStock) Northern Saw-Whet Owl by Bryant Olsen licensed CC BY-NC 2.0 (NORTHERN SAW-WHET OWL | The Aviaries female? Northern Saw-Wh… | Flickr) Cute space travel by mixx83 purchased license on vectorstock.com (Cute space travel Royalty Free Vector Image - VectorStock) Seamless multi-colored bicycles by pashabo purchased license on vectorstock.com (Seamless multi colored bicycles Royalty Free Vector Image) Flower elephant digital download purchased on etsy. While I thought at the time of purchase that I’d got the original artist’s shop, researching this for the post, I’m not sure. So I’ll wait to post a link until I’m more confident or find a better source and license it there. Figs on cutting board by my daughter. Her Instagram original is quite a bit better than before I mangled it for half tone etching with the laser and cropped for my aspect ratio. Japanese garden by me. A photo I took on my last sight-seeing trip to Kyoto. Flourish by me. I followed the InkThisScape tutorial here: https://www.youtube.com/watch?v=q8XORGTMjIs. The flourish on the notebook is my second attempt at vector illustration. After doing the tutorial the first time, my first attempt was a coffee mug I made for a different project. I thought I remembered that I first got the link to that tutorial on these forums, but I can’t find it now, so maybe I just Googled. Adjustable bicycle parasol and support is a diagram from the 1896 patent no. 555.025: US555025A - Adjustable bicycle-parasol and support - Google Patents
These came out great! It was generous of you to share the file, and I love that you were so mindful in purchasing/crediting your artwork sources. Your original art is quite nice as well.
Are the leathers all veg tan, just dyed/antiqued differently? Or is it a mix of veg tan and oil tan?
It’s all 3-4oz. veg tan. There are a couple of different antique gels used (Eco-flo briar brown and tan). The tan, I find is quite a bit more yellow in tone. Some got two coats. However, the biggest difference you can see above, I think, is based on how much time between the antiquing and the Satin Sheen finish over the top. It seemed to me that the first coat of Sheen lifts the antique a bit and more if the antique is fresher.
Oh yeah, the Owl also has some Black Hilite on it because I’d dialed back the engrave so that it was more of a light impression made by ablation rather than changing the color of the leather.
Another thing I learned by experimentation (hard way) is that Fast Orange which I used to scrub the edges with a 3M abrasive sponge changes how the leather takes up the antique wherever it touched. So it looked better if I did a light coat of Fast Orange applied in a circular motion over the whole front before cleaning the edges then wiping it off and casing with a damp sponge to do the crease.
Interesting. I recently bought some of the Fast Orange wipes, because @kittski showed such great results using them with wood. I tried one on a bit of leather and noticed a bit of color change where I’d used it. Between that and the stringent feel of the product, I worried that it might have a drying effect on the leather, which could ultimately make the leather more brittle/less supple. I have no scientific evidence to base that opinion on, just a gut feeling and a bit of leather working experience.
In this case, I think your solution (using the Fast Orange on the whole piece so that the color effect would be consistent) is a good one. Still it might be worth some experimentation to see how it holds up over time before using the Fast Orange too extensively in your leathercraft. FWIW, I’ve had equal or better results removing char from leather with just a slightly damp sponge and a bit of elbow grease.
Hope that does not sound critical or discouraging - certainly not my intent. My initial impression of the FO on leather was not so great (though I’m definitely impressed with how it works on wood). I got it in shortly before you posted this, so your write up was well timed.
Funny you should mention. I had just tried that for the heck of it yesterday. I’ve got one of those 3M sponges that has an abrasive pad on one side. And it worked just as well with a little water as with the FO.
I found the best cleaner of leather was leather cleaner/conditioner. (OK, that kinda sounds like a no-duh thing when I say it out loud lol.) It also seems to help cut the smell for me a bit to. Not sure how the conditioner would effect the leather taking dye though.
This is what I would be mindful of. Unlike the FO, you probably don’t have to worry about it drying out the leather … but leather cleaners/conditioners are typically used to restore finished (i.e - dyed/painted/sealed) leather products. Depending on the brand or type, many of these conditioners use oil or beeswax, which could alter color or even create a resist effect with dyes.
That’s not necessarily a bad thing. The end result might even be cool or interesting. Just something to consider. Worth some experimentation, to be sure.
I used both on the flourish where I wanted crisp edges and filled in shapes. I don’t remember the settings precisely, but I generally start with 350/7 for engraving (convert to dots) leather with the mask removed.
Your work is beautiful!! Did you use fast orange lotion or the one with scrubbing pieces inside?? Did you let your pieces dry after cleaning before staining?
I love this little notebook. I’m new to Glowforge and leather working, so excuse this question:-) What is the purpose of the hole in the center of the notebook? I get the two holes top and bottom, but am unsure what the one middle one is for.
Thank you!!
The hole is so you can push a loop through it from the inside. You can then use that loop as a closure. That’s assuming that your elastic is a little less than two times the length and width of the cover.
You can see that crosswise closure on a couple of the covers in the picture above.
LOVE these!! and I want to make one for an upcoming hike, thinking I will use a map of the hiking trail.
Sorry if this was asked already, and I missed it. How do you attach pages? Guessing a “string” either through holes punched in the pages, or pages folded in half and the string goes through the fold?? Or ??