I’m trying to figure out a good safe option for positioning and cutting leather. Ideally, a light colored self healing mat that would hold the leather down and have straight rule lines on it for positioning would be incredible. But, since the leather is so fibrous and messy, I don’t know if a Seklema mat would work. Anyone have experience or advice with this?
Masking both sides of leather gives it a bunch of structure and keep is really flat. I would treat it that way.
You’ll need to test your masking to be sure it won’t damage the leather surface, but I haven’t had much trouble using that method.
As for alignment, jigs if you need to, but a properly calibrated GF has pretty great camera alignment, so I would imagine most of your needs would be met?
5 Likes
Trying using strong magnetics to hold down your material
1 Like
You can use a repositionable adhesive spray on a piece of scrap wood. But if you do decide to mask the leather, you can then stick it on the Seklema mat without any issue. I did that the other day with some paper I was concerned about.
2 Likes
How do you plan to use the finished project? That may help determine what is best option for the leather.
If it’s going to be applied to something else, such that the back doesn’t show, you could try fixing it to another layer of leather or board that you’re fine getting scored/cut as you ensure the settings cut through the piece you want, using double stick tape or bit of glue.
Else you want to test to make sure the method doesn’t inconsistently alter the flesh (under) side.
I usually just use magnets and set to score lines and finish the cuts by hand since usually faster than trying to get the settings right to fully cut through my various leathers.
1 Like
Whew. Loaded question. ![]()
First of all you ALL are a wealth of information when there is none! Secondly, I’m a new GF owner, and I know NOTHING! So, thank you for paying it forward. I hope I can do the same.
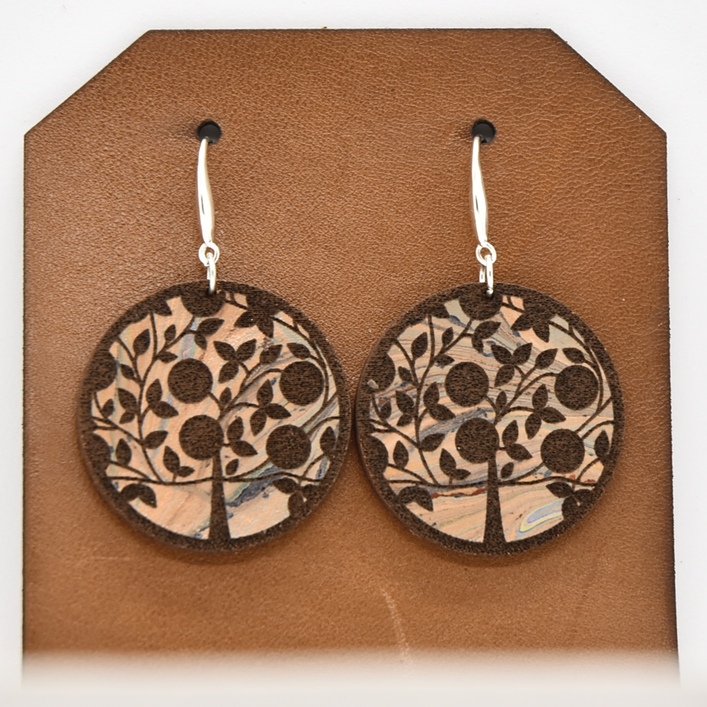
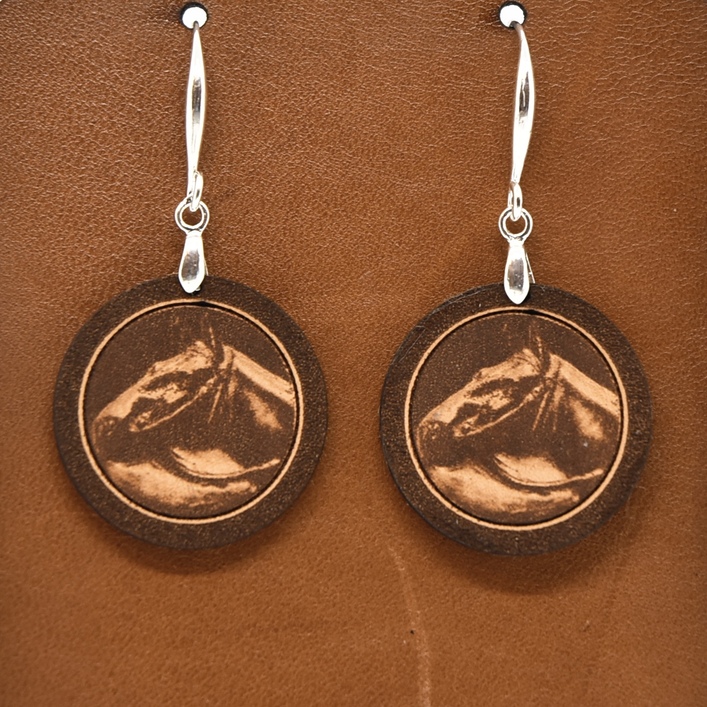
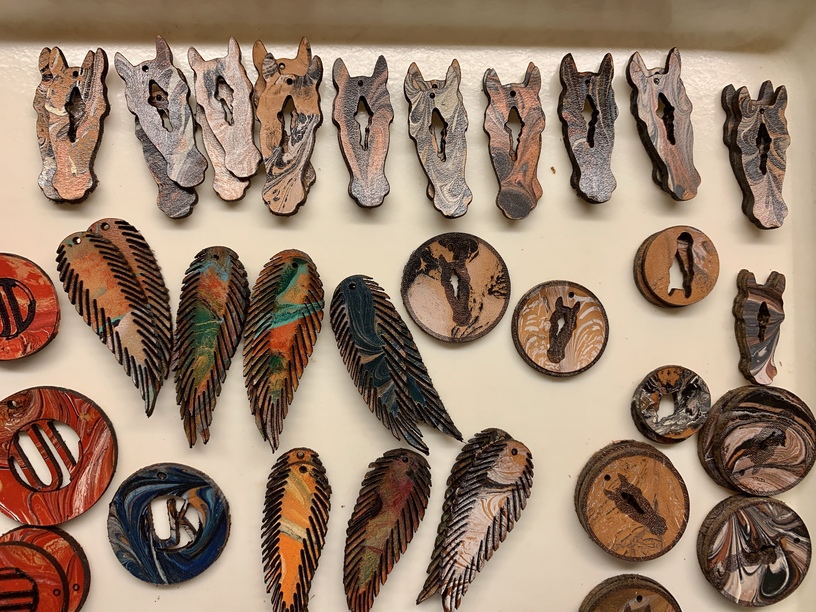
So, a little back story. I had the idea several years ago to marble on leather, and when I googled it, couldnt find anything. So, I got to work (a lot of trial and error, and the process is not very forgiving), and ended up trademarking Marbled Leather.
Had been using a local company to laser cut earrings for me, and then found out about the GF. Can’t tell you how freeing that was after such a steep initial learning curve.
So… here’s my problems.
-
Leather is uneven and curls. I need something to hold it down without infringing on the area.
-
Protecting the surface. I tried contact paper on the front of vegetan, but it left it sticky when peeled off, and that’s not very friendly for marbling. Plus, I don’t want to peel it off the intricate designs.
-
Getting my leather strips straight on the bed, and being able to see the leather. I got some white gator board, and that is the bomb, as cutting through the leather only scores the gator. However, all my settings for depth will have to be revised.

Thanks for the idea about double stick tape. I’ll try that. I’m wondering if one of my favorite things would work on the back side…press n seal!
Any other ideas are welcome!!! ![]()

12 Likes
Beautiful work that is well worth trademarking! Revising your depth settings shouldn’t be a problem if you use the set focus tool.
I don’t have any insight into addressing your current questions. When you used a local laser cutter did you observe their technique or could you inquire about their process? I’m sure they are unhappy about losing your business because of the Glowforge, but whatever they were doing worked and it is worth investigating.
2 Likes
Thank you for your kind comment. I did cut these on the GF, but am looking for a more streamlined process. Thanks for the tip about Set Focus!
1 Like
Those are wicked cool. I love the marbling effect. Don’t see that on leather often.
3 Likes
Gorgeous! So glad you figured out a process and were able to trademark it to help protect your hard work!
When I started my passion with leather work, like you, found very little info out there for machine sewing–fortunately I had a lot of sewing experience already, so that was a great basis… and trial and error for what works best for the GF, too!
So looks like you definitely want to be able to cut through, and avoid leaving any weird residue or pattern on the flesh side…
Magnets are my primary thing, but the leathers I use are pretty easy to flatten out in the bed. My thicker leathers (6 oz is my most common weight–I etch my logo onto guitar straps), and looks like you have about 4-6oz weight, I still use some magnets, but I also always use the Hold Down Pins (pattern is in the free design section–those are a must have & great way to use up odd scrap pieces to make them–make MANY).
Always etch, then cut. And cut inner lines/shapes, and then the outline.
And if you can, place magnets about 1/2" interior cut lines to help keep the center areas of the hide flat and stop it shifting during cutting (any closer the magnet could do funky things to the beam as well as avoid risk of running the beam over the magnet). You might have to place cut lines further apart to use magnets to ensure the piece is flat & they are away from cut lines, but if this means you get good pieces with less scrap than trying to pack the designs tightly, you may still be ahead… Or just work with smaller piece of leather onto the bed to begin with, so the pins at the edge are enough… but then that’s a lot of set ups–so you will have a lot of trial and error to figure out what works best for the designs, and hide.
For masking, look for “low tack” and you can find laser masking on Amazon or other sites and in multiple widths, since it’s nice to avoid seams. And if you do have to put more than one piece of masking on, butt up the joints. Painters low-tack masking tape works in a pinch too–but like everything, test it out!
But most of the time, even etching, I don’t mask, since rinsing & bit of soap on a toothbrush to remove the soot from etching & cutting doesn’t adversely affect my work (a few times I have opted to use masking tape to get the soot off when water wasn’t a good option). Not only to cut down the smell, but I don’t want a customer touching something that’s etched or cut and getting soot on themselves… Even with masking, the cut and etched areas still have soot in/on them–the masking just helps keep the soot the is blown away from settling onto the surrounding material…
Beautiful work & hope you find the method that is most efficient for you! And would be worth a shot to ask the company you used before what their process was…
3 Likes
Your leather is absolutely stunning. I have done marbling on paper and it’s just a magical process.
I don’t have much to add to what @bansai8creations has said other than to avoid contact paper. It (typically) contains PVC, which is unhealthy for you and bad for your GF.
4 Likes
Thank you SOOOO much for your valuable information, and the time and effort you took to help me! I will make some hold-down pins and find some low tack masking. I’m just blown away by you guys!
Do NOT use strong magnets on the cutting bed unless they’re shielded, this can screw up your printer head .
YOU’RE the one! ![]()
![]()
![]() I was so delighted to see marbled leather showing up on the market a while ago, really gorgeous !
I was so delighted to see marbled leather showing up on the market a while ago, really gorgeous !
When I was cutting lot of veg tan a few years ago I’d lightly damp with a spray bottle then press under a stack of books until dry. This left it flat enough that a light spritz of repositionable adhesive (like 505, Aleene’s repo or Krylon Easy Tack) on my gator board was enough to hold it flat for lasering. And as mentioned, Set Focus is your friend.
Contact paper is usually a plastic, often vinyl, and you wouldn’t want to laser that on leather for many reasons. Try a low tack paper based masking like vinyl transfer paper (made for transferring cut vinyls, not made OF vinyl, avoid the clear variety). It’s the same stuff they put on the Proograde materials. ![]() If you want to get just a few feet to test before ordering a big roll, your local signshop will likely give you some for free or very cheap. Packing tape or Gorilla tape after you cut makes unmasking intricate things really easy.
If you want to get just a few feet to test before ordering a big roll, your local signshop will likely give you some for free or very cheap. Packing tape or Gorilla tape after you cut makes unmasking intricate things really easy.
1 Like
i haven’t had any issues using cheap, weak, 3/8"-tall rectangular ceramic magnets from the hardware store wrapped in blue painter tape. they won’t flatten 1/4" wood, but they work for most anything 1/8" and under. They also work fine as quick temporary jigs/guides.
I haven’t had issues using STRONG neo magnets, rectangular and round. They’re strong enough that I’ve gotten pinch blisters on my fingers when putting them back together without due care…
Great info and insight. I’m gonna be spritzing away, and will get some of the materials you suggest too!
1 Like