Looking good @makesomething!

Dang! Had one of these sitting on a Pinterest to do someday and he beat me to it—and made it WAY cooler than I could ever do. Love the quick fix idea of his little inserts for the dates that needed to drop down to the next line.
Thanks! Was a fun project!
Love your work, music video jokes and that you keep the making journey fun and light. I always learn a few things with your video’s and best of all… They inspire me! 
Pretty cool! @makesomething you might want to look into fill-in paint sticks the next time you do something like this with engraved text. I think these are the kind we have in the office– they come in a lot of different colors, rub in easily and the excess wipes off cleanly. Seems like it produces a durable result too. I tried the spray paint technique a few times, but our in-house designers pointed me to this and it’s way better.
The dowel/sanding machine trick was genius! I’ll definitely use that one. 
Love the fact that the GF  has as common a role in his shop as the table saw and band saw.
And this project goes on the to do list!
Thanks Dean! I didn’t even know these existed!
Yeah, that part was really brilliant.
It really is neat how he works it into the flow just like any other tool.
Great video, keep up the good work!
Oh I felt you on that one.
“So, this is how you spray paint. You use a light stroke, back and forth, and… this spot… Just a little… I mean, a bit extra… COME ON GET IN THEIR STUPID PAINT”
Exactly how it went down!
That reminds me of something I did.
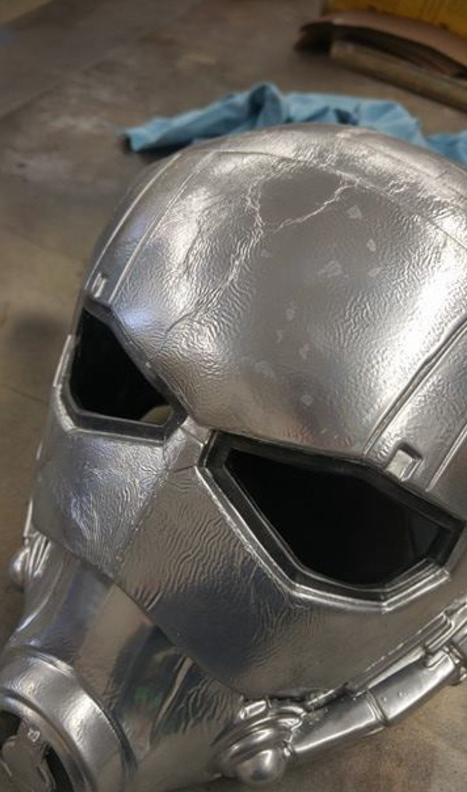
I do cosplay for charity events as part of my local scifi-fantasy convention. I built an Ant-Man costume from the ground up and I wanted a nice chrome paint job on the helmet. I used the Krylon chrome paint. I sprayed everything with a nice black base coat, taped the spots that were to remain black (which took 3-4 hours with a razor and roll of blue tape) and then started spraying the chrome.
Unfortunately, over the course of a few days I went back several times to respray. The majority of the helmet was shiny and chrome and there would be one spot that was slightly rough. So of course I would spray that spot again hoping to have one uniform, shiny, smooth coat.
What I didnt know is that putting the paint on that thick would make the whole thing wrinkle.
I had to strip the whole thing with chemicals and do it all over.
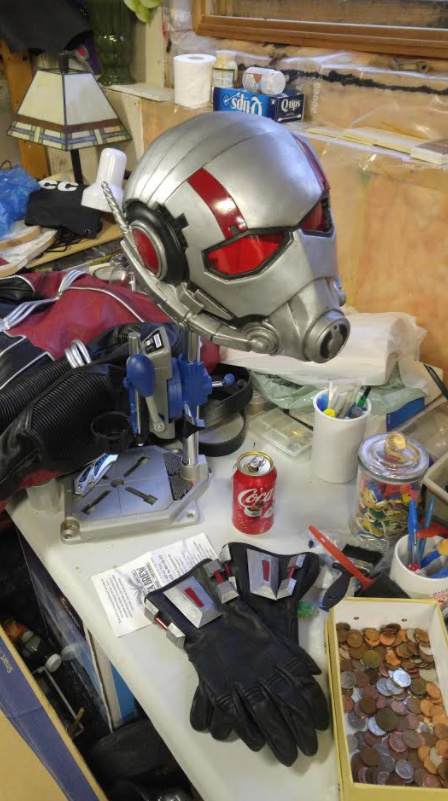
But looking at it now, I bet you have almost a sigh of relief that you put in the work to redo it instead of just “live with it”. It looks SO much better after correcting it.
it does, although i quite like the first attempt, regardless. it could be used to cool effect if you were trying to make a…battle-worn appearance.
Absolutely. I HATED the look and I almost scrapped the whole outfit. I am glad I stuck with it. Found a paint stripper that wouldnt effect the plastic helmet which saved me a LOT of sanding time and a lot of headache
Some paint formulations are specific about adding coats.
Like your result, I was finished the engine bay of my '66 Mustang before I reinstalled the rebuilt engine, and there were a couple of spots that didn’t quite reach perfection. A gloss black Krylon 'professional grade’s spray.
After a few hours drying I redid the areas in question and the result looked like a wrinkle finish! Reading the can (yeah, after the fact) it stated reapply before one hour or after 48.
Like you, #&% sanding and $@#! starting over.