i think one of the issues I’m having a tough time with in my head is that the GF is using LPI and an “always on” laser (to my understanding), so PPI (pulses per inch) or frequency are non-factors. It’s a constant beam on the x-axis and your overlap comes on the y-axis, which means you need to find the fine line between quality and overkill depending on the material.
1 Like
Oh, I’m not engraving anything yet…that’s just an AI illustration. 
LPI is just lines per inch. (So technical multiples of the beam width.)
1 Like
Yep. That’s the way I’m interpreting it.
(Might be totally wrong though. We’ll find out in December…(or January in my case.)![]()
Now this is interesting, with a 0.20 mm wide kerf, I calculate an optimal LPI of only 127 lines per inch.
I must be thinking wrong somewhere on this, because they are using something in the 250 LPI range, aren’t they? And that’s considered low res?
Are they going over and over the same lines?
Oh goodie…I think too freaking much…
1 Like
You’re just dividing an inch by kerf, right?
I would think with that method you would be more susceptible to noticeable banding since you would have minimal overlap (but still have some overlap). However, you’re correct that the more overlap, typically leads to burning etc.
Somewhere in my head, logic is telling me that as LPI increases, power will need to be decreased.
2 Likes
Just throwing this out there since I’ve never really cared about LPI, but wouldn’t 50% overlap be ideal? Every line gets 2 passes (except the first & last one) which should blend any banding.
Course I could be wrong. I don’t screw around much with PPI either - I’m a DPI only troglodyte I think ![]()
2 Likes
Makes sense. Guess that somewhere in there, taking the steps (stepper motor) into account might be necessary too.
I was using ppi as pixels-per-inch from the digital/print realm; didn’t know it had another meaning in the laser cutting realm.
1 Like
Other laser manufacturers use it as pulse per inch. I’m more familiar with the meaning you inferred of pixels per inch.
My original post, which I didn’t post, was going to state that their needs to be some sort of correlation between the input file and output settings of the laser. Just like with print, you can’t bring in a poor file and expect optimal results, which I’m guessing is going to be happening quite a bit with engraving of images.
2 Likes
Yep. But only at first. People will figure it out as they get more comfortable with the limitations on auto-tracing in general.
(Gonna be a fair amount of weeping, wailing and gnashing of teeth right out the gate though.)
3 Likes
Nothing’s final until we ship it to you (I should put that on a T-shirt). But we’re pretty happy with this set of materials + finishes.
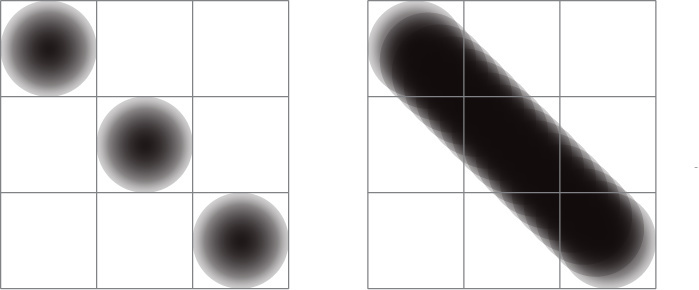
There’s another way of thinking about it… consider a diagonal line when your beam width is X. If you choose a DPI if 1/X, you’ll get the image on the left. If you choose 8/X, you’ll get the image on the right.
16 Likes
Are you firing spots of light? (Pulsing)
Okay, so the line on the right is one line of engraving correct? (Your infill was being input from bottom to top in a straight line in one of your demo’s, so the question is - how much overlap on a single horizontal line is there when you move up to the next line in the fill?)
I’m just trying to get a handle on the overlap situation with the fill.
(That does explain why the deep scores and cuts don’t get ragged.)
1 Like
The one on the left would take 3 horizontal passes; the one on the right would take 24 (hence the longer print times).
If you drew it in vector mode instead of raster - what we call a “score” or moving the laser directly from the top-left to the bottom-right instead of going back-and-forth horizontally - then it would be lightning quick and have no jagged edge at all.
8 Likes
Yeah, that makes sense. So that is the actual overlap showing.
Very good.
1 Like
Hey Guys, just appending a quick note to this thread. The main reason is that it’s my cakeday today and I wanted to post something so I could get the little icon.
Also, I recently started a public instagram feed of some of my drawings (like the one I had etched) that I do in meetings, church or wherever. Feel free to check them out if you like:
thanks.
17 Likes
Happy Cake Day!
1 Like
Happy  day.
day.
Could see a big wall art piece made 3 high by 4 or 5 wide, with your drawings etched on 12x12 or 300x300mm plywood.
Could even attach them with Velcro so you could rearrange them.
3 Likes
Happy cake day! 
2 Likes
HCD!
Your drawings are striking — wow!
3 Likes
happy cake day! Enjoy.
2 Likes