Maker Faire 2016 Face Puzzle

Hey future Glowsmiths. I was really fortunate to attend the World Maker Faire this weekend with my son and visit our friends at the Glowforge booth. I learned a few new things that I think/hope might be of some interest to those who won’t get the chance to see and use one in person until December (fingers still crossed). I tend to get a bit wordy when I do recaps like this, so I apologize in advance if it goes long.

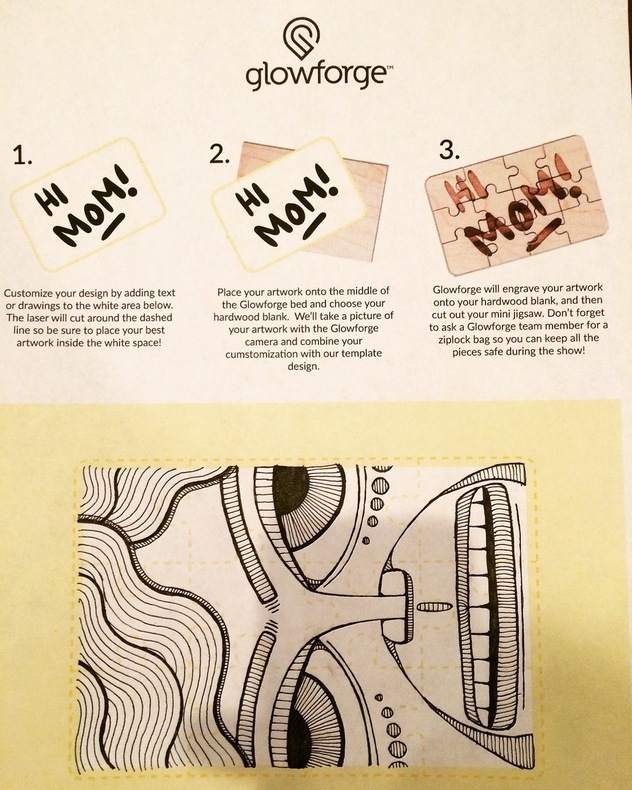
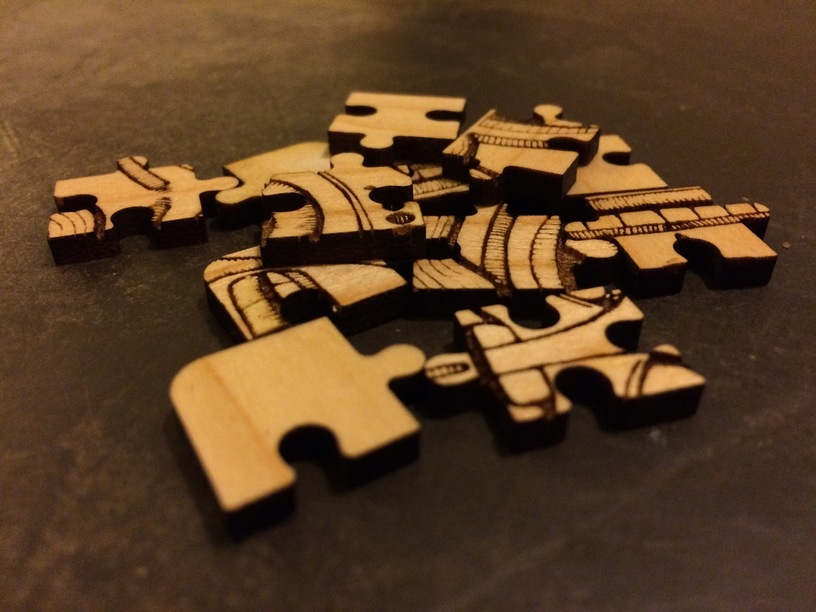
So, both my son and I chose the puzzle as our sample. We printed out the templates and scribbled them up the day before. My son took the normal sharpie route, but I thought I would put the lid camera through its paces and used a .38mm Muji pen on my drawing. I went over the major lines a couple of times to make sure it was nice and dark, but there were still plenty of areas that had a lot of fine lines.

We arrived on Saturday a little after 1:00 and went straight to the Glowforge booth. Our timing ended up being perfect because the normal crowd was out searching for funnel cakes and the line was surprisingly short. I think we only waited 45 minutes or so.

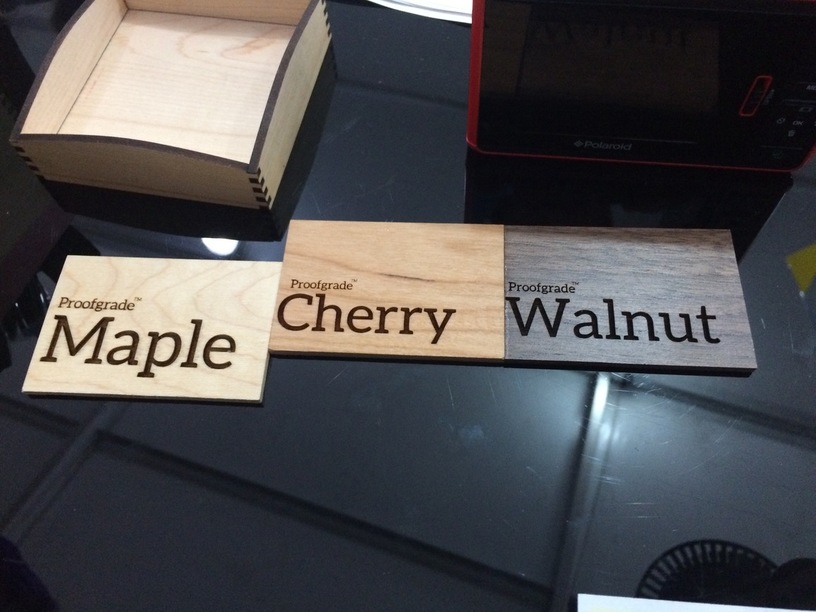
Their booth was really nice, and the team was as friendly as you would expect. It was fun meeting @bailey and others in person. They had the expected project (Settlers, the nori, etc.), as well as a few I hadn’t see online before. Everything was beautiful and looked even better in person! Behind all that was a table with templates, sharpies and wood samples (you could choose (maple, cherry or walnut) for those who wanted to print. And to the side they had 2 forges plugging away.


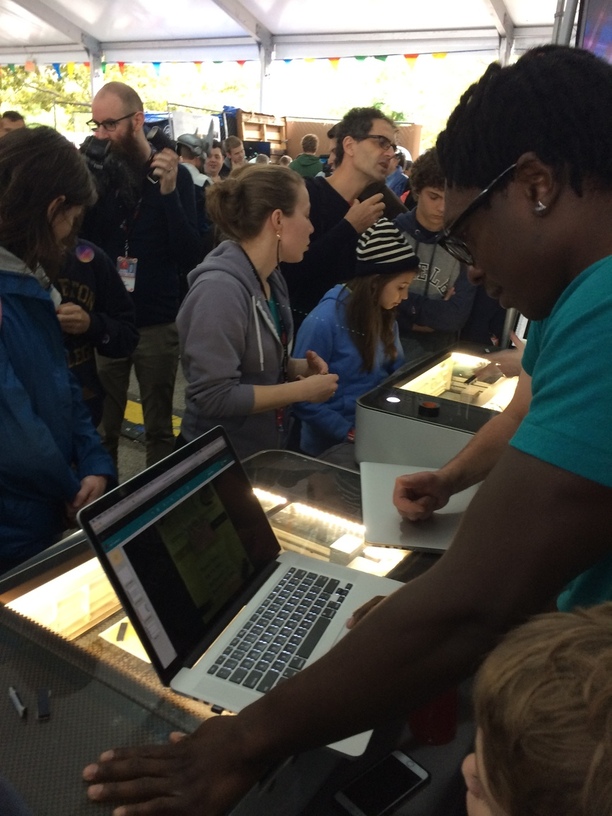
While waiting in line I spoke briefly to a couple of the team members, both developers. One of the guys (sorry I forget your names!) said that even though he works with these machines every day, he still is amazed by what they can do. I must admit that I had a pang of jealousy toward their jobs. (@dan, let me know when you open a NYC office!)

Anyway, one of the coolest parts of the experience was watching them use the interface. I know it’s still in the works, but it seemed quite polished already. They asked that I not film the screen, but basically what happened is they placed the paper in the bed, with the small piece of proofgrade wood, just above the yellow part of the template. I think this was to center it as much as possible under the camera. They then took a capture, cropped the drawing area and adjusted the contrast until it looked the best. In the printing UI they already had the puzzle cutting layer added, and they placed the drawn etching layering on top, scaled it down and aligned it on the piece of wood. Some of the other templates seemed to have had multiple etching and cutting layers based on their complexity. Once everything was in place they hit go on their end. It took a little while for the cloud to do its thing, and finally the machine was ready to go.

In case you are wondering, pushing that big, glowing button is every bit as satisfying as you would expect.

For those doing the math, the video was taken at 12x speed. And my camera ran out of memory, so I didn’t get to finish. Sorry about that. The actual time was about 7 1/2 minutes. Because my picture was fairly complex, it took about 50% longer to print than most. I want to again thank the Glowforge staff, who were really nice about me hogging their time, and seemed just as excited as I was to see how it would turn out.

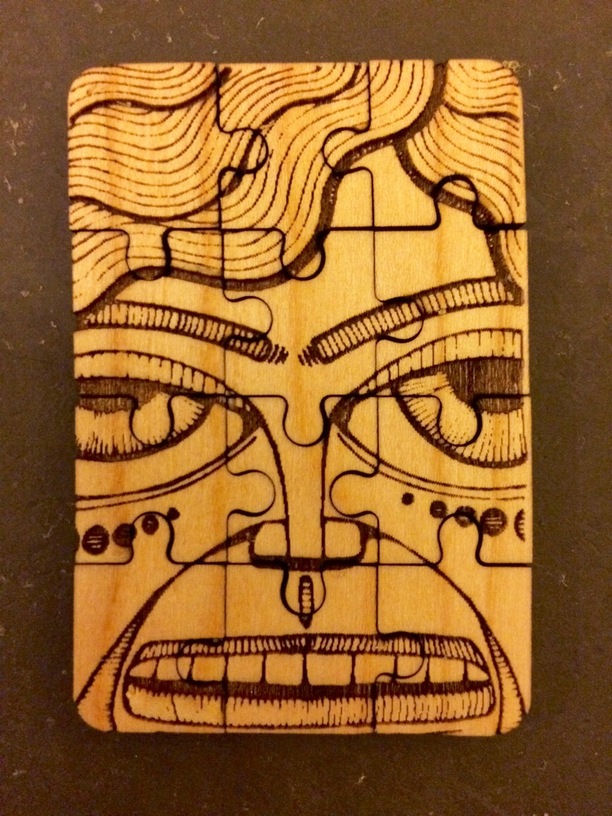
Here’s the final product. I’m really pleased!


Okay, so I know I’ve already typed your eyes off, but I lastly want to share some random thoughts.

First, and I know it’s been mentioned before, but the Glowforge is not small. In fact, it’s pretty big.
Second, while a couple of samples were printing (including mine), the table was bumped by the madding crowd, which moved the wood and caused a slight shift in the etching. In each case they stopped the presses and started over again, which I thought was nice. The moral of the story, though, is to make sure you keep your machine on a very stable surface.
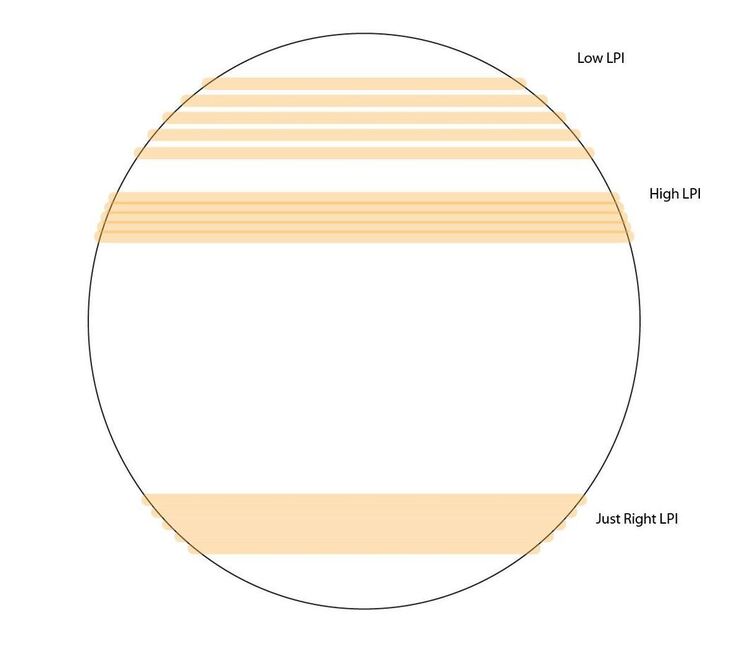
Third, they were printing the samples at a very low resolution (or whatever lasers do). You can easily see “pixelation” if you look closely. This makes sense for samples, of course. But it does give me pause when I think that if my little picture took 7 1/2 minutes in draft mode, how long would take to print it bigger at hi-res? I guess that’s why they invented books.
Fourth, if you look closely you will notice that some of the finer lines in my drawing did not end up being etched at all. This was less of an issue with the forge itself, and more of the capture and edit software. The capture was quite good but in order to find the right contrast levels they had to wash out some of those areas. So, for basic things it’s great, but for more detailed drawings like this it will still be better to scan it in and do all the image editing initially in photoshop or the like.
And lastly, I was super impressed with the proofgrade woods. I’m sure it might end up being more expensive then other options, but it was very high quality and having the sticker coating on both sides really helped. I might just have become a believer.

Overall I’m so happy that I had the chance to experience a forge in the wild. I feel very confident that I made the right choice in buying one and can’t wait to spend hours and hours making things with my own!

63 Likes

That’s a great drawing to test it with, and the cameras are doing a much better job of capturing some of the thin lines than I’ve seen on any of the various cutter software. (Without doing a lot of adjustment first.) :smile:

Excellent-a-mundo! :sunglasses:

(Unfortunately, my hand drawing skills are a good two or three levels beneath Dan’s, so I’m not going to use that much, but it’s nice to see such a good job being done of it. Lot of folks are going to be tickled pink!)

:relaxed:

9 Likes

Great post! Thanks so much for giving such a complete report and for the video! I wish I could have been there to see it in person.

9 Likes

Thanks for the detailed description. Take as long as you want!

3 Likes

Thank you for the detailed report!

I’m so glad that you “typed our eyes off” because I got sick as soon as I got to Seattle Maker Faire and missed so much of what I went there to see. I glanced at the sample projects (from a safe distance) and hung in for the demo/presentation, but didn’t retain much and didn’t even try to make anything. Didn’t notice the proof grade materials either.

Thus, your post is the next best thing to (or in my case, better than) being there. I sincerely appreciate the time that you took to relay everything, as well as your insight re: print time and table stability.

6 Likes

I loved reading every word of your review. Anything we can glean from other’s firsthand experiences gives us just that little bit more edge than we would have otherwise. Thank for all the details and photos.

5 Likes

Excellent write-up! I went there first thing in the morning and it wasn’t too bad.

On your forth point, about finer lines not being etched, that could have been due to the resolution it was set to. If the resolution is bigger than the size of the line, the algorithm might skip over it. Not sure if that is the case with the glowforge. I have had issues with my 3d printer where it will skip over some really small features because I have the resolution too low.

3 Likes

Amazing write up! I didn’t feel it labor on and you kept me engaged.

To add to you description of the software. I talked with the developer running mine and he said a couple promising and not so promising things.

The good: there are shortcut keys making it really easy and fast to switch commands.

The bad: some of the tools aren’t developed yet. Like rotate or flip. He told me the reason they line the piece of wood up on the template is to make it so you don’t have to rotate the drawing. This is something I was hoping for. He did say that it’s possible that it’s added in time for shipping. And then reassured me that the beauty of the web based software is to push changes like this after they ship.

So glowforge employee. I hope I don’t get you in trouble …

7 Likes

Thanks @joe!

As far as the resolution goes, I definitely understand what you mean. In this case, though, both myself and the forge technician were very conscience of the lines so we were watching them closely. The good news is that the etching ended up looking just like (though slightly more lo-res) what was captured/edited. The bad news is that the capture was not amazing. Still pretty good though.

1 Like

Interesting. I thought I remembered them tweaking the rotation a bit, but it might have just been a detail my mind placed in there afterward.

Something else that is related that I had forgotten to add is that they are still obviously working on registration. The fact that they printed onto small blocks of wood, not much bigger than the sample, is a good sign. However, while waiting in line I noticed one incidence when the final print was not registered properly and ended up cutting outside the boundaries of the wood and they had to start over. There were also two times (including my son’s) when the cut was so close that it really only had to cut on 3 sides. It looks like they have it down pretty well, but it’s not perfect yet. Hopefully that improvement will come over time, like you said.

6 Likes

Great account of you experience. Many thanks. :+1:

1 Like

Thank you for your insight, exactly the kind of test I would have tried - perfect demo for my hopes/plans!
Really eased my pain of not being able to attend.

And thanks to the staff for dragging themselves and the gear across the country for the show!

This is helpful case study of the fine lines in the line art succumbing to the capture/edit limits.

When it captures do you know if it (the onboard software) is generating high rez bitmapping prior to engrave in order to filter out grey noise? Do you know what the resolution is? (If so, a software like Photoshop definitely provides a lot of control in the conversion process—and I would never want to attempt it at less than 800+ppi prior to the conversion.)

1 Like

With these Proofgrade samples on display does this mean you have finalized them @Dan ? :smiley: (I understand if you can’t say anything yet)

Hey @quixotequest,

I can’t really speak to any specifics on what it is actually going on behind the hood. From what I saw, though, it seemed like it took a picture, grayscaled it, and then increased the contrast so it was just black and white. They then had a brightness slider of some sort that allowed them to tweak it to find the right balance of white/black bleed.

So if you scanned into photoshop at 800+ ppi and did your own editing, you would definitely be able to export a much cleaner image for the forge to take advantage of. That will definitely be my approach.

Of course you can do even better by tracing to vectors in Illustrator or the like, but that might be overkill in most scenarios.

1 Like

Absolutely 1000% correct…there is not an auto-trace vectorization program in existence that can duplicate the “human” machine.

(At least we’re not yet obsolete.):slight_smile:

Short of creating your own vectors:

…draw with black ink, (not pencil), on smooth opaque white paper, and keep the lines as clean as possible. Do a hi-res scan at about 300 ppi. (Going too high with the dpi might overload the program, and it takes forever. 300-350 ppi is usually considered fine for print work.).

Smudges are a no-no, or if you get them, take it into Photoshop or Gimp and clean it up before the auto-trace.

(You’ll get great results with any auto-trace function by following these few tips…I pinky-promise.):stuck_out_tongue_winking_eye:

7 Likes

Amen. And Illustrator always leaves very distinctive patterning in its auto trace that screams “hey look at me! I’m auto traced!” :stuck_out_tongue_winking_eye:

6 Likes

From my past work as an art director at a 2D animation studio: We would always have line art drawn at larger than 100%, scan at 1200ppi (min 800 ppi) which helps capture line data and give one good picture data for any pre-conversion cleanup.

Then when sizing down to 100% production size, even though often still a big file size in greyscale scan, once you convert to b/w bitmap mode it becomes a very manageable size but helps contain the appearance of jaggies at final repro. You can also sometimes accomplish some attractive half toning and line patterning effects using this technique too.

For our best look we also liked having them drawn by the artists in hard pencil, since fleeting artistic expression better came through on the caricature art. But a mechanical ink pen (like Rapidograph) could help get us great results too in the hand of a good artist. Sometimes pen was favored in the original art depending on any digital paint processes that were called for. (I mourn the artistic loss of the disappearance of animation cels.)

We always thought this preserved more of the artistic hand drawn look in final repro form than using a vectorization tracer which introduces a lot of fine detail noise and bloat—as well as vector point glut. For my part I only like vectors for art that is ground-up designed efficiently for their scaling and smoothness strengths.

11 Likes

Unfortunately that’s the difference I’ve run into between print art file size and cutting file size. Most of the cutting software isn’t designed to handle extremely large file sizes. The more ppi you have (as you would get with 800 ppi+) the slower the processing is going to be.

Cutter software tends to crash with huge files.

I’m not sure if this software will crash or not, but it’s something we learned not to do.
:slight_smile:

In addition, it’s just overkill to take it too high…with a laser, we are going to be limited to the width of the beam as far as accuracy goes - with a tight focused laser, we will get a 0.2 mm line width, and at a high lpi resolution, although we might not see much of a stair-step edge pattern, on curves it will always be there. (Any time we use a laser for fill engraving.)

If we go with too high of a lpi, we’ll likely develop stripes in the fill, as the laser overlaps previous burn lines.

It’s like trying to color in a picture with a flat edged highlighter, by drawing straight lines across the area, and not overlapping previous lines. It’s impossible.

The only way to hide edge stairstepping completely is going to be to use the laser to outline around the shape as well. (a vector path for the laser to follow).

That’s just the geometry of the thing.

4 Likes

@Jules What bitmap file type mode are you using to engrave at that ppi?

And for a laser cutter are you basing “lpi” on a correlative to a certain traditional print workflow (which can be used for deciding optimum source ppi), or is it based on technical multiples of the beam width?