Mark's Learning Projects

Yesterday I made a very simple headphone hook that friction clamps to my desk to hold my gaming headphones. It’s a couple of layers of 1/8" Maple Plywood with a small clip that holds them together. I intended for the clip to be flush with the slot that attaches to my desk but I got distracted and goof. It works well enough that I can’t be bothered to fix it. :slight_smile:

First thing I’ve designed using Fusion 360 and the slicer. It was pretty straightforward.

Another sign this morning, this time for my wife. My kids are all very active in dance and my wife helps out a great deal with costuming. She spends many hours a week at the dance studio in the costume closet with a couple of other mothers who also help out. They spend so much time there that the closet got nicknamed “Narnia”.

Naturally, I thought we should make it more official with a sign. Medium 1/8" Cherry Plywood :proofgrade:. Took about 15 minutes to cut once I had it designed. There was a fair amount of fiddling with the text to clean up the vectors and then some fairly simple adjustments to the wardrobe image to adjust levels and contrast. I’m pretty happy with how it turned out.

36 Likes

Very nice! I think the sign will be a big hit. Next they will have you helping make the costumes with craft foam!

4 Likes

:sunglasses: a functional piece and a decorative one. Both are really cool, I really like (need) the headphone rest!

I’m impressed that you were able to incorporate slicer with your very first F360 design. I still like my own design for my nicer headphones Headphone holder realized but I really like your quick concept for all kinds of hooks and holders around the lair.

2 Likes

Oh I like all of these hook ideas! I’m going to need to come up with something pretty soon here.

(And love the gateway to Narnia idea too - my niece is getting into theater - i need to do something like that for her closet!) :smile:

2 Likes

Mixed media day! Very very simple but satisfying one this time.

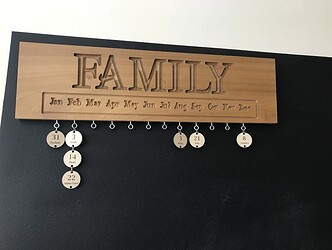
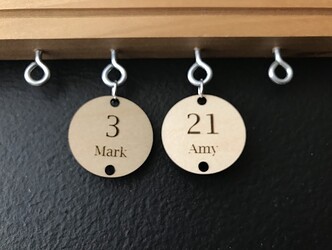
A while ago (an embarrassingly long while if I’m honest) I made my wife one of those birthday wall hangings where you hang charms for each birthday. I made it as an experiment on my X-Carve using a V carving bit and we were generally happy with the result.

The charms, however, were a different matter entirely. I experimented some at making them on the X-Carve, and while doable it was a hassle. This sums up a great many of my experiences with CNC milling in general, and a big part of why I was so excited about the Glowforge. Ultimately I never got around to making the individual charms so the gift sat on a shelf for … a while.

Today, I finally cranked out the charms on the 'forge in about 15 minutes. Not having to deal with hold down strategies for work pieces is an incredible game changer when comparing laser to CNC routing/milling for the types of jobs that the laser can do. The X-Carve is still an excellent tool and it can do a lot of things my Glowforge can’t, but when I have the choice it’s Glowforge every time.

Still, the V carving in the big FAMILY in this thing is so gorgeous it’s hard to feel bad about going that way for that part of the project. :slight_smile:

33 Likes

My Handibot will always be my first love as to Digi fab maker tools but you nailed it. If a project can be done on the :glowforge: the workflow is just so much easier. No noise concerns, no clamping. just position your material and go.

4 Likes

That is such a great idea…I’ve never seen one of those! :smiley:

7 Likes

Are you planning on using different colors or wood types for children, spouses, grandchildren, etc?

2 Likes

I love this!

2 Likes

Yep! And a red acrylic heart for our anniversary. :wink:

7 Likes

Great idea! WAF (wife approval factor) just hooked upwards!

4 Likes

I made a VERY similar project a few year ago, and yeah, while the main part was not too bad, the charms hanging off the bottom were the annoying part of the project. However, it’s great to help me remember all the various birthdays.

I hadn’t considered changing up the charms to have them done on my GF. I think I may redo them now, thanks!

1 Like

5 minutes of goofing around in Inkscape with no idea what I was doing resulted in this, which I’m pretty happy with.

33 Likes

:thumbsup:

1 Like

Isn’t this amazing? Being able to knock something out with computer controlled precision in minutes…
Ok, an hour for me.

8 Likes

This one is completely silly but fun. My 13 year old son hurt his foot yesterday and wound up at the orthopedist. It’s not broken, but he’s going to be on crutches for a few weeks and was pretty bummed about it. I wanted to cheer him up, so I decided to … accessorize his crutches.

I was inspired by him sitting on the couch pretending his crutches were a gun and decided to lean into it. It’s a very simple 4 layer stack of Draftboard CA glued together.

This was surprisingly interesting. I modeled it loosely after the Colt 1911 frame and learned quite a bit about it along the way. I started out researching what angle the grip was at and found myself in a twisty maze of mechanical drawings. It was fun though. :slight_smile:

25 Likes

That’s a fun idea, and i love how you attached it with the pre-cut slots in the gun! :grinning:
(Sorry he hurt his foot though.)

3 Likes

Funny story about those slots. I monkeyed around with the drawing for probably an hour in Fusion 360 trying to figure out how to build a reasonable clamp. Then I smacked myself on the forehead, made a couple of slots, and cut a couple pieces off of the velcro roll that was on my desk. :grin:

10 Likes

If you added a simple pivoting trigger mechanism, he could use that as an actual rubber band gun. :slight_smile:

3 Likes