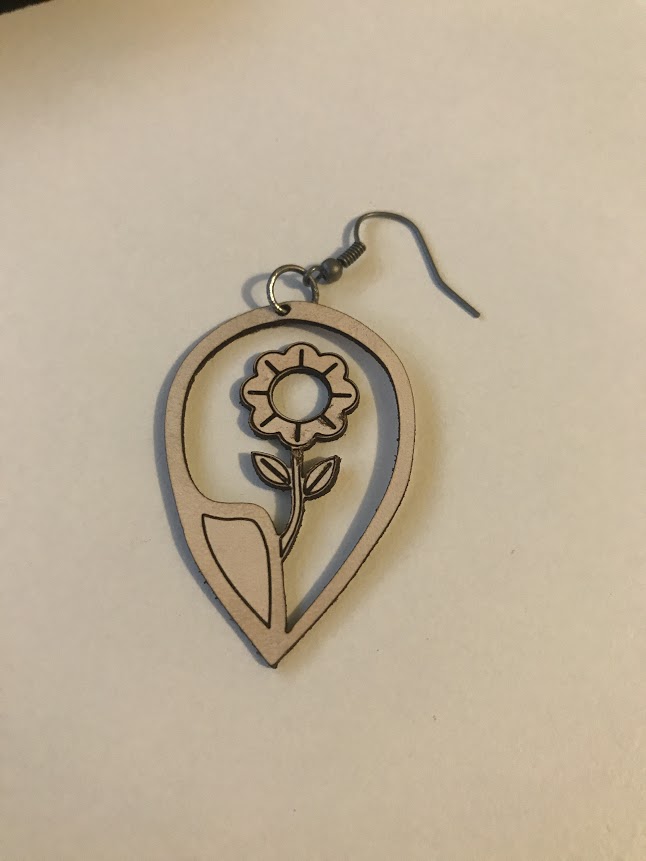
This leather is not yet dyed, this was very much just a test run to see how the leather behaved when cut, what scores looked like, and so on.
The two primary things I learned:
Leather smells really, really bad when vaporized by a laser. It’s not all that strong but the specific odor gets to me like nothing else I’ve cut.
Leather is (shocker!) pretty flexible. So while my design looks neat, it’s also a bit floppy.
I have some ideas for experiments and iteration on the design. A few possibilities occur to me initially:
Add a second layer of leather behind the first that just has the exterior outline cut to provide stiffness.
Add some additional support structures between the outside and the petals to provide a little more support.
Just remove the interior cuts entirely.
Not sure which way I’ll go or when I’ll get back to it, but it was a fun exploration. Definitely looking forward to making some more complex things with leather.
Any of the options that you listed will work, and will yield subtle but distinct differences. Would be cool to see all of the variations
One piece of unsolicited advice - you may want a slightly thicker border around the hole for that jump ring. Thinner weights of leather can tear at connection points like these, so it’s good to give them a little extra buffer.
I wasn’t sure how thick to make it there so I definitely erred on the side of being very thin. Good reminder to reconsider that before the next iteration though.
Can’t you do something like reverse poach it to stiffen leather? Soak in cold water and then a bath in hot but less than boiling water? Sorry - I don’t know technical terms
Some people stiffen wet formed leather using heat, but I don’t think that would work well for this project. To do this you’d soak the leather in warm water, wait until it’s mostly dry, shape it, and then (once you’ve got your shaping as you like it) hit it with a hair dryer or pop it into a very low temp oven.
But I think that trying to shape this design would distort the pattern and possibly weaken the connection points. Not sure if it would stiffen if you just soaked/heat treated, but I suspect it would not do much.
Have heard of people stiffening leather by soaking it in a mix of water/elmer’s glue. Never tried it myself, so you’d have to google for more info on that option.
Another alternative would be to put a wood veneer backing on the design. Unfortunately, the flower floating up from below is always going be a failure point–the stem will eventually succumb to gravity, or if made of/backed by wood, will get broken when the wearer is handling the earring. You could get a similar delicate prettiness by making the flower hang from a vine from the top instead.
As a jewelry designer, I would also like to give some unsolicited advice. Leather is soft. And right now the flower is anchored ONLY at the bottom… It will not take long before that flower will flop over and look dead.
My suggestion find a way in the design to anchor it at the top as well… Either making the flower petals bigger or some other way to stretch to fill more of the space. I would take a look at stained glass designs and look at how the black connects everything together… Another good resource is coloring books… If the petal part is increased by even 25% and the outside shape moved to just touch the petals that would give enough support. Then change the touching area to engrave and you ~should~ be fine. Otherwise I LOVE the design.
Great advice, thank you! I’m always happy to receive advice, particularly when we have such a talented and experienced group of makers in this community. This is literally the first jewelry related thing I’ve ever even attempted so it would be very difficult to hurt my feelings.
I like the idea of making the tip of the petals touch the outside. One of the things with the laser cutter that I’m really trying to get a handle on is use of negative space since it’s so easy to cut out interior voids. As I keep learning, just because I can cut a tiny little feature doesn’t mean I should or that it’s even going to hold together when I try to remove the masking!
I think this is something that will come with experience so I definitely appreciate the benefit of yours.
Negative space works differently for different materials too. You have to think about how the material works on it’s own… The stiffer the material, the more complex you can make the negative space. So Acrylic and Wood you can do fairly complex “line drawings” but softer materials like cloth, felt or leather you have to look at HOW you are planning on using it and how it may break while being used. Especially for jewelry. Earrings and necklaces are the most protected since they are least likely to get banged around, while rings and bracelets need to be more sturdy since they will be hit, banged, scraped and every other manner of thing during daily wear and tear. More so if the person is active or talks with their hands.
I can’t wait to see your next iteration of this design.
Curious…what settings did you use for cork? Is it in the proofgrade list by chance? All my settings are for my Universal lasers and dont translate to settings…
Apologize. Out camping and can’t test. My cork engraves were before all the power changes so they would no longer be of use. So I trashed the list of settings.
First off, very nice! Some of the stuff you’re doing is right along the lines of projects I have in mind once my GF arrives. Second, you mentioned dividing the file into score/cut/engrave layers, which is one of the things I’m most curious about when it comes to the GF interface and how to tell it which parts of your project should be engraved, which should be cut, etc. I don’t want to hijack your thread, so can someone just post me a link or two to any posts that discuss that process in greater detail? I’d like to have some files ready to go for printing once mine arrives.
It’s pretty simple, really. The Glowforge uses colors to differntiate between steps in your print. You can apply different cut, score, or engrave settings to each color.
In my design software (Inkscape and Illustrator) I tend to create a layer for each of these so it’s an easy matter to color everyone on that layer however I want.


 settings…