Matrix lamp

Thanks, that fixed it.

Thank you very much! VERY nice!

Thank so much! I loved this lamp the first time you posted it. Looking forward to building one day.

Well, I did it. Sort of.

After cutting a couple of test pieces on draftboard, it seemed like they press fit together without too much trouble, so I went ahead and made all the parts. But I was very, very wrong about the fit. Because I’m stupid, I spent a few hours pushing and squeezing and jamming this thing together as best as I could, but several pieces broke, the rest is a terrible mess, and there’s no way in hell I’m ever getting the top or bottom on. And my hands hurt so bad. Wow am I stupid.

Despite that, the effect is really cool. I was thinking it would be fun to build this in Fusion 360 as a practice project, then I could vary the thickness to get one that works with the materials I have. I wouldn’t share it without permission, of course.

15 Likes

I am sorry if you had issues with this. I made about 10 of them in a few days but I suspect my plywood was on the thinner side of 1/8th. No press fit for me, they were fall-apart lose.

if you redo it, feel free to share it here, the restrictions therein are already fairly high.

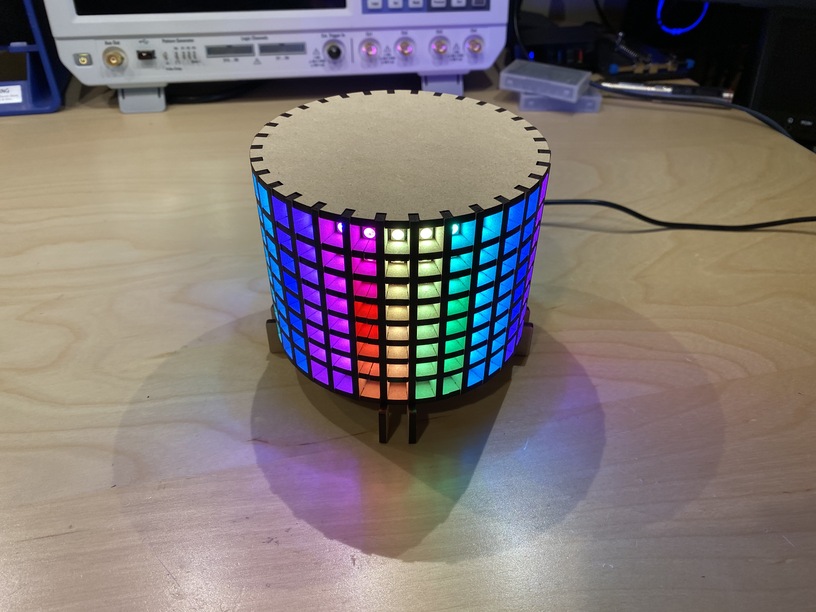
Whew! That was a capital-P Project, but I finally managed to recreate your design from scratch in Fusion 360, export profiles with the Colorific post processor, and after a few of the expected screwups, I got one that fits together perfectly with the Draftboard I have at hand.

Here’s the link to the F360 project:
https://a360.co/2lmrNQ8

And the SVG:
Matrix%20Lamp%20Nested

Thanks again for making and sharing this thing. Besides having a cool lamp, it turned into a great learning opportunity.

23 Likes

This is SO lovely…I love all the colors. (and no, you’re not stupid…at all). :slightly_smiling_face:

4 Likes

First of all, thanks yet again for this design. I’m really enjoying experimenting with it.

I wanted to mention that I tried out a Pixelblaze controller, and it is awesome combined with this lamp.

I made a short video - https://youtu.be/W347UFUb1tI

5 Likes

i will have to check that out. quick skim of his site has gotten my interest.

1 Like

Thanks for sharing this! I am transitioning from Sketchup to Fusion and this is incredibly helpful! The project looks amazing, I want to try to do something like this with my students. Great work!

3 Likes

Thanx for bumping this. I missed it the first time through. I find deconstructing other peoples work one of the best ways to up my own Fusion 360 game.

3 Likes

On that note, if you come across anything I did stupidly, I’m happy to take feedback.

1 Like

This is one of the most satisfying projects I’ve done to date. Thank you @mark14 for sharing your design and @chris1 for your remake and pointers to PixelBlaze. I ended up using Chris’ SVG as I was cutting with PG draftboard. It worked great and I love that it all fit on one board!

I put the lamp together without glue to begin with. I used rubber bands to hold the “frame” (legs and full circles) in place while I worked the “broken” circles into their place. The rubber bands worked well, allowing me to wiggle the pieces into place.

I found hooking up the rubber bands like so worked best…

…once all the “broken” circles were in place (a bit tricky but not too bad)…

…it was time put in the vertical supports…

These went in with ease and was quite satisfying!

When I did finally get around to gluing, I just took one vertical piece out at a time and used a toothpick to dab some CA glue in a couple places before sliding the strut back in place.

NOTE: I did not glue the top. It provides a great way to access the inside and I can make decorative tops that can be swapped out depending on mood. :slight_smile: IMO the top is only real piece that needs fancy wood and draftboard provides a nice diffuse effect for the LEDs. In addition, since I can access the internals from the top – I’ll be updating the SVG to replace the large hole on the bottom with one just large enough for the power cord.

The PixelBlaze board it great! I’ve been having a lot of fun coming up with custom patterns. I’ll upload some to the PixelBlaze site so others can try then on their own lamp. It is so nice to do coding and updates in real time over WiFi.

Thanks again for the great project!

16 Likes

I like how you assembled it. Great idea to use the rubber bands.
Agree that pretty wood is only needed on the top. Made a bunch of these with Baltic birch which is my go to basic wood.

1 Like

Awesome! I’ve made about 5 of these so far; as you said, they are very satisfying. I’ve been spending a lot of my spare time programming different patterns. I’m now porting them to run on a bare ATmega328P. I may go for something even smaller, I like the idea of running the whole thing on a 50 cent chip.

3 Likes

I don’t see how anybody could stop at one! I happened to have two 16x16 matrices lying around, so I did a few modifications to the svg and now my first one has a big sibling.

Two 16x16 matrices chained worked great with the PixelBlaze. It was tricky to get them in place but I’m really happy with the results.

8 Likes

Totally beyond the scope of laser projects, but has anyone ever come across a way to decode an HDMI or composite video signal to drive one of these?

3 Likes

I don’t know if anybody’s actually done what you say but there are composite libraries for Arduino

1 Like

HDMI implies HDTV which is millions of pixels (1080 = 2,073,600 pixels) This thing has only a few hundred to work with (256 in the small size or 512 if you double the height) . So, this could recreate a tiny corner of the tv screen (smaller than a postage stamp) with full resolution or a very coarse version of the entire screen. Or, as I told my son, watching the avengers on this would reduce the Hulk to one green dot and the rest of the cast would have to share dots.

2 Likes

The operative word implies. HDMI is just another serial protocol and could be any resolution. I see is used to carry low resolution feeds all the time.

1 Like