Morphing hex star box

Greetings, my name is Wala, you know me already.


I am continuing my exploration of small magnet boxes with heavily sanded edges. This time, I wanted to get away from spirals and head to something more organic. Note, more organic, I was going for something curvy but still geometric. I landed on this design. This post will be a bit light on technical details, you can get more of that in my other posts.

Notes:

  • All woods 1/8" hardwood
  • Overall height 1.25" (ten layers)
  • Diameter about 1.9"
  • Sanded to 600 grit
  • Finished with wipe on satin polyurethane

I started with a hexagonal star from the polygon tool in Inkscape. I played with the spoke ratio until I felt like it was how I wanted it. I left the sides with 0 roundness, because I wanted to use the rounded corner plugin to handle that part later. I felt like it gave me more control for the next step.

Walnut, Padauk

Once I had my star, I was able to make another copy of it, but this time I made the points 30 degrees offset. The idea was that the top of the box would smoothly transition to the bottom, which I felt would be pleasing when sanded smooth to remove the steps. I used the interpolate function to migrate smoothly from the top star to the bottom star across ten steps. Note I didn’t want to rotate to that position, I wanted it to “morph”.


Walnut, Padauk

Here we get a good look at the padauk inlay. When polished to a high grit finish padauk has really good chatoyancy. More on that later, but the various pieces shimmer as you turn the piece. This sun motif was fun to design, and I thought that keeping the orientation of the grain in the “rays” radial would help with the illusion, so the grain all points away from the center of the sun. Pretty pleased with the end result there. You can also get another good look at the curvy sides.


Walnut, Padauk

Another good look at the lid. You can see how the rays catch the light at different angles, the effect is really nice. Padauk, man. Get some, you won’t regret it.


Walnut, Padauk

The interior of the box should look pretty familiar if you’ve seen any of my other posts in this series. I really like this lid design, the lobes reduce the spinning friction as you twist the top on and off to engage/disengage the magnets.

Click for more about this lid if you like. It was a bit more complex than usual.

The tricky part here was that I was inlaying the whole lid. One of the constraints is that I like to inset the “stay” into the top layer of the box. This has a couple of effects: it keeps the magnet orientation exactly correct since it inserts into an engraved pocket and also prevents the surface-to-surface contact of the lid to the box to a minimum – again, trying to avoid friction.

The hard part here is that I had to inlay the lid first, then engrave it. So, I cut the lid and the sun parts, then inlaid all the pieces, which involves gluing. Once I let the glue set overnight, I had to engrave the entire lid now, across the inlay, which meant alignment had to be perfect.

I made a new file with a kerf-adjusted jig with the engrave properly aligned. Cut the jig, insert the lid, run the engrave, easy as that. Alignment was absolutely perfect. The end result engrave worked flawlessly, with no noticeable difference in engrave depth between the walnut and the padauk. As a bonus, you get to see the little rays poking out like that. Cool.


Walnut, Padauk, Neodymium magnets, Brass rods


So that's it. Nice simple box, definitely going to be a holiday gift. I have gotten pretty decent at sanding these boxes now, I start with a dremel and knock down the big steps at 120 grit. Then I switch to a 240 grit dremel drum and get it almost completely done. Hand sanding ensues, I get it almost perfect... then I use a dremel sanding sponge wheel to get the last bits, it smooths out any uneven spots and gets it almost ready. A final hand sanding with 340/600 grit sandpapers, and it was ready for polyurethane. The sanding took probably 45 minutes to get it just right, I think that's pretty good considering the complexity of the curves at play here.

Some bonus pictures turning it a couple of ways to show how the light catches the sun.

Click for bonus nerdery if you like...

If you look closely here, you can see a light colored “triangle” on the side of the box on the top three layers. The walnut had a light streak of heart/sapwood (not sure which) that ran down one edge, apparently my sides cut into it. The result is an inconsistency in the color on that side of the box. I actually like it, it’s wood after all, and that’s a very analog material. Adds some character.

Besides, I can’t do anything about it, so I best learn to like it, right? :slight_smile:


Padauk. Go get some.

50 Likes

Seriously–you know we’re going to click on it. At least there were 8 before me, Trying to clear my list of new topics :stuck_out_tongue_winking_eye:

5 Likes

I specifically clicked on this knowing you were probably the author, and that meant that I had to click on it!

Edit: Now that you’ve updated it, I can leave a real comment on it. Have you mentioned the dimensions before? Holy smokes, nearly a 2 inch diameter!? I always had it in my head that these would be at least a 4 inch. Where’s your dang banana! :wink: So how big are those rays? They’ve gotta be tediously small.

4 Likes

i’m going to hold off clicking on it because you asked nicely

1 Like

image https://i.kym-cdn.com/photos/images/original/001/391/129/4e3.jpg

4 Likes

You guys are so impatient :wink:

1 Like

it’s extra funny because I was in the middle of posting this meme and you changed your title and content

4 Likes

Gorgeous, as always. I am determined to make a box soon!

2 Likes

Amazing… Well done!

2 Likes

Soooo pretty! As always. :slight_smile:

3 Likes

Nothing like receiving a gift from the hands that made it.:sunglasses:

2 Likes

Not too bad, actually. Forgive the bad pic here, the lighting has terrible color recreation… and this was pre-finishing, so the colors just don’t pop yet:

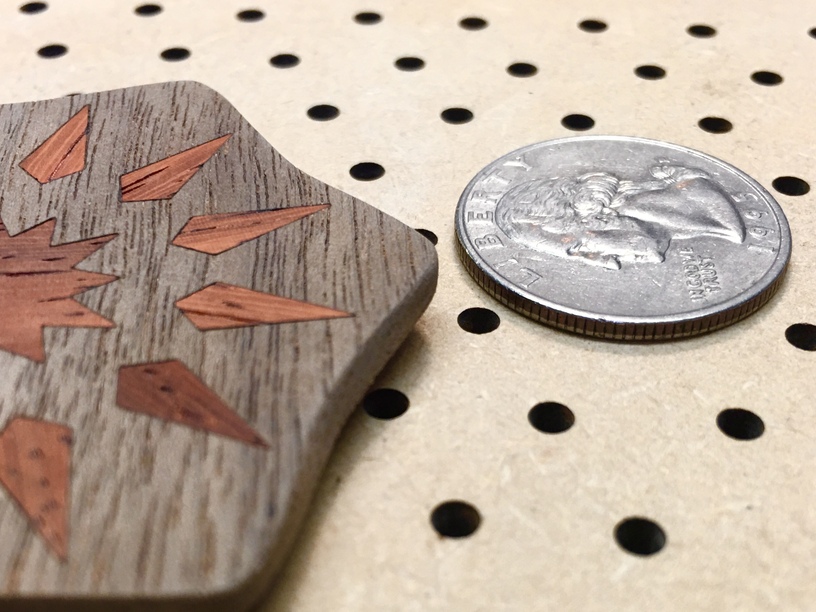
These were a lot easier to inlay than the swirls on the spiral staircase box.

9 Likes

Gorgeous for sure! Until I saw the box between your fingers I thought it was at least twice the size! Fine work, but less sanding than I thought…

2 Likes

It’s absolutely beautiful!

1 Like

I’m wondering what made you choose polyurethane over your usual Danish oil?

1 Like

Caveat: I’m a total amateur about finishing so take what I say with a small pile of salt.

I transitioned away from oils because polyurethane is more durable and consistent. With most oils you have to occasionally reapply them. Polyurethane doesn’t have that issue.

Application of poly is a fast process. Wipe on and almost immediately wipe off excess and you’re done. With danish oil, you have to wait 30 mins then wipe off excess… and then it takes quite some time — 24h or more — to cure and lose its oily feel. Poly is ready to be handled much more quickly.

Once I switched to poly I never looked back really.

3 Likes