For once - it’s not a leather project!
Evidently, one of the currently trendy things to do in custom PCs is to pick up a cheap LCD screen (generally intended for Raspberry Pi projects) and mount it inside your case as a sensor panel. Lots of the tutorials I’ve seen on this are pretty light on how to install the things - everything from “just use some double-sided tape and stick it somewhere” to “a few zip ties and an unused drive mount” … I just figured, I have a Glowforge, I should be able to do something more interesting than that!
If you want to do something like this yourself and you’re interested in learning from my mistakes, by all means, read on. If you’d just like some more PC glamour photos, scroll to the bottom.
Getting there
This is one of those nightmare projects where nothing goes according to plan. Buying a graphics card in 2020 is not an easy thing so I went at it with the same attitude I’ve had the last few times I bought a graphics card - I’ll get whichever model I can get my hands on first and not care too much about which SKU it happens to be or which AIB it happens to come from.
That decision caused no end of problems. I’ve wanted to build in an InWin 303 for ages so when I ran across the EK edition of the 303 I figured - done! Besides, with so many people building in O11Ds, I figured this was a chance to do something at least a little different. Ha ha, yeah, not a great idea.
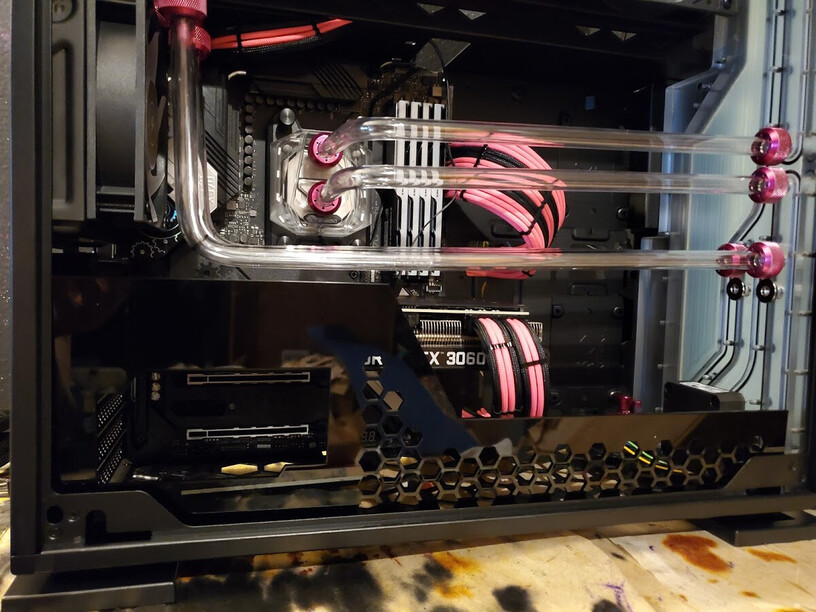
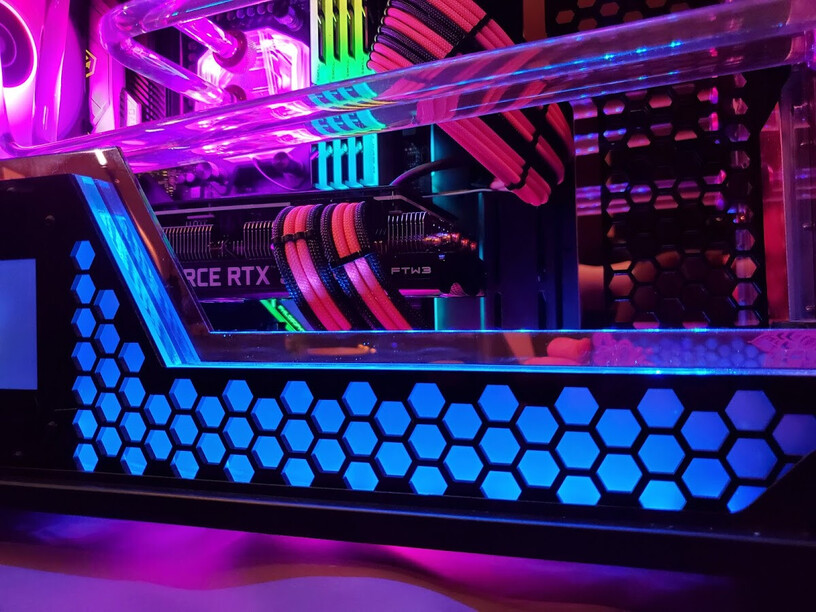
I did manage to snag a GPU (at MSRP no less!) but it was just a touch longer than I really had room for…

Not that it wouldn’t fit in the case, but that connecting the distribution plate to the bottom radiator became an order of magnitude more challenging and I had to route the power cables differently than expected which put that radiator in the way of the cable passthrough I needed and… this just wasn’t going to work.
So I moved it, and then got myself another pair of 90 degree extension fittings to make tube bending at least a little easier… this is the end of this radiator being a problem, right? No, of course, it isn’t. We’ll come back to that.
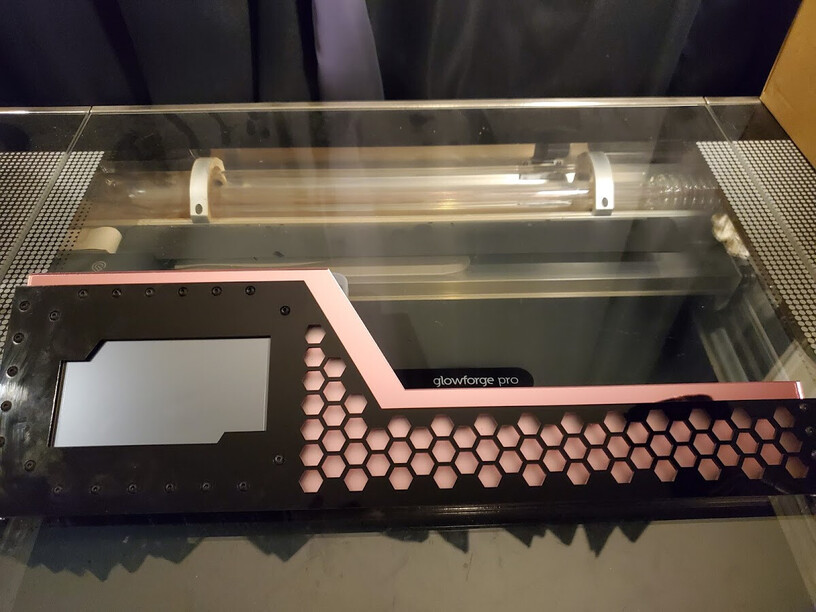
At this point, I could finally design a bracket! I tried several creative things for the front cut out, most of which looked cluttered and bad. Eventually I landed on this -
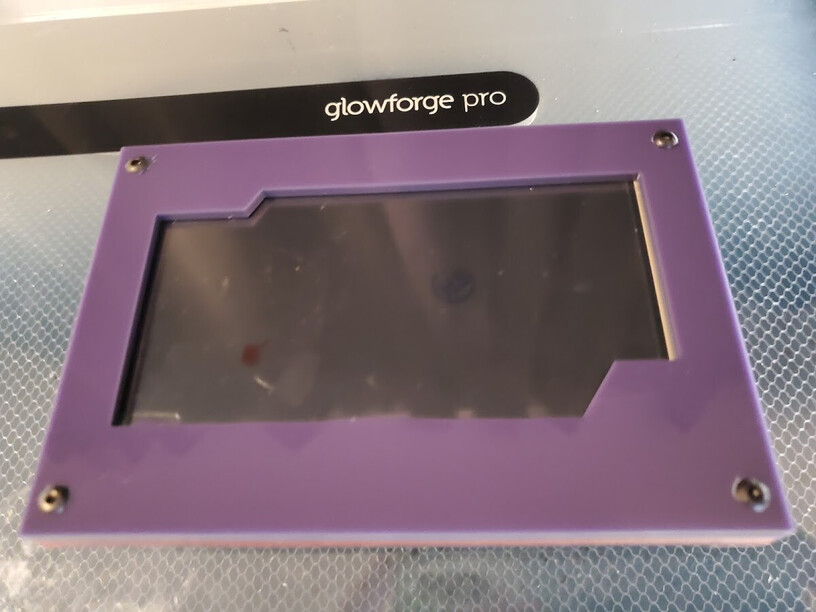
My original idea had been to do this assembly in 3 layers - an opaque front with some interesting cutouts for lighting, a layer of frosted acrylic to diffuse the lighting and a reflective back layer. As thin as LCDs are, they’re not quite thin enough for that to work but I figured I could throw in a spacer layer in clear acrylic (or multiple spacer layers if needed.)
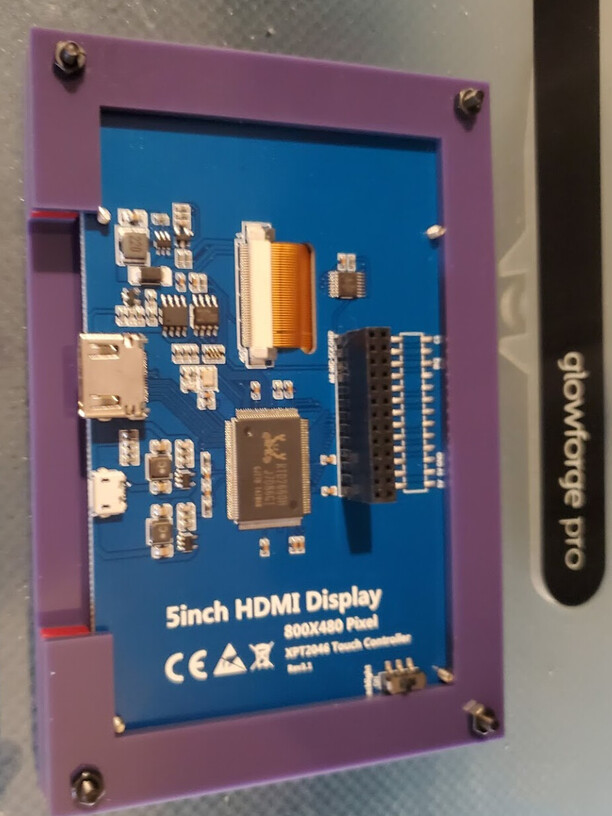
Given that this particular LDC was intended for a Raspberry Pi there was a connector on the back that I really didn’t care about, but I figured I didn’t have to be too precise as long as it cleared the standoffs and held things in place.
After that I did a quick fit test on a draft version of the panel…
Remember that radiator? It came back to haunt me. Technically, the piece fits. The problem is, you can’t actually put the thing in place if the radiator is mounted there. I got the test piece in because I could flex it but… 4 layers of acrylic aren’t going to flex that much.
At this point I said “well, might as well go for it” and did the not smart thing. I ran with the panel as designed…
Let’s call this the “not smart” way of dealing with the position I put myself in. I finished up the wiring, removed the radiator, installed the panel and then reinstalled the radiator. At this point, if I need access to any of the fiddly bits of wiring along the bottom of the motherboard, or if I want to pull the GPU (or just add another one, one of the two of which will happen) I have to drain the loop, and remove the radiator before I can remove the sensor panel to access any of that… Did I mention that I hadn’t done a power on test yet? I was just waiting to find out that I had something like a lighting strip that wasn’t properly connected to an RGB header that I’d have to drain the loop in order to fix. Oh… and the panel makes it a little harder to access the drain, you know, just because I like to make my life hard that way…
But I had leftover mirrored pink acrylic and an SSD mount that I wasn’t using for anything so I figured - why not do something interesting with it? Honestly, I wish I had done this in a way that let me run another strip of lights to the panel, but as a thing to hide wiring behind and bring some interest to that part of the case, it didn’t turn out too bad. I used a piece of 1/4" acrylic as a spacer on the SSD mount to give myself some room for wiring to pass behind it but if I ever needed to use a 2.5" SSD, I could still install one in the lower mount behind the accent panel and you’d just never see it.
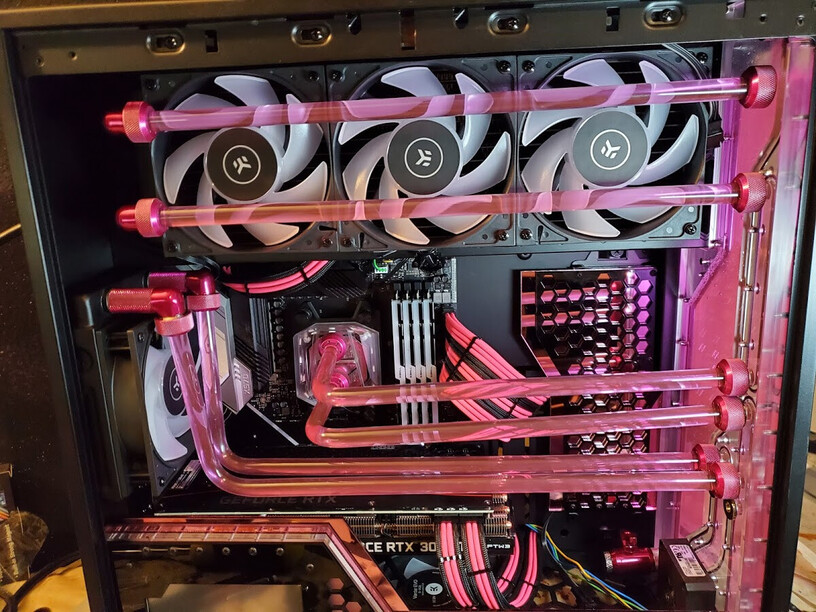
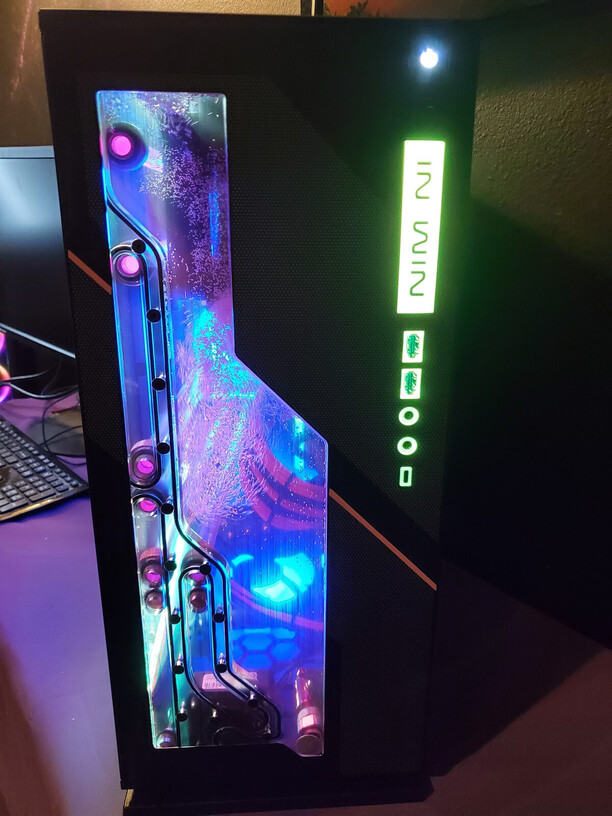
And there it is, full of coolant and ready for me to find out if I’d made a horrible mistake or not.
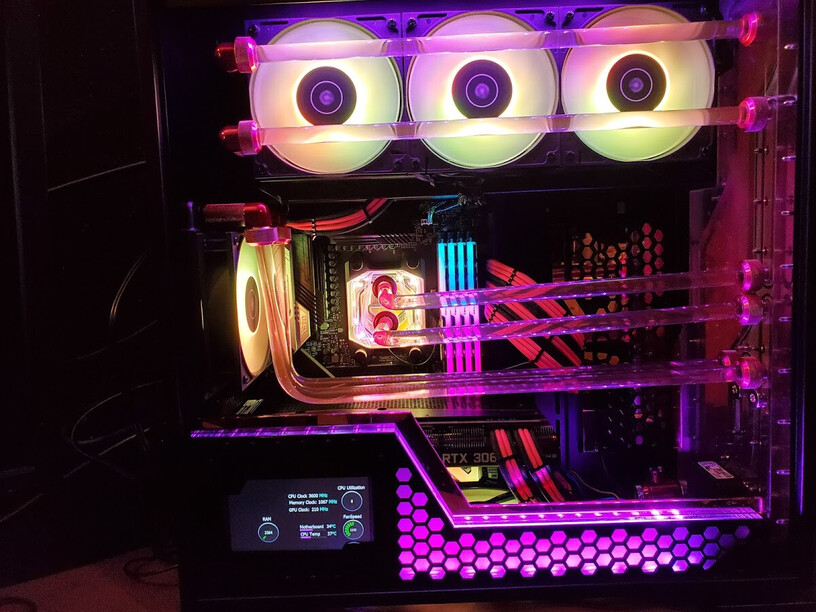
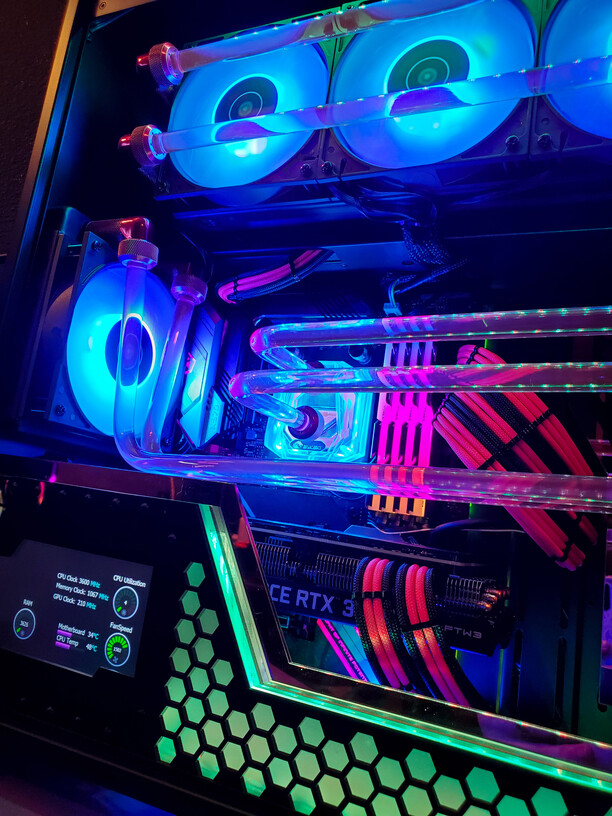
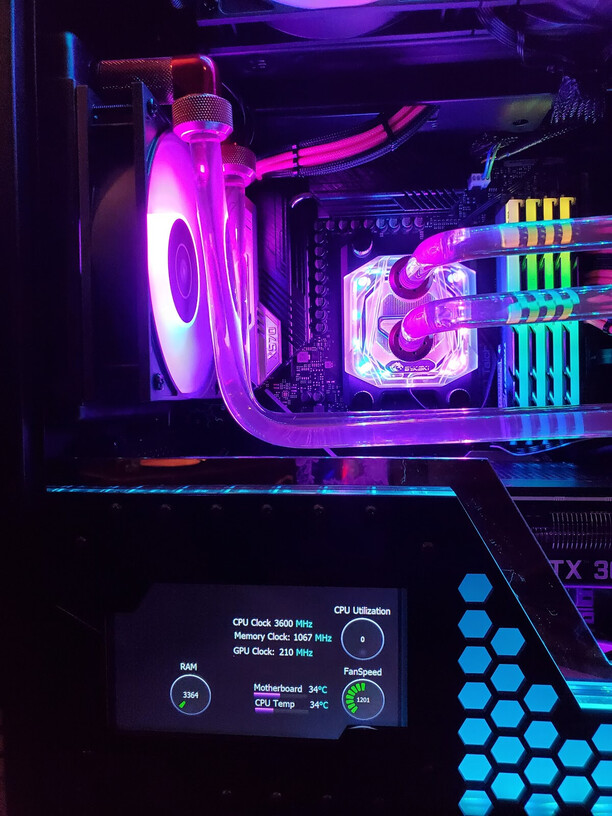
All in all, not too bad. The lighting on the sensor panel does exactly what I wanted it to do. I still have a fair bit of customizing work to do in Aida64 on the sensor panel itself, but it looks good as an internal display.
And the edge lighting isn’t half bad either.
Aesthetically, I’d give the end result a 9 out of 10. It looks really nice. As an overall build, closer to 7 out of 10. There are other solutions to the problems I had, but ultimately, it’s not enough case for me. It’s super cramped along the bottom, and the distribution plate causes more problems than it solves - yes, it makes loop planning fairly straightforward, but it has ports that are too close to each other or to the walls of the case, it blocks mounting points for fans and it really doesn’t work well if you’re using fittings that aren’t set up for tightening via allen key. All of which I made worse with the LCD mount.
In short, it looks great, but it has some functional problems that - while they don’t impact system performance - make maintenance harder.
Things I would do differently
Re-orient the LCD panel
More than anything else, I had the wrong response to the radiator blocking the installation of the panel. I should have oriented the panel vertically and put it on the right-hand side instead of where I did. The tradeoff would have been seeing less of the custom cables on the GPU but the wins in maintainability would have been pretty significant. When I next drain the loop, I think this is a change I’ll look at making.
Fan Grills
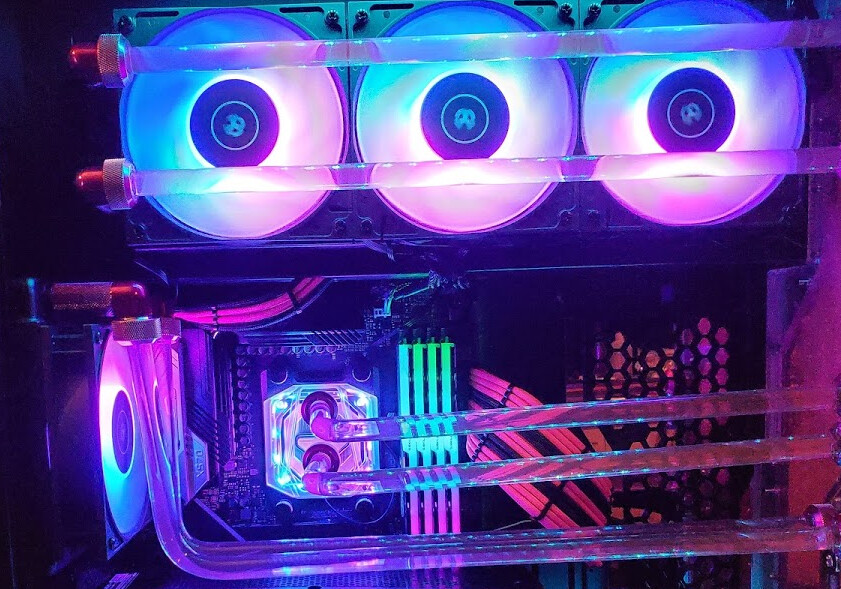
Don’t get me wrong, they’re pretty fans. I actually like them more than the Corsair LLs from my last build. Still, I’d love to have put a honeycomb fan grill over these to tie things together a bit more. I used 30mm 90 degree fittings on both radiators to make running the tubing a bit easier - it just didn’t leave me more than 1 or 2 mm of clearance between the fitting and the fan. Maybe I could track down some 1.5mm acrylic and still do fan grills the next time I take it apart for maintenance but I could just as easily have used 35mm 90 degree fittings to give myself some extra room.
Opaque Coolant
I like the idea of UV Pink coolant… but once things are lit up, you can’t even tell.
Half the reason to buy this case is the distribution block that’s visible from the front.
Silver Mirrored Acrylic
It’s just a little bit cheaper and much like the pink coolant, once the lighting is on, you don’t get a strong sense of pink from the mirrored acrylic. Not worth the extra $$.
Parts list for those who are inclined
I ordered most of this the weekend after Black Friday and then it spent a month solid sitting on my bench and making me look like some kind of tech reviewer on most of the video calls I was on:
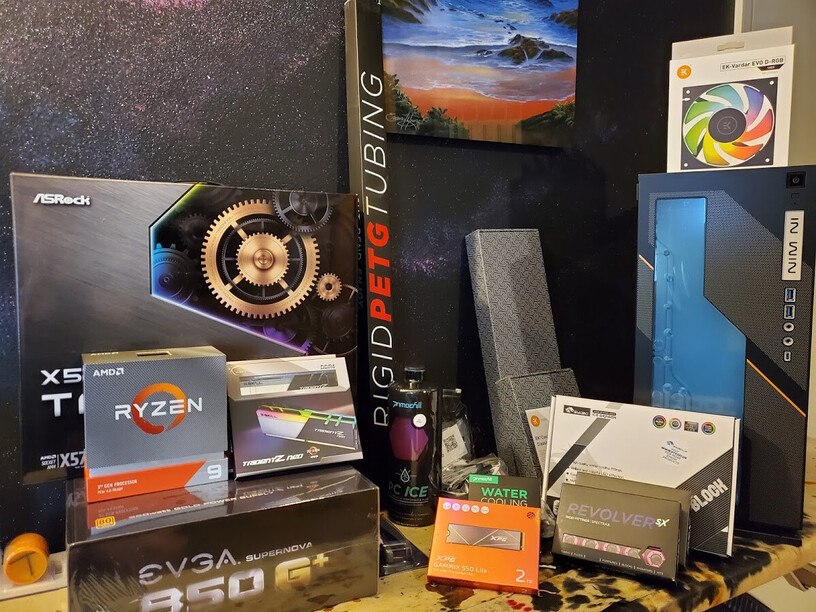
Case: In Win 303 - EK Edition (would not recommend.)
CPU: AMD Ryzen 9 3950X (because I gave up waiting for a 5950X)
GPU: EVGA RTX 3060 Ti (Yay for EVGA Step Up because this isn’t going to cut it long term)
Motherboard: ASRock X570 Tai Chi
RAM: 64 GB G. Skill TridentZ Neo 3600
PSU: EVGA Supernova 850
SSD: 2TB PCIEe Gen4x4 from XPG
Fittings: Primochill Revolver
Fans: 5x EK Vardar
Radiators: EK Classic SE (120mm + 360mm)
Custom Cables: Mainframe Customs