I recently bought a Glowforge for my husband as a gift. We’ve been having some fun playing around with it, and he’s even made a couple of wooden signs for our son’s Scout troop that have come out pretty cool.
Speaking of our son, my dad used to also be a Boy Scout, back in the day. Not too long ago, he gave our son his old camping knife. It’s dated from the 1950’s, and is a fixed blade knife. My son’s been working on restoring it (it was very dull, the handle was falling off, missing a rivet, all kinds of issues), and he’s finally finished that project. But the sheath the knife came with is leather. (Again, from the 1950’s!) I have no way of knowing how it was tanned, but I’m reading that’s important. (If anyone has a way I can test it without damaging it, that would be terrific.)
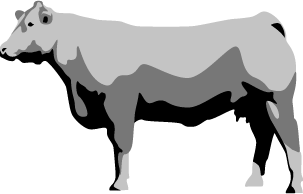
My dad is also a longtime farmer, and has his own little logo for our family farm , and my son wants to have that engraved on the leather sheath for the knife. I’m pretty good at Adobe Illustrator (considering its use is part of my day job), so I drew it out as an SVG file, but I made it multi-layered. It’s basically a picture of a cow, and it’s got shading (basically three different colors). I was thinking we could engrave each layer of shading at reduced power on each pass. But again, it’s OLD leather, and I’m not sure how it was tanned, and I’m also not sure how it would do with multiple passes like that.
Anyone have some advice/suggestions for me? (Even if it is to say “don’t do it”, which we’re all willing to accept if that’s the necessary advice. Perhaps we could make a new/different one and leave the original alone, if need be. But my son’s really hoping he can do it, so I figured it can’t hurt to ask those who would know!) If it helps to see the image, I will attach it below:
You’ve only really got two colors to work with using a laser, burned (black) and unburned (white). So three colors isn’t going to really work too well.
What you want to do is increase contrast (actually that is pretty good from a contrast standpoint) and then convert it into a raster image. Once it is rasterized, the Glowforge will apply a dithering program to it to space the dots farther apart giving the appearance of grayscale…like old newspaper pictures.
For that, you would use one of the Photo Engrave settings in the Glowforge interface. Make sure you use masked leather for a practice run, and mask the sheath, or use lower power settings…leather burns really easily. Run some tests on a scrap before hitting the sheath.
(I use 2% power, 1000 speed and 270-340 LPI for engraving on leather without masking.)
If it’s a shaped sheath, pretty good odds it’s veg tanned.
I wouldn’t do multiple passes at all. You want to go shallow on leather; cutting through the surface for a single-color engrave is okay, but you won’t get different colors at different depths; you’ll just have a cow silhouette in dark char.
What I would do is a light engrave, enough to mark the surface but not cut through, using “convert to dots” rather than “vary power.” Do some tests on the PG leather you got in your “free” package, to see how light the settings need to be. (Remove the masking first; it will just make a sticky mess if you leave it on.)
Or not. Almost all discussions of engraving will be incomplete, because it’s complex.
Use the vary power setting and it will not use dithering. You’ll get a better result. I would suggest trying the design on some scrap material (even if it isnt leather) to get a sense of how it’ll look.
If you have a scrap of leather laying around, (proofgrade leather would work), I’d remove the masking and try a vary power engrave with manual settings. Do not set your material as proofgrade, and try it out manually.
Ah, thank you. I know in some previous tests on wood, if we reduced he “Power” level, the depth/darkness of the engraving changed. So I thought that could be done with the above picture, as well (the app is separating the colors, so the power level would be the highest for the black, and lowest for the light gray) I was worried that multiple passes might do something weird, though.
FTR, the image I uploaded isn’t the image file type I’m using - I just provided a PNG for visual aid. I have it as an SVG file, and the app is separating each “layer” for me, and I thought I could do it one at a time.
But your idea actually sounds a LOT better/easier - I’ll see what I can come up with for that! Thank you
As @Jules has explained there’s really only the two colors to work with and I think multiple passes on leather are both not necessary (you could change the power/speed for each color instead) and would weaken your leather quite a bit.
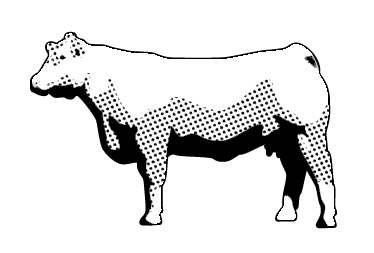
Sounds like you have some design chops, you could take this as an opportunity to play with the design a bit to maximize the limitations of GF engraving. Using your example cow something like this perhaps: