I flew in this evening and promptly setup my Glowforge. A few things I noted.
The setup instructions-So the first thing you are supposed to do is go to app.glowforge.com and start there right? Umm wheres the link there to the setup/unboxing instuctions? Oh, no. That’s in an e-mail you got a while back, or available after you set it up. No problem. Watched a youtube video on unboxing it instead.
I had issues connecting to my regular wifi, so I had to connect it to my guest wifi network. An ethernet jack would be handy.
I had signed in as a guest on another users glowforge, This may be why the setup skipped the part where you name your glowforge. Sent an e-mail to Support to have them name my forge.
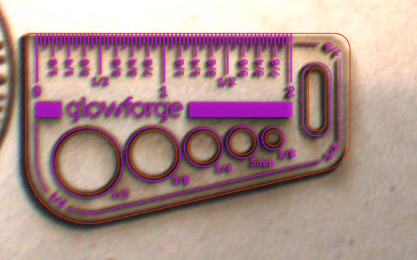
Printed the traditional founders ruler fine.
Headbanged on calibration after that print, reset head and restarted unit.
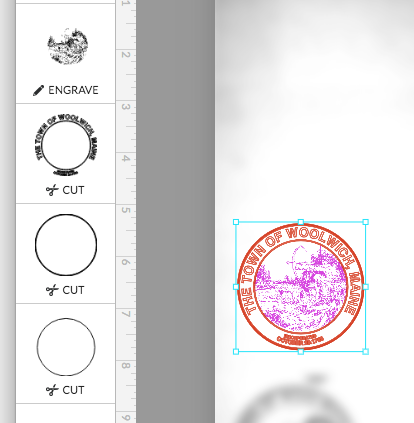
Load my first design, a town seal. I find it has conveniently split the engrave and Cut areas. There are 2 areas of engrave though, the vector components and the raster. Can’t seem to find a way to combine the engrave operations into one, so it needs to engrave the job twice.
Got more than one “Unable to process” errors with no idea what they mean.
Engrave is slow. I hope I’m doing something wrong. The head seems to lazily sweep back and fourth, regardless of settings.
I did get a job to print. I need to play with settings because the part I got out wasn’t as good or as quick as my K40, and I know this unit will do better.
Here’s what I get when I import my Inkscape plain SVG.
For some reason the raster engrave, Lettering and outer ring all appear as seperate engraves. I have a thin outer ring that it correctly sees as a cut, but the thicker outer ring I want to do as an engrave, but it sees it also as a cut. Converting it to engrave makes it want to engrave the interior of the circle as well.
The ring you want to engrave is just a vector circle? You can either cut or score the circle (single kerf width) or you can engrave the interior.
If you want a thicker engraving of the circle, you cannot just give it a stroke width. The Glowforge ignores stroke width. You instead need to convert it to an outlined path.
As you noticed, it is treating each engrave as a separate operation, and since it is basically 3 concentric areas, it is going to make three passes over the area. If you want the same settings for them, you can rasterize the 3 pieces together in your design software and then just have a single raster engrave do all three elements at the same time.
The link on the sheet inside my box said go to setup.glowforge.com, not app.glowforge.com. The first thing were the instructions for unboxing. Though if you were excited and in a hurry it would be easy not to notice that the instructions were more than one page and you needed to scroll through them. Thought it funny that you had to open the box to find the instructions on how to open the box.
So pumped you have your Pro now. I expected more speed on my basic as all of the other lasers I had seen had fast head speeds. I would’ve expected the pro to be faster. I would like to compare sometime. If you want, send me a small file and we could do a test between the pro and basic on how long the job takes. That would be interesting to see.
Congrats. Glad it is working. Lots of little issue that deserve attention to enhance the out of box experience.
Setup requires the coordination of distinct steps plus getting instructions that rely on the user keeping three separate mental spaces as I understand it. The first is actually getting to the setup instructions pages of the support and reading it and understanding it and having the presence of mind to isolate that resource on a device that is always there for you to follow. That device need to remain connected to the internet for refreshes and jumping from page to page as needed.
Then there is the small setup browser app that relies on the ad-hoc network that the Glowforge offers to enable connecting the Glowforge to the local, or home wifi network. Whatever device you use to shepherd this connection process may temporarily lose connectivity to the internet. If you have cell data going, you could have another browser window or tab open to the GFUI app itself just waiting for a connection to the new Glowforge. The connection app should hand off and send you right to the GFUI app automatically, even reconnecting to the local wifi network. If there are issues then you are kind of caught between the machine setup app that may or may not have connected correctly and the GFUI browser app.
Then there is the GFUI home screen that has the design catalog on it and the menu item in top right that gives settings and connection status. Theoretically you would automatically have landed there but perhaps not.
I think there is a problem often with setup and first prints because the GFUI browser app is the home tab for the support tab which contains all the instructions.
I think that the first link needs to go to an instructions/how to page. But even then there have been issues such as clicking next before you have scrolled down to further instructions.
What would a flow chart look like documenting all this effectively.
As to two engraving operations, if you embed a bitmap or place a bitmap, it will always process as a separate operation. You can make vector fill objects all process in one pass operation by making them the same color and combining them as a compound path in the design. But you can’t merge a vector fill engrave with a bitmap object engrave.
Slow. Yes although that is always a question of context. But you will not be able to knock out a full bed of engraved objects quickly. We are talking at least a half hour for many hand sized engraves. It is not a fast production machine.
I think a big part of the speed issue is the glowforge head has a lot more mass than the standard lens and mirror design. The head housing is machined aluminum, has a fan to clear the lens bore of smoke, a motor to actuate lens focus, a camera with lighting, the red laser, the window and mirror and the head carriage has the air assist mounted on it.
I seem to remember Dan saying the head has like 8 systems in it. I read it at 371.7 grams, right at 13 oz. That’s going to determine how fast you can yank that around.
But the workflow can be smoother and with fewer failed cuts requiring another pass, it’s often pretty equivalent in getting something actually complete (especially with PG that’s pre-masked and pre-finished).