Even if I was inclined to create files for a spray paint can storage rack, and I am not, I would need to know a lot of information in order to complete the job. I am inclined, however, to pontificate and lecture about design, so I’ll just do that instead. While this tutorial will design a spray paint can rack, for the lurkers out there it could be used to make a K-cup holder, jar holder, or a holder for pretty much any set of containers.
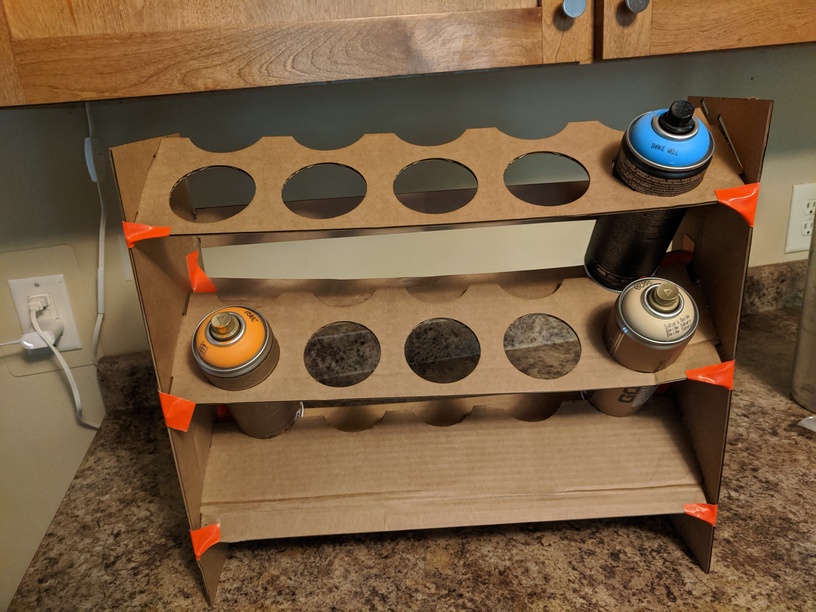
I am not going for the bin style of rack linked to in the OP, but the one in the photo marmak3261 posted. This is the prototype in cardboard.
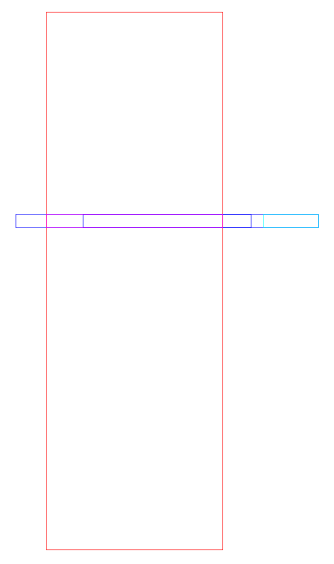
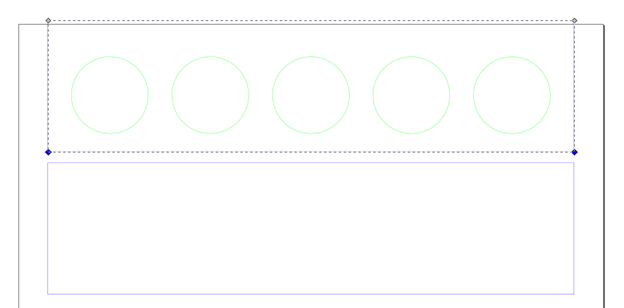
Open Inkscape, set your artboard to 12”x20”. While you’re in Document Properties set your display units to the measurements you use, so either inches or centimeters. I’ll be using inches in this tutorial. Make a spray paint can. I measured mine to be 2 5/8” in diameter and roughly 8” tall. We design in 2D so our can can be 2D. The can is the red rectangle. We need a cross piece, the blue rectangle, and we need a hole for the can, the green circle. The green circle is the diameter of the spray paint can, so 2.625”.

The design on etsy was for larger sheets than the glowforge can cut, so I will assume we’re designing for the Basic or Plus. This means we’re designing for the size of material that will fit on the bed. If you have a Pro go bigger. The first thing to do is move the red can out of the way; it’s role is well down in this tutorial. The next thing is move the cross piece to the left and make it as long as will comfortably fit on your material. I did this by changing the values in the H and W box at the top of Inkscape. Write down the width. I chose 18”. You will need this for the stop bar (a section that is way below.)
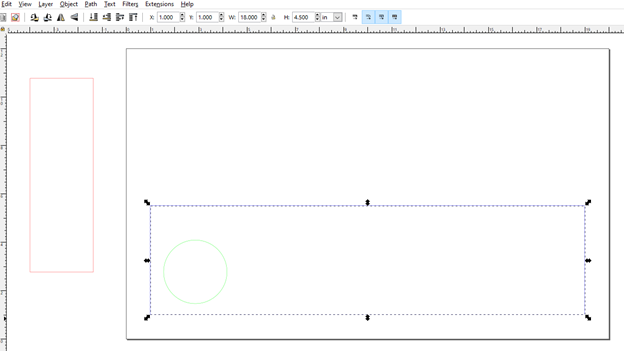
Next, select the green circle and copy it (Edit->Copy or Ctrl+c). Then paste (Edit->Paste or Ctrl+v) a bunch of copies and fit them in the cross piece. Paste all the circles above the cross piece. Then select all of the circles (see below).
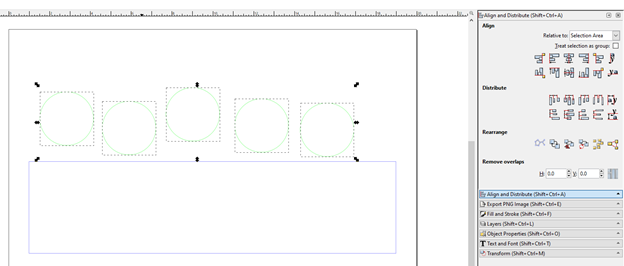
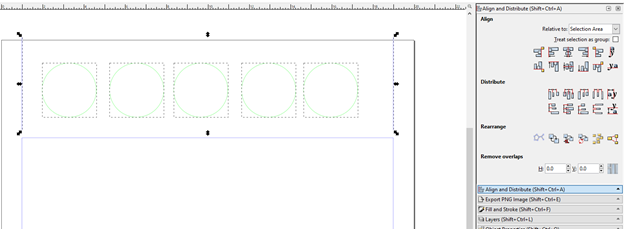
Go to Object->Align and Distribute. In the dialog click on Center on Horizontal Axis (under Align, third icon, second row.) At this point, you can take the easy route or the OCD route.
The Easy Route:
With your green circles selected click on Make Horizontal Gaps Between Objects Equal (under Distribute, fourth icon first row.) That’s it. The holes for the spray cans are now equally spaced based on the position of the first and last circle. You may now skip the OCD Route and go to the part where you move the green circles into the cross piece.
The OCD Route:
Select the cross piece and copy it. Next go to Edit->Paste in Place. This places a copy of the cross piece directly on top of itself. Using the up-arrow key move it so it is directly above the original cross piece. Go to Path and select Object to Path. This turns the rectangle into a regular object. Using the Edit Paths by Node pointer (second icon on the left-hand-side ) select the bottom line. The diamonds on the right and left ends will be blue. Then click on the Delete Segment Between Two Non-EndPoint Nodes button.
Do the same for the top line. You now have the two side lines remaining. With them selected go to Path->Break Apart. This is very important. Before you break them apart they are still a single object. Once you select Break Apart they become two objects. Select the two end lines and the circles and click the Make Horizontal Gaps Between Objects Equal button (under Distribute, fourth icon first row) from the Align and Distribute menu. This will make your circles evenly spaced between the right and left sides of the cross piece.
Move the Circles Down
Delete the two end lines and move your circles down into the cross piece using the down arrow key. Using the down arrow key won’t move your carefully spaced circles to the right or left.
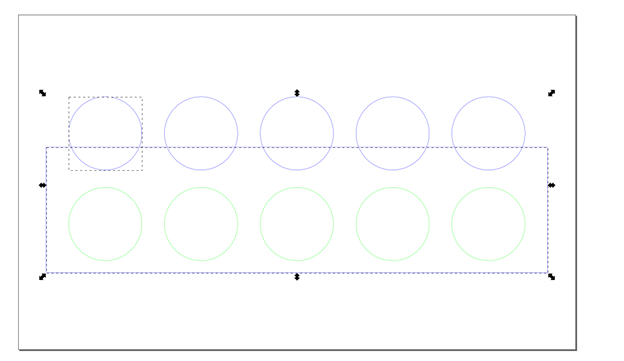
For this design we don’t want the circles centered in the cross piece, which is why we didn’t snap them; we want them closer to the bottom edge than the top edge. Exactly where is up to you. Once you have them placed, with all of them selected make a copy. Then go to Edit->Paste in Place. Move this second copy up so the bottom of the circles overlap the top of the cross piece. If this second set of circles is a different color than the cross piece, make the circles the same color as the cross piece. I do this using the Stroke Paint tab of the Fill and Stroke menu, but you could also use the handy color bar at the bottom of Inkscape.
Select one circle and the cross piece like this:
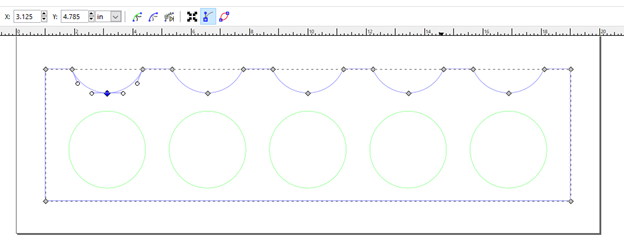
Go to Path->Difference. The circle will be subtracted from the cross piece and we have our first can rest.

Repeat with the circles remaining in the top row. Now it’s time to write more stuff down. Select the cross piece and write down the Y coordinate from the Y: box near the top of your Inkscape window. Mine is 1.100. Next write down the Y coordinate from one of the green circles. Mine is 1.535. Select the cross piece using the Select Paths by Node pointer (it was used in the OCD Route section to delete the two horizontal lines.) Select the bottom node from one of the can rests. Mine is 4.785 (the blue diamond below.)
Next make a rectangle that is the width of your material and shorter than the height of your cross piece. This will be the tab that inserts into the side of the paint can rack. Make two copies of it for three total tabs. My cross piece is 4.5” tall so I made my tab 2.5” tall. I could have made it an inch, two inches, three inches or what just looks good. Just don’t make it tiny.
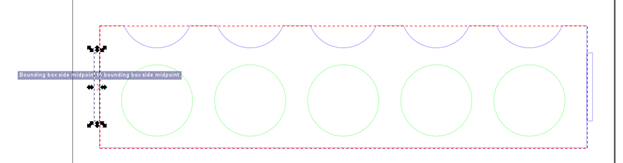
In Inkscape you want to make sure the following three icons are selected: Enable Snapping, Snap Bounding Boxes and Snap Midpoints of bounding box edges. The way I have Inkscape setup these icons are in a vertical column on the right hand side and look like this:

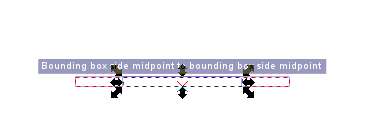
Move one of the tab rectangles to each side of the cross piece until it snaps. It will look this:
When both tab rectangles are placed, select them and the cross piece and then select Path->Union. Finally, select the cross piece and all the circles and then select Object->Group. Grouping locks all of the selected objects together so that they keep their position. Yay! We finished the cross piece. Now move the cross piece out of the way.
Make a rectangle whose width is the height of the cross piece and whose height is the thickness of your material. This is a cross section of the cross piece. Select the third tab rectangle and then click one of the Rotate the Selection 90⁰ buttons. It doesn’t matter if you rotate it clockwise or counter clockwise. Click the Snapping Centers of Bounding Boxes icon (see above where you made sure the three icons where selected.)
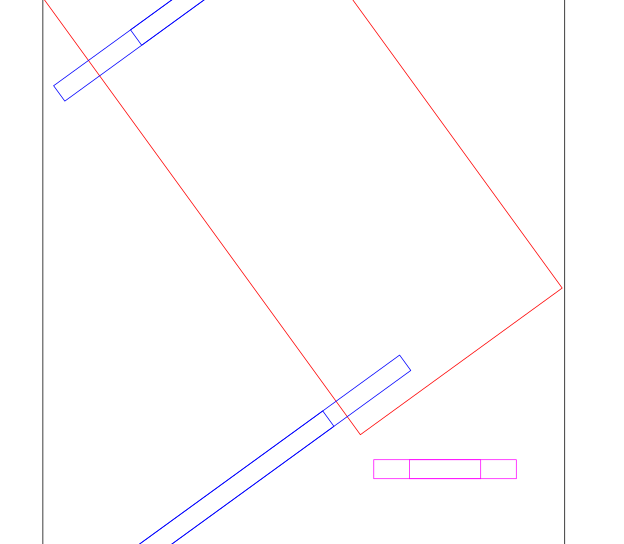
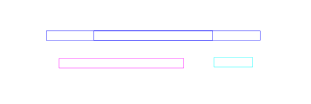
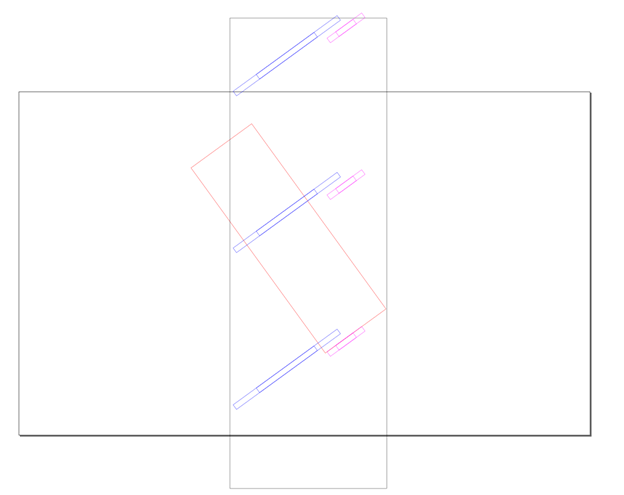
Make a rectangle whose width is the diameter of the can (green) hole and whose height is the thickness of your material. It will help if you make it a different color than the other two rectangles. Subtract the Y-coordinate of the bottom node recorded above and subtract it from the height of the cross piece plus the Y-coordinate of the cross piece. I made the height of my cross piece 4.5” so for me I would first add the cross piece’s Y-coordinate (1.100) to the cross piece’s height. 4.500 + 1.100 = 5.600. Now subtract the Y-coordinate of the bottom node from this sum. 5.600 – 4.785 = 0.815. This is the depth of the can rest. Make a rectangle whose width is the depth of the can rest and whose height is your material’s thickness. Make it a different color than all the rest of your rectangles. In the image below the longer blue rectangle is the width of my cross piece. The shorter blue rectangle inside the longer one is the cross piece’s tab. The pink rectangle is the hole for the spray cans and the aqua rectangle represents the inset of the can rest.
Click the Snap to Edges of Bounding Box icon. Snap the right-hand-side edge of the depth rectangle to the right-hand-side edge of the cross section rectangle.
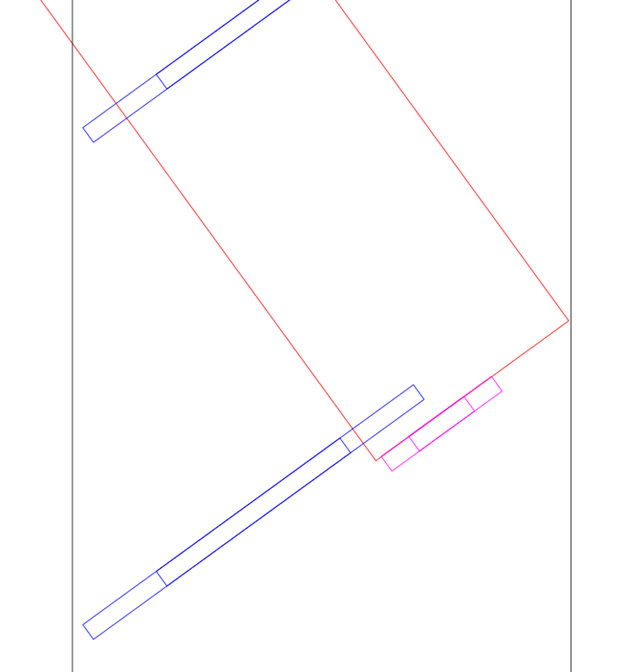
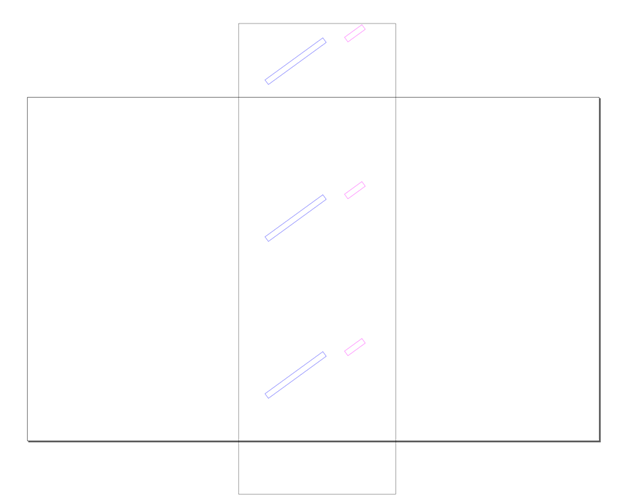
Subtract the Y-coordinate of the cross piece from the Y-coordinate of the green circle to get the circle’s inset. In my case this is 1.535-1.100 = 0.435. Select the cross section rectangle (long blue one) and note its X-coordinate and its Y-coordinate. For me the X is 4.195 and the Y is 8.516. Add the inset to the X coordinate. 0.453 + 4.195 = 4.648. Select the rectangle that is the width of the can (pink one.) In the X and Y box replace the values with X+inset value and the Y-coordinate. So I would type 4.648 into the X-coordinate box and 8.516 into the Y-coordinate box. And this is what I made:

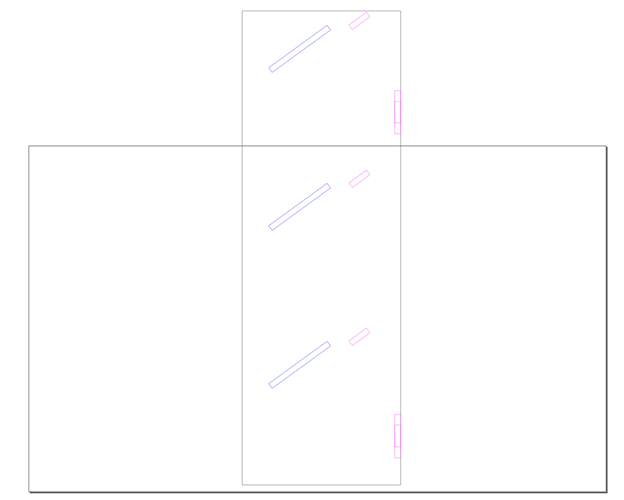
Select all four rectangles and then go to Object->Group.
Select the spray paint can you made at the very start of this exercise and set its X-coordinate equal to the X+inset value (the same x-coordinate as the rectangle that is the width of the can (pink one), in my case 4.648.) Use the up and down arrows to position it so the cross section is where you want it to come on your spray paint cans in real life.
When you have the spray can positioned where you want it vertically, select it and the cross section rectangle and then select Object->Group. Make a copy and stash it off to the side. There is going to be a lot of fiddling and if you get hopelessly lost you’ll have a copy to start fresh.
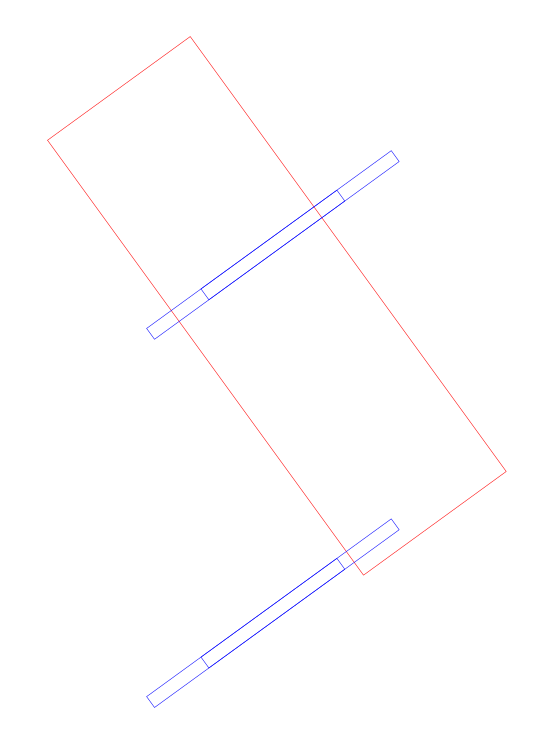
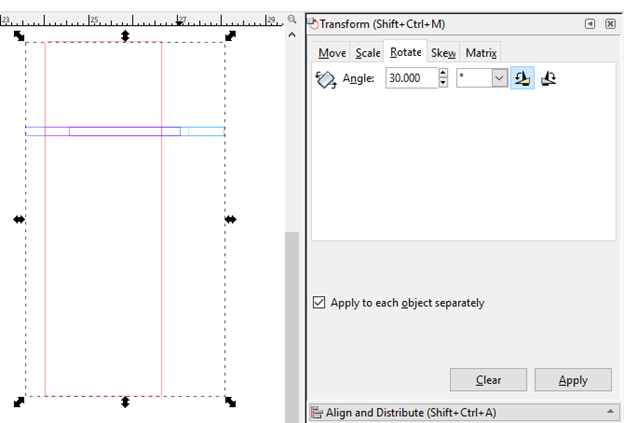
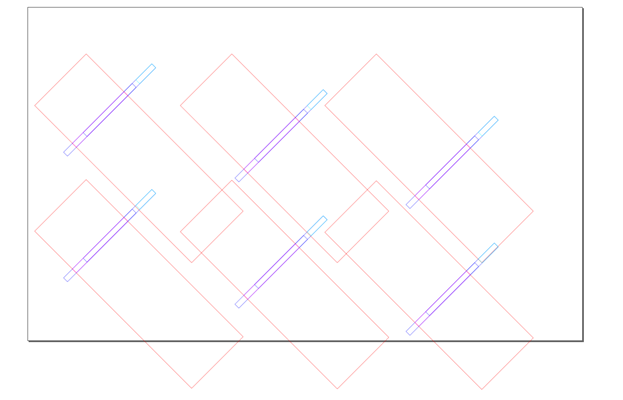
Select your grouped spray can/cross section and open the Transform dialog. Go to the rotate tab and enter the angle you would like to have your cans at. Make sure Rotate in a counter clockwise direction is selected and click Apply.
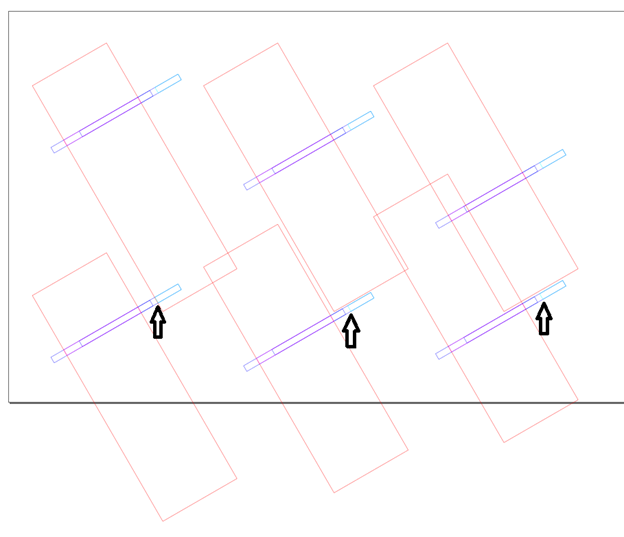
Next, make a copy of your rotated object and go to Edit->Paste in Place. The whole design rests on not moving the copy left or right. Not even by a thousandth of an inch. You only move it up and down. I recommend using the down and up arrow keys (your other option is to manipulate the value in the Y-coordinate box.) Move the copy down until the left-hand side of the inset rectangle lies along the bottom-ish of the spray paint can. In the illustration below I have shown how the angle you picked may or may not work.
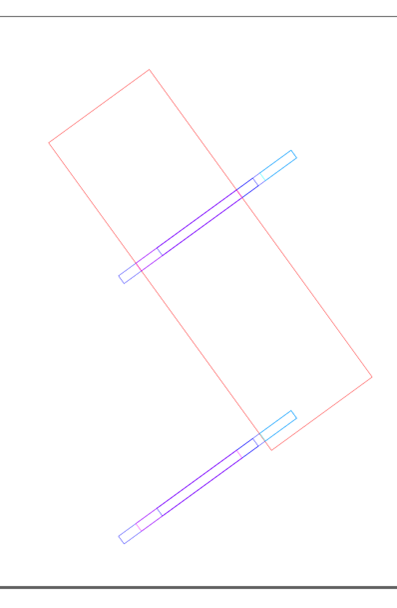
Each of the three examples above are identical except for how high the cross section rides on the can. Each was rotated 30 degrees and then moved down. The middle can and the one on the right will never rest on the can rest of the lower cross piece. The black arrows show where the top can needs to rest. Where the top can will rest is dependent on how high up the can you want the cross piece to be, the angle of rotation, the depth of the can-rest-inset and how close the hole is to the front of the cross piece. Change any one of these factors and you’ll change the distance between cross pieces. In the illustration below I have changed the angle of rotation to 45 degrees. This angle works for all three locations of the cross piece.
If you don’t like your first try just delete the copy and rotate the original can object back to vertical. You do that by rotating it clockwise the same number of degrees you rotated it counter clockwise. If you want to change where the cross piece is placed go to Object->Ungroup. Now you can move the can up and down. Remember to go to Object->Group before rotating again or you may get some funky rotations.
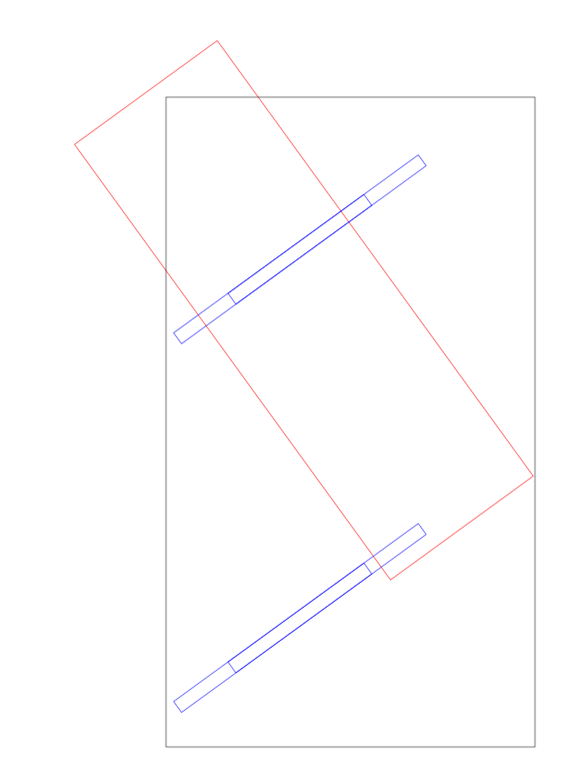
Once you have it the way you want, ungroup both objects. Delete the can from the bottom one. You should have something like this:
The X-coordinate of the top and bottom cross piece must be identical. WARNING – It is the X-coordinate of the CROSS PIECE not the top can. You ungrouped them so make sure you are checking the coordinates of the cross pieces only and not the can. Then write down the values of each Y-coordinate. My Y-coordinates are 6.365 for the top one and 0.886 for the bottom one. The difference between these, 6.365 – 0.886 = 5.479, determines how many cross pieces can be placed on each vertical support. The smaller the difference, the more you can fit.
Select one of the cross pieces and ungroup it. Do the same for the other one. Select the inset rectangle from one of the cross pieces and delete it. Do the same for the other cross piece. Select the can rectangle and delete it. Do the same for the other cross piece. It should look like this:
Now draw a rectangle around this. Don’t worry about the height of the rectangle, we’ll use math to determine that. The left-hand side of the rectangle is where the front of the rack will be. The right-hand side of the rectangle is where the back of the rack will be.
If you are going to mount the rack on a wall, the back of the vertical support (the black rectangle) has to extend to or beyond the furthest point of the spray can. Otherwise the only rule is that the vertical support has to encompass the tab rectangle of the cross piece.
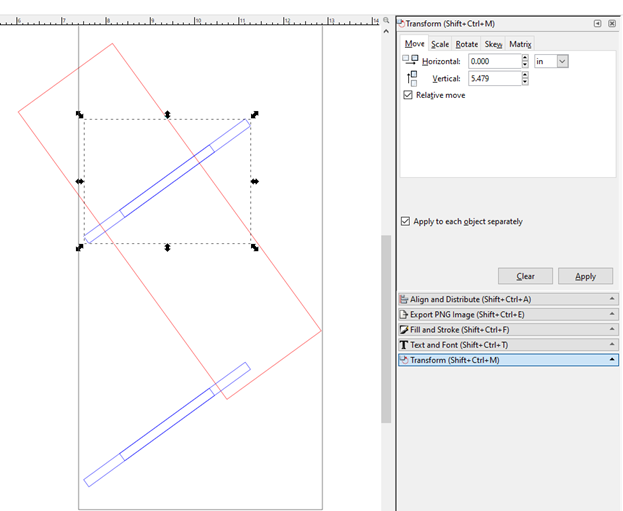
Select both rectangles of the top cross piece and group them. Then make a copy and then go to Edit->Paste in Place. Open the Transform dialog and click on the Move tab. Enter the difference between cross pieces you calculated previously and enter it in the Vertical box. For me the difference is 5.479.
Click Apply and now you will have three vertically aligned cross pieces. Depending on the distance between your cross pieces, and the size of your material you may only be able to fit two cross pieces, or maybe you can fit, four, five, six or more. Keep making copies and keep spacing them the correct distance.
If you are going to wall mount these we’ll need to do some math to figure out the height of the vertical support rectangle. If you are not going to wall mount the rack, or you will wall mount them but don’t want them to stack, make the vertical support rectangle whatever height you want. If you want a stackable rack continue with the next section, otherwise skip to the Stop Bar section.
Stacking the Rack
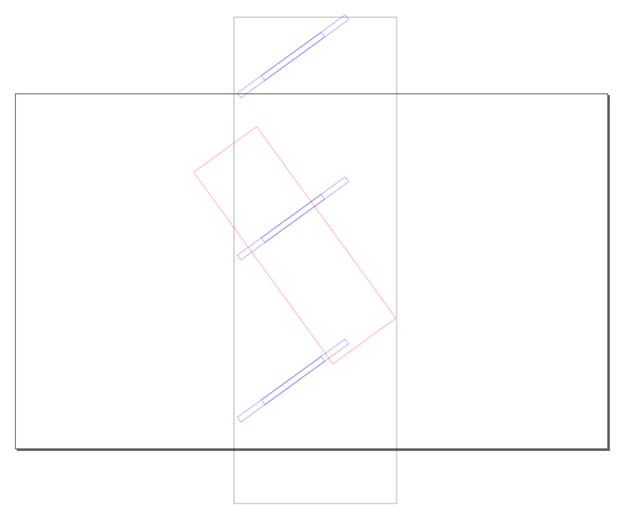
The vertical support will be the number of cross pieces times the distance between cross pieces. I have three cross pieces so I multiply 3 by my difference of 5.479. 3 x 5.479 = 16.437. Select the vertical support rectangle and in the H: box near the top of Inkscape enter your height.
Divide your difference between cross pieces by 2 and subtract that from the y-coordinate of your bottom cross piece. 5.479 / 2 = 2.7395. My Y-coordinate is 0.866 so I subtract 2.7395 from it. 0.866 – 2.7395 = -1.8735. Don’t worry if it is a negative number, Inkscape will be fine with it. Select the vertical support rectangle and enter your value in its Y-coordinate box. My result looks like this:
It’s okay if the top cross piece peeks out a little bit. When two or more are stacked on top of each other the cross pieces will all be the correct distance from each other.
Making the Stop Bar
The penultimate task is to make a stop bar so gravity and the paint cans don’t conspire to make the cans fall out the back. If you are going to wall mount the rack(s) you could skip the stop bars, but you’ll dent and scrape your wall. First we will make a cross section of the stop bar. To do that make a rectangle whose height is the thickness of your material and whose width is less than the diameter of the spray paint can. You could make it wider than the spray paint can if you are so inclined, although it will complicate things, you be you. I made my stop bar 1.5” wide. Next make a tab rectangle for your stop bar. I made mine half the width of my stop bar, or 0.75”. Finally group them. If you are going to wall mount the rack, make a copy and move it off to the side. Place the original stop bar somewhere under the paint can. This is my result:
Select the stop bar and rotate it counter clockwise the same amount you rotated your cross piece. Using the mouse and/or the arrow keys, place the stop bar so it will stop the paint can from sliding out the back.
You can place it towards the bottom of the can like I did, towards the top, in the center, whatever you like.
Make a copy of the stop bar and do an Edit->Paste in Place. Then use the transform dialog to move it vertically the same distance as the difference between your cross pieces. If you are going to stack them you need the same number of stop bars as cross pieces. If you are not going to stack then you do not need the top one.
You may now delete the paint can. Also, ungroup all of the cross sections and delete the outer rectangle, leaving only the inner rectangle aka the tab rectangle. If you are wall mounting it, and made a copy of the stop bar and placed it off to the side. DO NOT ungroup and delete the outer rectangle of that one.
If the tab rectangle of your top stop bar goes outside of the vertical support you kinda have a problem. You may want to go back to the part where we started rotating things or not stack them.
To make the stop bar do the same things you did to make the cross piece, except without any of that circle stuff. Make a rectangle whose height is the width of your stop bar cross section (mine is 1.5”) and whose width is the width of the cross piece without the tabs (hint: you wrote this down at the very beginning.) Then make two rectangles for the tabs. These rectangles will have a width equal to the thickness of your material and a height of the tab rectangle you made for the stop bar cross section (mine is 0.75”.)

Select all three rectangles and go to Path->Union. If you are not going to wall mount you are basically done. Yay! Skip below to where I clean up the colors and group the vertical support. If you are going to wall mount it you’ll need some mounting bars. I am going to reuse my stop bars as mounting bars. The other option is to make a mounting bar of a different size. Just do the same thing we did for the stop bar: make a cross section with a tab rectangle and then make the mounting bar.
When we first made the stop bar, you made a copy of its cross section and moved it off to the side. Drag it back to the area of the vertical support. Click one of the Rotate Selection 90⁰ buttons so it is vertical. Make a copy and paste it anywhere. Snap both of them to the inside edge of the vertical support.
Where you place the mounting bars is up to you. Just remember you are going to need to get your mounting hardware (screws presumably) and any tools in there to them. How and where you mount your rack(s) is well beyond the scope of this tutorial. Even if you don’t plan to wall mount the rack, depending on several factors, you may want to add mounting bars to lend rigidity to the final rack.
Ungroup each of the mounting cross sections and delete the outer rectangles. If your mounting tab rectangles are a different color than the color of the vertical support, make them the same color as the vertical support. Select the vertical support and select one of the mounting tabs and go to Path->Difference. Select the vertical support and select the remaining mounting tab and go to Path->Difference. You should have something like this:

Color Clean Up And Final Grouping
Best practice for the glowforge is to cut the inside pieces first and the outside piece last. The reason for this is because your material may have internal tensions that will be released as pieces are cut out. If you cut the large piece first, and it moves around (mainly twisting up), your inside pieces may not be cut exactly where you want them and maybe not all the way through.
I have made things all sorts of colors to make the tutorial easier. Now that it is time to cut we need real colors. Make all of the inside stuff black. And make the outside part blue. You may need to ungroup stuff so you can select the individual objects. Once the colors are all set, group the tab rectangles and the vertical support into one object. Do the same for the cross piece and the formerly green, now black, circles. Once the vertical support is grouped you can select it and click one of the Rotate Selection 90⁰ buttons. If you have the Pro and have the pass through software enabled, the orientation is up to you. For Basic and Plus owners it should look like this.
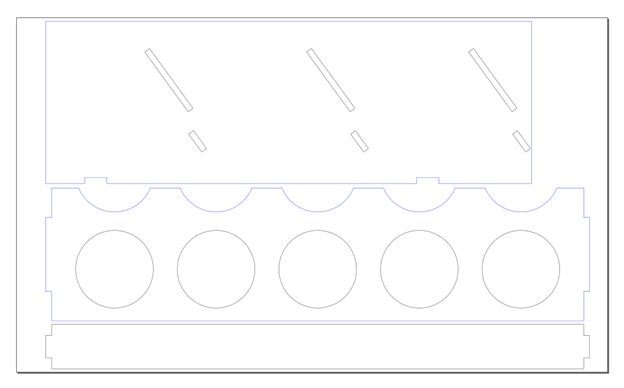
As you can see one rack is going to take a fair amount of material. The way I made mine, I need three cross pieces, two vertical supports and five stop bars/mounting bars. Or four stop bars/mounting bars if I don’t stack them. If I am not going to stack them, or if I do and make multiple racks, I could delete the top stop-bar-tab from my vertical support for the top rack. And of course, go crazy with the decoration/personalization. For the truly OCD you could engrave the paint color under each hole.
To assemble cut all the pieces you need and insert tabs into slots. Run glue along the outside edges of the cross pieces and stop bars. For the mounting bars place the glue along the face of the tabs. Clamp together. How to actually do this, and keep everything square, is an exercise left to the user. I would suggest prototyping it first. What I learned from the cardboard one (the very first picture in this achingly long post) is that I would prefer the stop bars further away from the cross pieces and I should have made the holes for the cans just a little larger.