About a month ago I made some lunch numbers to put next to my front gate. The post is called lunch numbers just because I threw the design together one day over lunch.
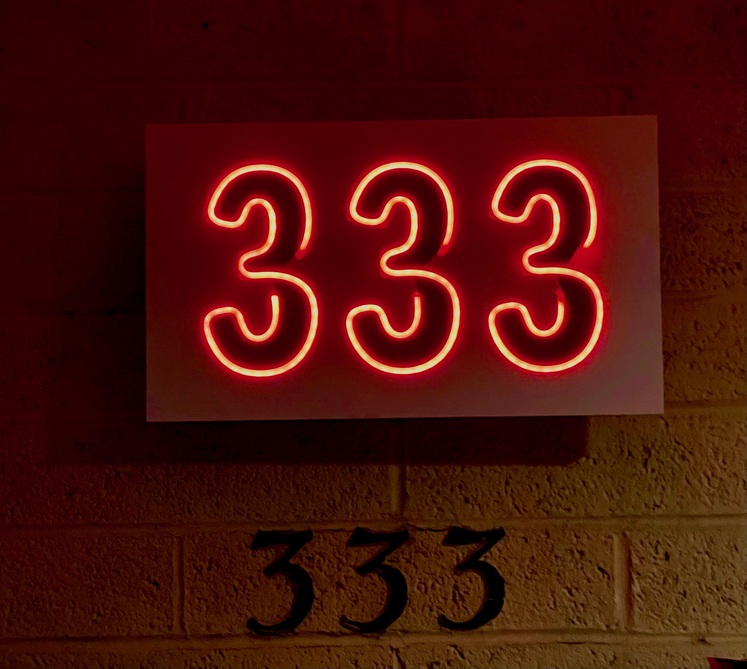
So now I have gotten around to replace the numbers on the house. I recalled seeing a post that used the Neoneon font and decided to use that font for these. I wanted it to look like a neon sign from the street and I think it fits the bill nicely.
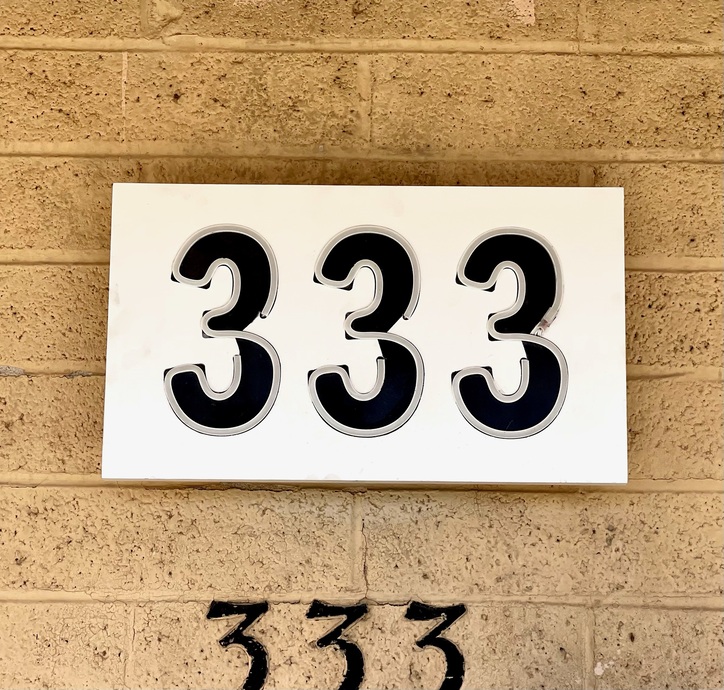
Next I need to chisel off the old numbers then power wash and paint the house.
I sized the font until the width of the lines were the width of the lighting. I cut a test piece and there were a couple of corners where it was a bit too tight of a bend. I added a 1/4" diameter radius cut in those spots to reduce the stress a bit. If I were to do it again I would fix the outer corners as well. I’m not happy with the resulting gaps but not unhappy enough to start over.
I cut two 1/4" sheets of plywood and glued them together to create a channel for the lights. I cut a third sheet with holes that lined up with the beginning and and of the runs. It also had tab cutouts to line up with a standard box top. This was also glued to the stack and gave extra support to the back of the 3s.
The box that attached to the back is inset 2" from the sides and 1.5" deep. It nests over a slightly smaller box that is mounted to the wall with cutouts to screw it into the electrical box and to pass through the power wires. The power is controlled by a smart switch inside as it was a regular porch light in a past life. There is a pin that drops into the top to hold it into place and so that I can easily open up if needed.
Of course it isn’t actually neon. I used some LEDs for the lights. These weren’t the exact style I wanted but I didn’t want to wait for a delivery from China. The profile of the top of the LEDs is square rather than rounded. Also at 2 meters long I only had about 4 LEDs left over. It was almost not long enough for the project. Had I waited I would have cut off the ugly connecter at the start of the run.
Right now it is using a simple controller. The video is the controller running through one of the built in sequences.
The LED strip is mounted vertically inside the cover. That’s why it can bend around such sharp corners. It was also smaller than any strip I’ve used in the past. The contact pads were tiny. I ran the power separately to each number and only ran the data line from number to number. I tested everything before using silicone to glue it into the channels.
When I powered it up only the first number worked. It turned out the data line got damaged during installation. So instead of running the numbers sequentially I mirrored the data line to each number. As a result they mirror each other. This isn’t bad but I does limit some of the animation possibilities. One of the ideas I had was for a sequence that was just solid red but one number would randomly flicker like it was burning out.
Eventually I’ll add a custom controller to it so I can create my own patterns. I also plan to add LEDs around the box to give is a back glow. That is why the box is inset 2" from each side. It was another fun project.
I am big fan of WLED. You might be able to use it to create what you want. I have some running on an old version. The new one has the ability to create and address segments.
There are a lot of options out there. I’ll probably end up using an ESP with a WiFi module so that I can control it from Hubitat. I’m not going to be doing anything crazy. Since the numbers are mirrored it will only be pushing about 70 pixels. If the backlight ends up being addressable then that will add maybe another 150 pixels.
My exterior lighting is normally 3 down lights at about 50%. During the holidays all 9 down lights come on in holiday appropriate colors - red, white, and blue for 4th of July; orange and purple for Halloween; red and green for Christmas; pastel yellow and green for the first day of spring; ect. It would be nice to have the numbers change too. For now they are just red neon.
You don’t have to use that exact power supply. It is just the one that showed with LEDs. I think they can pull about 8 amps at full brightness but typically you are using much less.
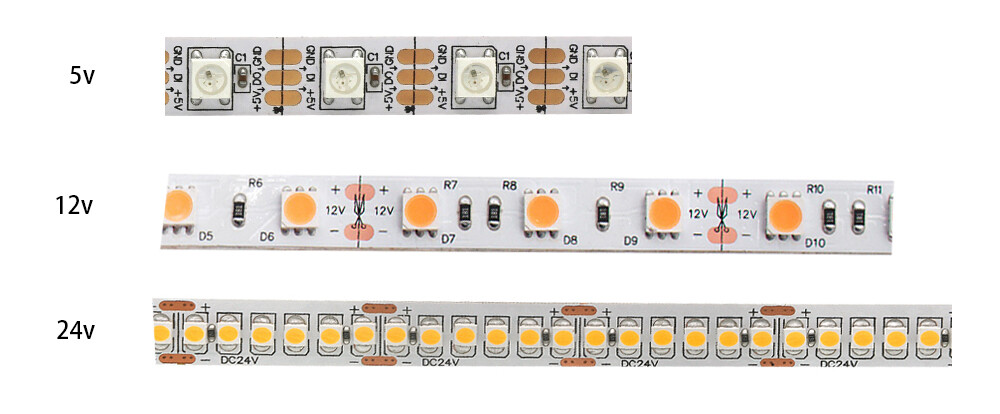
You plug the three together and then you can control the strip from your phone with Bluetooth. It works surprisingly well. To cut the strip you just have to be careful. I looked at where the lights were and carefully cut the silicone sleeve between them with an Exacto knife. Inside you will see three little pads like the ones in the top strip in this image.
You can cut the strip in the middle of the pads - as marked by the line. This particular strip may be cut between every LED. The tricky part is that since it is such a small strip it is a pain to solder wires to. It is possible but takes some practice. You will also notice that there is an arrow at each set of pads this is the direction the data flows so you must connect your controller at the correct end.
For my lights I ran power and data to the first strip. Then I ran a separate power line to the second strip. That way I only had to solder the one data line to the output of the first strip. As I said above I managed to break that connection when installing the strips so ultimately I also split the data line and ran it to each number.
That’s really all there is to it. It gets tricky when you change out the controller for a custom controller. Then you have to write some code to get the lights to do what you want. Even the basic controller you get more than 100 different patterns. Sure a lot of them are the same and just change the color but it is a good jumping off point.
If you want to get your feet wet you can get a complete setup like this:
I’ve never used the particular product, I was just looking for something that had all the parts and was a bit easier to work with than the strip I used. There are a couple of things to look out for if you are buying lights like this.
Typically the less expensive light strips are not addressable. All the lights come on with the same color and the same brightness. You can only control the entire strip.
Some of the strips can be cut between each LED and come cannot. In this case look at the pictures of the strip and you will see that there are pads between every sixth LED. You can only cut the strip at those points so the minimum length will be six LEDs.
Other than that it is just a matter of getting comfortable with a soldering iron. If you can cut the strips and solder them back together you can make all sorts of things. Once you get good at that you can then consider building a custom controller but that’s a story for another time.
I will eventually have some things outside year round. I have a stupid little triangle of land that I can’t access directly so it is useless to me. It is on the corner of the property at the intersection of two streets. It is perfect from some big art piece. My neighbors already think I’m nuts. I drew them all outside when I was testing some poofers that created 10-15 foot fireballs.
There used to be a porch light at that location. Behind the numbers is an electrical box that the light was connected to so it was easy to power.
Solar is a whole other can of worms. You have to make sure you size your panel and battery big enough to run the LEDs. The more LEDs and the brighter you want them the bigger your system will need to be.
Start out small and work with powered strips until you understand them well. Then you can look at going solar after you get good with the other parts. Trying to learn too many things at once will end in frustration.
That is so cool! So many possibilities with the neon - lookalike! And thanks for sharing the details of the build and the parts - I’d have no idea where to start but this helps in case I decide to fall down that rabbit hole!