Hi gang- I’ve had my Glowforge for awhile, but haven’t played with it much. Issues with not being able to vent it where I am, but I now have the filter. Yippee!
I’m completely overwhelmed when searching for help on the forum, since there is now years worth of info (THANK YOU!). I’m creating a sign for my friend’s nursery, and I need to convert colors to gradients. Can someone please point me to a newer post that talks about this in layman’s terms? I watched Christophers Mastro’s YouTube about properly setting up Illustrator and I’m all set there. But I don’t understand the power settings, so I need to educate myself there.
Sorry for the lame question…I know how to search Just overwhelmed with a bunch of technical info that I don’t quite understand yet.
Urp! This is probably not my area of knowledge. I assume we’re talking about photo engraving? Not exactly sure how to parse “convert colors to gradients” here. Maybe an example would help.
If it’s about engraving a photo, how to convert it to get the best results, and how the Glowforge’s engrave settings affect it, there are some real experts on the forum. I’d love to learn more about this but just haven’t had the time.
Thanks Chris…not exactly. Sorry, should have been clearer. Here’s the design I did in Illustrator, but clearly I need to convert the color bits. I’m a bit confused by how to do it. Do I assign them colors and then alter that “color” in the settings? Like lower power for lighter?
Hm. Maybe I should have slept more last night because I don’t feel like my brain is working well today. I’m usually pretty quick about figuring stuff out.
Oh, that’s a good question. Have you tried this and gotten different results than what you wanted?
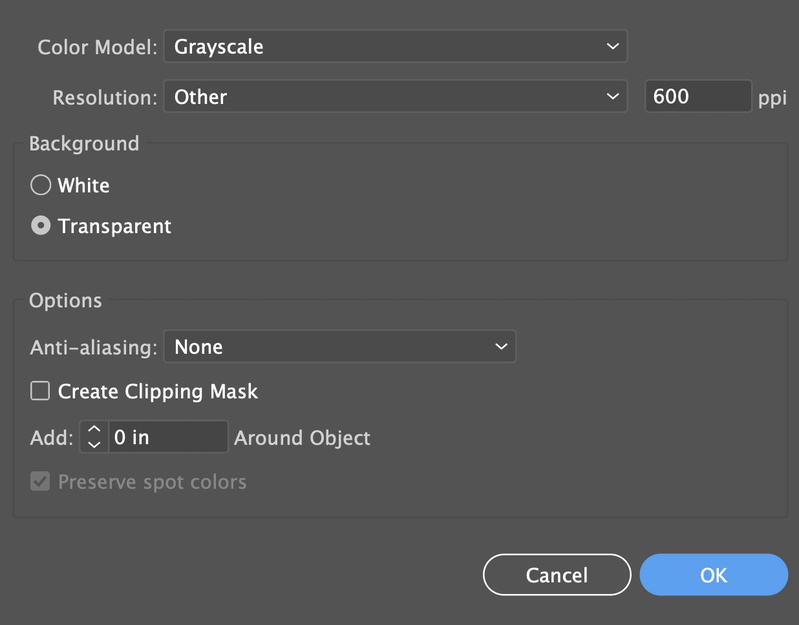
I’ll tell you what I would do, but I’m not claiming to have the right or best way here. I think you’ve given me an idea for another video though, because I’m finding it hard to put this into words. There’s a difference between how the software treats vector objects and bitmap (raster) objects when it comes to engraving. For the vectors, it will basically give individual controls for each one and it ignores the color apart from grouping. Whereas with bitmaps, the colors are converted to shades of gray and those can affect the power level (if you set it to “vary power”) or dot pattern to give a kind of grayscale image.
Anyway, I would make a copy of my file (because this will be destructive), then group all of the engraved objects and do Object > Rasterize… with these settings:
That will give you a single image object, and if you grouped the right stuff, leave your cuts alone. You can then bring that SVG into the Glowforge app to adjust your settings. The other advantage this has is that there’s a single engrave step, rather than doing the bear and then going back and doing the mushroom and then the bird, etc. It should be faster to make it a single image.
I will come back to this at some point because I definitely want to make a video on it now.
Thank you! I’ll try it. I haven’t attempted to engrave anything just yet. I did rasterize (although, these weren’t the settings) and it looked very funky once I imported it. Let me see what I can do and I’ll post an image when I’m done playing around. Super appreciate your knowledge here! And a video would be fantastic. I looked on YouTube as well.
Just as a way of quick example, check out the difference between how these two files behave when loaded into the Glowforge app (I have had to zip them due to forum limitations):
In my opinion, you aren’t going to be happy with the results of trying to engrave that design using gradients/shades on wood, which is what I assume you’re looking to do. The fine outline lighter colored elements will barely mark, and it will be difficult to see what the objects are supposed to be, especially against wood grain.
This is a very artificial estimate of what you could expect:
Images for engraving need to have “artificially” high contrast. For detailed design elements like your tree and critters, black and white would produce better results.
If you were planning on coloring them somehow, then you’d still likely want a darker image to leave a recess in the surface for accepting the ink/paint/etc.
 Just overwhelmed with a bunch of technical info that I don’t quite understand yet.