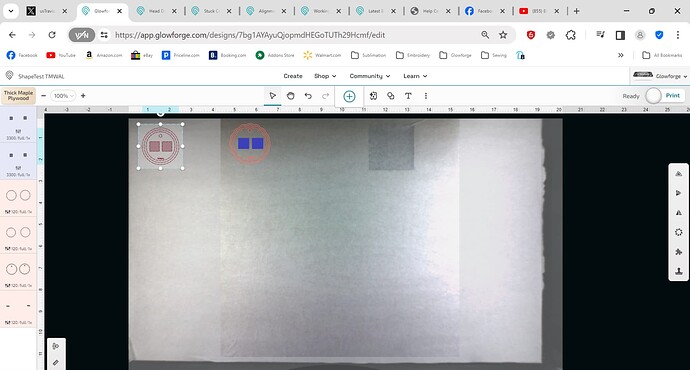
Hi, I am using non PG material and the cameras are not picking up the entire material for cutting. If you can tell from the picture it is only letting me print on the center and not in the middle. It is not picking up the image on the left. Thank you for any help.
It looks to me like you are trying to use a very fast speed, for engraving, I assume. And the head needs time to speed up and slow down, so the faster you go, the narrower your work area becomes. It can’t slow down that close to the edge. You can tell if your artwork is outside the printable area because it will become a dashed outline instead of solid.
did you intentionally change the settings to go to the fastest possible speed? (or maybe it was not intentional?)
what material are you working with?
Welcome to the community! In addition to what the others said, did you use “Set Focus” on your material? That’s a great habit to get into, especially with non-proofgrade materials, but even when you do use proofgrade materials. You’ll usually see those gray borders (showing to the right and bottom of your material) disappear when you set focus before you start to cut.
Thank you, I am new to the world of engraving and I set the speed/power to what the company I purchased the wood from recommended. I will change the speed and see what happens. Thank your quick assistance.
I did, the site I purchased the wood from recommended these settings. I will lower the speed and try again. Thank you
I didn’t set focus, lower the speed and see what happens. Thank you for your quick reply.
While there is room for 20.25x12 wood, you can only cut in an area of 19.25x10.95 under the best of conditions, and as noted a fast engrave reduces that width as well. As for a generic “any brand” laser settings, I think it would be all but useless as the speeds do not translate from brand to brand to say nothing of the power settings. You would be better using the PG settings for similar species, and even then experiment.
I should have mentioned that I am using 1/4 inch White Birch plywood. Should I just thick Maple plywood and let Glowforge do it’s thing?
Thank you. I am just going to select Think Maple plywood and see what happens.
There is a huge quality range there depending on the source. HD told me what I was buying was “Baltic Birch” which it definitely was not. The glue they used was nearly laser proof, and the quality of the wood was awful too. Actual Baltic Birch has strict rules in its manufacture and cuts very well.
I tried using Glowforge Thick Maple and it engraved but did not cut, so I am going to try to cut with the companies recommendations and see what happens.
I typically don’t just assume that the settings I’m given are the best. I usually do a test print to find the best settings for my project and my specific machine.
Here’s what I generally do, for cutting new material after making sure it’s laser-safe:
Place the material into the bed and make sure it’s flat. I often tap it to see if it sounds consistent and/or if there is any wobble. If it is not completely flat, i use honeycomb bed pins to hold it down to make it flat. Then I move on to the dashboard.
Make a basic shape (i like to do a square or a star because there are corners, as opposed to only doing a circle). Keep it small, like 1/4" or 1/8" in size and cut it out as a test cut. Find the closest PG material. Choose that from the dropdown menu. Make a mental note of what speed it is. Set focus.
If it cuts out thoroughly and I think that a faster speed may still cut through (because the item falls through on its own or it has excess char, for example), I increase the speed by 10 and try again. I continue this until it doesn’t cut through. (And I may also do increments of 5 if I have reason to really narrow it down to the best speed.) This allows finding the fastest speed that cuts through and has the least amount of char.
The ideal speed is the fastest speed that cuts through most efficiently. However, as you have seen, if you use a very fast speed, it makes the print area smaller.
For engraving and scoring, I follow the same basic process - start with the closest PG setting, do a small test print. For engraving, I find the lowest LPI that gives me the results I want - high LPI mean long print times. Sometimes I prefer to score and paint rather than engrave because it can really save a lot of time.
Thank you, great information. I will do that.
While you’re getting good answers in this thread you might want to look at the testing method from #6 here:
It is a way to find the exact setting you need in a single test. It’s more accurate and efficient than guessing one cut at a time, and once you’ve set it up it can be reused the next time you want to test a new material.
BTW you can have your settings for next time you use that material, too.
Personally, I don’t have time to do a whole test for everything, when usually it’s just takes a couple of cuts to find the right settings and it’s much faster for me to just cut out a star or square, and I can fit it into a tiny corner of my material no matter what size or shape my material is.
